


The modern market offers every customer a huge amount of different models of gadgets, smartphones and other similar devices. Despite the fact that the screen is made reliably, the customer decides to extend its life by purchasing safety glass, This is due to the fact that over time we are not as careful about smartphones as in the first stage. Today we will talk about how to clean the protective glass inside and what we need for that.
What is safety glass?
Safety glass has a modern-looking screen cover on smartphones and devices. Let it be with a chemical method based on tempered glass.
Important! Compared to ordinary film, it is several times thicker and harder. Therefore, if this coating is present on the phone, it protects the screen from fingerprints, scratches, moisture, and even shock. Despite these characteristics, brightness and color do not change.
Due to the multilayer coating, the thickness of the glass varies from 0.25 mm to 0.5 mm, the composition of which is as follows:
- The first layer is always made on the basis of silicone. Stick to the screen.
- The next layer is the connection. It does not allow the fragments to spread if cracks or mechanical impact occur.
- The third coating layer is an anti-reflective film. Retains the visibility of the drawing on the screen if direct sunlight or other bright light enters it.
- The protective layer protects against shocks, falls and other mechanical damage.
- The latest layer is an oleophobic coating. Provides protection against moisture, fingerprints and simplifies screen cleaning.
With active use, the top coat, which ensures the reliability of the unit, becomes dirty. Then the question arises how to clean the protective glass of the phone. How to do it and what is needed for it, we will consider further.
What is a protective film?
Protective film has appeared on smartphones for a long time. It is not a high-tech product and is present on every device. This product is characterized by the presence of three layers:
- the bottom sticks to the screen;
- the medium absorbs ultraviolet radiation and provides brightness if exposed to strong light;
- top – is responsible for protecting the screen.
Important! The most important thing of the film is the correct gluing. To do this, you need to have a little skill, because the first time can not always succeed.
All protective films present in the market of smartphones and gadgets are divided into three types: matte, glossy and mirror. Let’s take a closer look at each look to see if there will be a difference in cleaning:
- The matte film absorbs glare and hides fingerprints. The main disadvantage is that it reduces the image quality. However, its price is very low. Many masters attribute such a film to technology and advise not to stop the final choice on this product.
- Glossy protective film is the most popular among similar products. The main disadvantage of such a coating is that it is easily damaged. The film strongly reflects light, scratches and others appear on it quickly. mechanical damage, Fingerprints are also visible.
- Mirror film is the least popular among similar products. The peculiarity is that it can mirror the image with the help of an extinct screen. However, the quality and brightness of the screen change when gluing this coating – this is the main drawback.
All of the above films are contaminated, and this is especially evident when dust comes under the coating. How to clean the phone film, we will now analyze.
How to clean the protective glass on the phone?
If you are thinking about how to clean the film for your phone, then plain tape or, as it is also called, adhesive tape will help. For this you need:
- take a wide ribbon;
- cut a piece of it about 30-40 cm;
- glue it to the surface so that the sticky side is on top.
After that there is a protective film adhesive side on the adhesive tape. Then remove the film very carefully and slowly. All the dust that was present on this product will disappear and the sticky layer will remain.
Important! If you need to remove scratches from the top of the protection, damage the imperfections with felt, a soft cloth or with the help of auxiliary products – white toothpaste, GOI paste or olive oil.
Another way to clean the protective glass inside is to use soap and water. To do this:
- You must remove the contaminated product from your phone.
- warm water wash all dust particles.
- After this procedure it is very good to smear the sticky layer with soap. To do this, it is better to use two or three layers.
- After that, take and rinse the soap solution under water. Watch the glass of water film.
- Then paste the film on a clean wet screen using an ordinary credit card.
- We take care that air bubbles and other fairies do not fall.
Today we disassembled all kinds of protective films and talked about how to clean the protective glass inside. As you can see, it’s very simple. Now you don’t need to throw out the old film and stick to the new one, because you can simply clean it again and stick the same protection on the gadget. Use our tips and simplify your life!
Many people buy smartphones of new models not only to be able to use all the modern features of such devices, but also to emphasize their status. And what style can we talk about if the screen is scratched or cracked at all. To prevent such possible difficulties, almost every phone user uses a protective film for the screen. Bubbles are formed due to the air coming under such a surface useful accessories like a film. It happens that the “flaw” occurs due to a small stain of dust, then the procedure is a little more complicated – you have to change the whole film. In order to first paste a film on your smartphone or have to paste it, you need to know how to remove bubbles from the film of the phone as this is perhaps the only and main nuance in this matter. Today we will discuss this in more detail and we will try to remove all obstacles.
Film replacement
This procedure requires extreme caution and a high level of cleanliness in the room. It is best to carry out all manipulations in the bathroom, because due to moisture, dust does not fly in the air. Do the following:
- We pick up the smartphone and straighten the air bubbles that appear with your fingers or some other flat but not sharp object. If nothing comes out, the film will have to peel off and try to fall back into place.
- display mobile device is best wiped with a special towel for computers. You can use the same cloth to clean all the dirt from the old film.
- Now take the device firmly with your left hand, hold the edge of the film with your thumb and gently stick it to the glass so that no air penetrates under it.
If you’ve been careful and your film isn’t exactly worn out, everything should go smoothly.
Safety glass
How to remove air under protective glass? Everything is a bit more complicated here, because excessive movements can violate the integrity of protective accessories. We recommend that you read the most common tips from experienced mobile users:
- use a driver’s license or a plastic card to “squeeze” air under the surface of the glass.
- You can use the simplest needle that everyone has at home. Take the needle and place it under those places where air has accumulated. Carry out the procedure very carefully – you have to lift the edge and then press it firmly so that air cannot get there.
- If you have fishing tackle, then you can use fish. Pick up fishing tackle and guide it until the problem areas are finished. All that remains is to put the glass back in its place and squeeze it gently.
- Some experts recommend using a home hair dryer to repair malfunctions. Heat the glass of the mobile device at a distance of 20-30 centimeters, place it face down on a flat coffee table and leave it under the pressure of books overnight. During that time, all the air should be out.
Important! You can also remove the cup by any of the above methods and clean its surface with a strip of tape. Scotch tape will collect all the dust and small debris, after which you can glue the protection back.
To avoid problems in the future, we have prepared a short list of recommendations for you:
- Do not stick if you have dirty hands, Wash oily skin with your fingers, otherwise it may leave marks.
- Both safety glass and film are best replaced in a moist ventilated area. These precautions can prevent dust from entering the surface.
- Do not put much effort when replacing the glass, otherwise – you risk breaking it.
- You can remove dust to remove excess dust.
- You can use the most common medical syringe to remove the bubbles. Pass the “nose” and pump air under the surface of the film or glass.
Currently, the price of protective 3D glass for the iPhone 6 ranges from 900 to 2500 rubles. Most stores offer the services of gluing additional accessories for an additional fee (usually 30-40% of the cost of goods), but even they do not always manage to do it well, so the installation of protective glass will be the right solution in this situation.
If you are confident in your skills and knowledge, but doubt the correctness of the chosen solution, we have specially developed instructions for installing protective 3D glass on your smartphone, which consists of 6 steps. The instruction is suitable for goggles on iPhone 6 6Swhich you can buy from us in the online store.
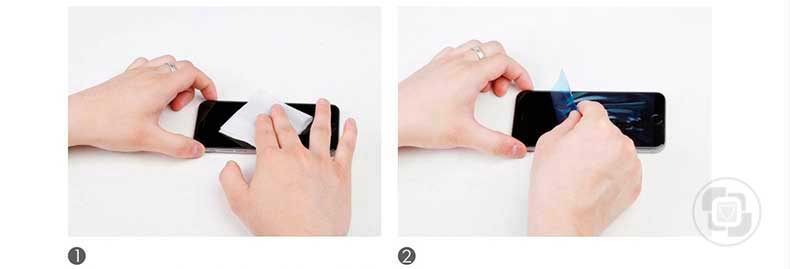
Wipe the screen with an alcohol swab to remove fingerprints, dust, and dirt from the surface of the smartphone. Then use a dry microfiber cloth to remove wet cleaning agent particles.
Take a large blue masking tape to remove invisible dust particles, hair and crumbs. Peel and glue the absorber alternately. After completing the screen cleaning in step 1-2, carefully inspect the smartphone screen, you may have missed something. If this is the case, we recommend that you repeat step 1-2 until the surface is perfectly clean.
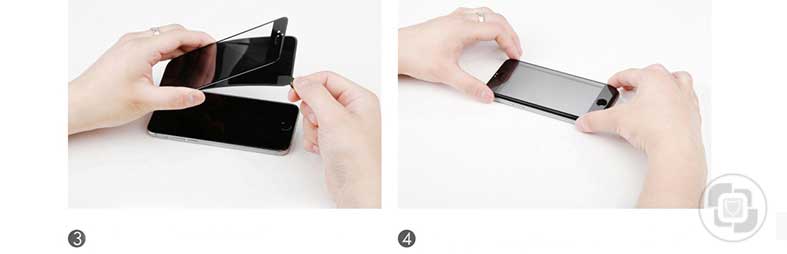
Grasp the protective glass in your hands while holding the edges, and then carefully remove the black board before installation by pulling down on the label.
Place the glass on the gadget at a distance of 1-2 mm, align the holes with the smartphone. Then slowly attach it to the screen. This step should be given special attention because it is on it that most beginners make mistakes. You shouldn’t rush here.
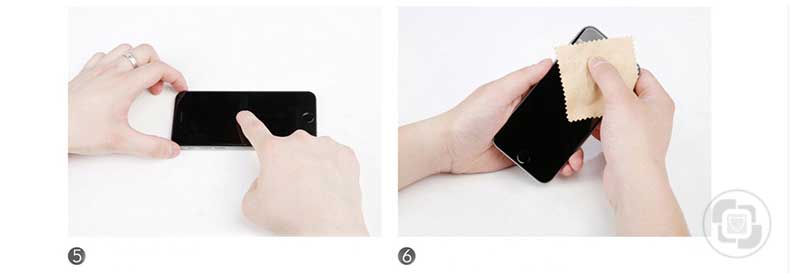
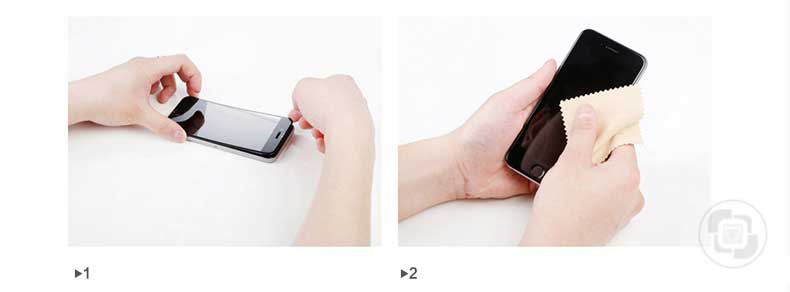
Lightly press your index finger into the center of the 3D glass for iPhone 6. After pressing, the process of gluing the glass will automatically begin, which is fast enough. Attention: after the glass presses the entire surface on the smartphone screen, you cannot click on its edges before removing the air bubbles.
Remove air under the protective glass that is not glued around the edge. Use a yellow microfiber cloth to expel air bubbles. Your movements should start from the center of the screen and end at the 3D edge of the glass. When the air removal is complete, click on the 3D edges of the cup to complete the gluing process.
Tips and notes:
The quality of gluing depends on many factors: experience, knowledge, handling, etc. If, as a result, the protective glass openings do not match the smartphones, we advise you to make adjustments in the following steps.
Problem 1
Most of the adhesive layer is located not only on the protective glass itself, but also on its 3D edges. If after completing the process of gluing the protective glass rests on a good word, it means only one thing, you have not glued it evenly.
Solution 1
Remove the accessories from the screen, carefully align the holes with the smartphone, and repeat steps 4-6.
Problem 2
After installing the cup, small air bubbles appear.
You probably didn’t glue the glass according to the algorithm listed in step 5. You applied force not to the center of the screen, but to its 3D edge.
2. solution
Try to remove the air particles by expelling them with movements from the middle of the screen towards its edge, if such actions do not lead to the desired result, remove the protective glass and place it according to step 5-6.
Do I need to stick protective glass on the iPhone 6? It is worth deciding on the purpose of such accessories. If you drop the phone frequently or its operation takes place in aggressive conditions, where any mechanical force can leave scratches or chips on the screen, the protective glass minimizes damage to the smartphone screen. If you handle your phone carefully, the need to use tempered glass fades into the background.
If you still have questions about how to properly attach the protective glass to your smartphone, we will be happy to answer them in the comments. As a rule, newcomers often make a large number of mistakes that cause the protective glass to peel off on the iPhone 6. Read our instructions carefully so that the glass lasts longer.
Related posts:
 How to access Steam games without an internet connection
  How to view FPS with Xbox Game Bar in Windows 10: Steps Made Easy
  Hacked account? How to check and remedy
  How to make video calls from WhatsApp Web
  How to increase the RAM memory of a desktop or laptop + Tips and Tricks
  How to organize your YouTube subscriptions into categories
+ Tips and Tricks
How to organize your YouTube subscriptions into categories
+ Tips and Tricks


