


Change DPI on Android (from PC, with no root)
– Take a look at these tips, tricks, and solution you can use to make your life much easier with your devices whenever problems arrive and complications which you may find difficult to deal with.
You’ll want to change the DPI on Android to make the items you see on the screen bigger or smaller (less or more visible content, respectively).
The DPI or Dots Per Inch (dots per inch), is a measurement commonly used to determine the sharpness or definition of a print: the more dots “painted” on the paper by a printer, the better the resolution of the print. In Android and in this context, the DPI is used to determine the amount of information that the screen shows. Beware: it does not work to change the sharpness of the screen: this would mean changing the PPI of the screen and that is something impossible (more information in this article about PPI and DPI in Android).
Why change the DPI on Android
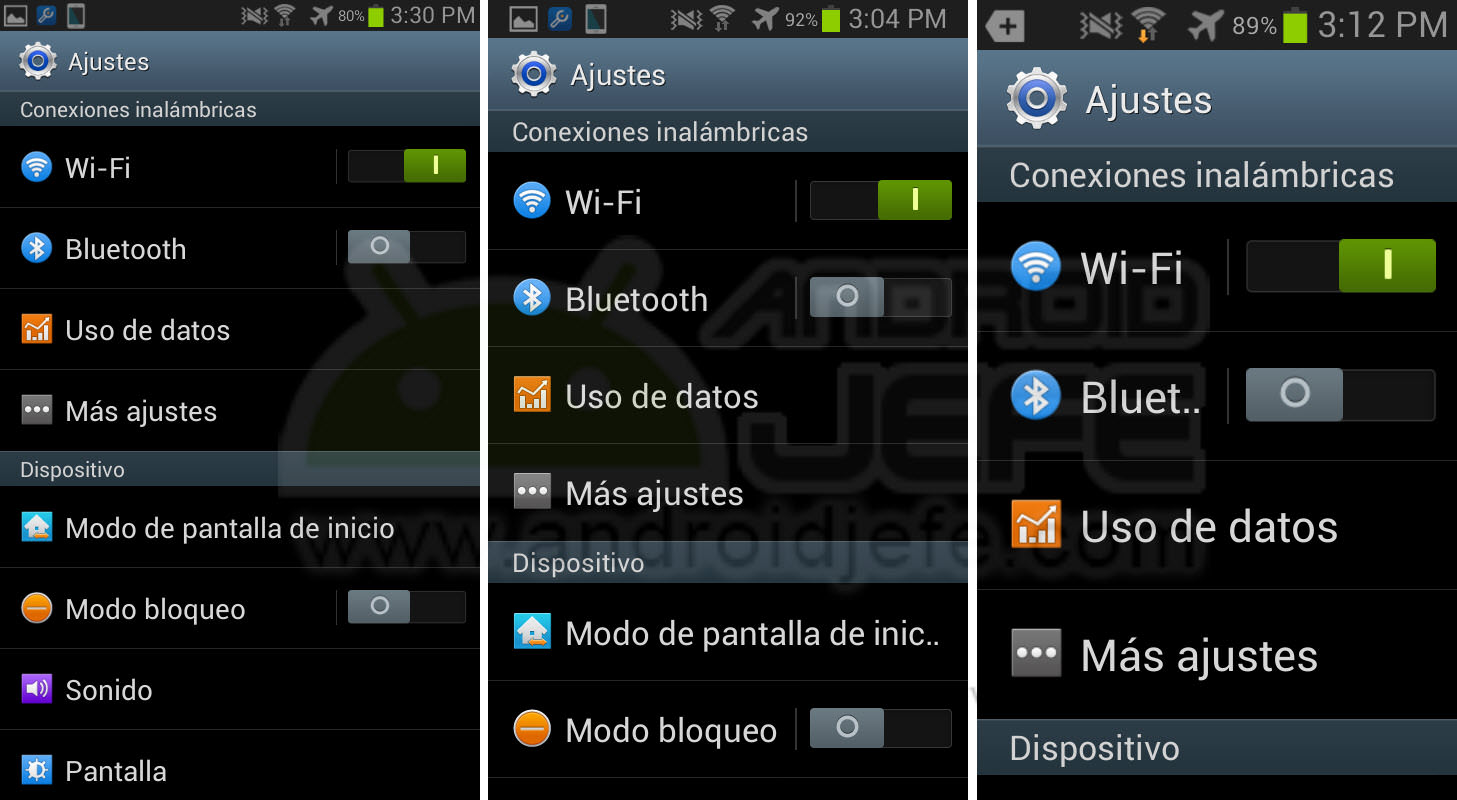
Reduced DPI (200), Default DPI (240) and Increased DPI (320) on a Samsung Galaxy S3 mini
To reduce the size of items and make the screen display more information at once (lower DPI) or to make images and letters on the screen appear larger (higher DPI). This can be evidenced in the image above.
Dangers of changing the DPI on Android
This procedure of changing the screen DPI is made primarily for application developers, NOT FOR CONVENTIONAL USERS. It has its risks: in the worst case, the device can no longer be turned on or it can be constantly rebooting (bootloop). In the best of cases, and this is a fairly common problem, some pre-installed applications will stop working or will stop constantly (the launcher application is the biggest problem, since you will not be able to see the start screen of the computer. The factory application SMS, contacts and others are also included here).
In summary, if you are not sure what this means and you do not know how to deal with the potential problems that may arise, such as those mentioned above, DO NOT PERFORM THIS PROCEDURE. If you do, remember that it is your sole responsibility.
How to know my DPI and what value to put
First, use an app like Screen Size or DPI Checker to see what the current DPI of your Android is. From there you can increase or decrease it according to your needs. Do not make drastic variations: you can use jumps of 20. To know if you should increase or decrease the DPI, remember the following rules:
Higher DPI = less information on screen = larger elements
Lower DPI = more information on screen = smaller elements
Change DPI from system settings
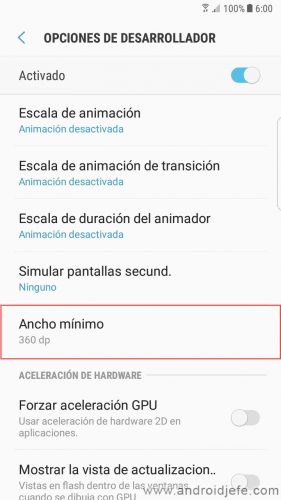
The easiest way to change the DPI is through the Android system settings, specifically from the developer options. If you don’t see this menu in the settings, activate it like this: Android settings, About device, Software information. There he touches seven (7) times on «Compilation number». Go back to the settings and you will see the “Programmer options” menu or similar. Tap on the menu and activate the switch.
Finally, to change the DPI, look for the option “Minimum width”, enter the value you want and “accept” the change. “
Change DPI on Android from PC
This is the most “difficult” way. Here you have to meet the following requirements first of all:
1. Install ADB on the PC (Link).
2. Install the mobile ADB drivers on the Windows PC (Link).
3. Activate USB debugging on Android (Link).
4. Connect the mobile to the PC using the USB cable and confirm the USB debugging on the Android.
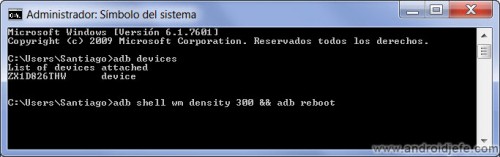
5. Open the ADB program on the PC, write adb devices and press Enter. The serial number of the device should appear in the program.
Only after having done the above correctly you have to write the following command in ADB, depending on the Android version, and press Enter:
adb shell wm density VALOR_DPI && adb reboot (Android 4.3 or higher)adb shell am display-density VALOR_DPI && adb reboot (Android 4.2 or lower)
Replace VALUE_DPI by the desired DPI value.
To return to the default DPI value of the device, use the following command and press Enter:
adb shell wm density reset && adb reboot (Android 4.3 or higher)
The command for Android 4.3 or higher has worked perfectly on a Motorola Moto G with Android 5.0.2 Lollipop, without root. Unfortunately, I cannot say the same about the second command, applied to a Samsung Galaxy S3 mini (Android 4.1.2 Jelly Bean), which has not been recognized by ADB. Perhaps it is just a particular case of the Samsung brand, however …
Con Root
Here the process is much simpler and there are two ways to do it:
TextDroider DPI app
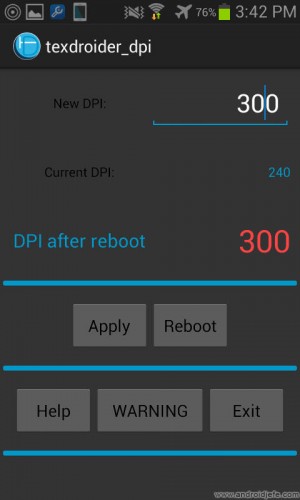
After accepting the application’s warning, which is the one we explained at the beginning, you will be able to see the current DPI of your screen. Change it, press the Apply option, grant the superuser permissions to the application and then use the Reboot option. That’s all.
Download TextDroider DPI from Google Play
Modify the system file build.prop
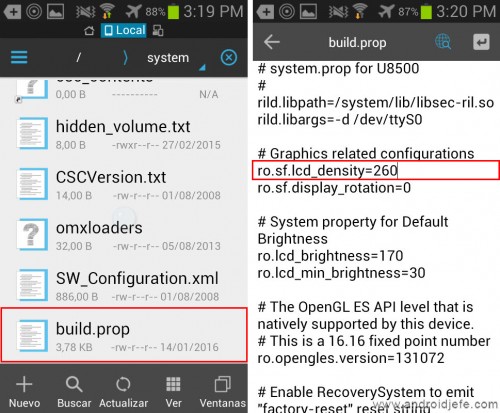
In this case you have to use a file explorer with root support, such as ES File Explorer (Link en Google Play), and go to the / system directory. Open the file that has the name build.prop, edit it and locate the line that says ro.sf.lcd_density=VALOR_DPI: replace VALUE_DPI by the desired value. Save the changes to the file and reboot the device.
As you can see, changing the DPI in Android can be very useful in many cases, especially when you have the feeling that the screen is very small: you can reduce the DPI so that it shows more information at once, giving us a feeling of more screen real estate. The same if you think that the elements on the screen seem very small and you want to enlarge them: in this case you should increase the DPI.
Related posts:
 How to access Steam games without an internet connection
  How to view FPS with Xbox Game Bar in Windows 10: Steps Made Easy
  Hacked account? How to check and remedy
  How to make video calls from WhatsApp Web
  How to increase the RAM memory of a desktop or laptop + Tips and Tricks
  How to organize your YouTube subscriptions into categories
+ Tips and Tricks
How to organize your YouTube subscriptions into categories
+ Tips and Tricks


