Download and Configure [v1.6v] Zhash and Equihash – To increase the profitability of cryptocurrency mining, it is necessary to take care not only of the performance of video cards and their effective cooling. The hashrate also depends on the optimization of the operating system. Setting up Windows 10 correctly for mining will ensure that your farm runs smoothly and your coins flow. You only need to install the 64-bit version of the OS, because the mining software does not support 32-bit systems. If we talk about the version of Windows, then both Windows 7 and Windows 10 will do. “Ten” is more complex in the initial settings, but it works more stably. Before starting mining, you should pay attention not only to the OS itself, but also to the BIOS.
BIOS setup for crypto mining
The optimal operating parameters of a computer for mining depend on the motherboard model. The following settings are common:
- Fan speed (CPU Fan Control). Check that the automatic speed control mode (Auto) is set. Otherwise, the processor cooler will make unnecessary noise and wear out more intensively.
- The speed of the PCI-E slots (PCI-E Speed). Change the “Auto” mode to “Gen2”. This will stabilize the hash rate.
- Autostart when power appears. Select the “Restore on power loss” option and the computer will automatically turn on after a power failure. You do not need to manually start the farm, it will start mining itself as soon as electricity appears. Such a solution will facilitate the management of crypto mining and reduce equipment downtime.
- Disable onboard audio controller and Serial port. To do this, set the “Disabled” parameters opposite them.
Further BIOS setup for mining depends on the firmware version, the list of integrated equipment and the features of the motherboard.
Installing the operating system
When installing the OS, adhere to the following rules:
- Before installing the operating system, disconnect the farm from the Internet by pulling out the Ethernet cable from the network card slot, and leave it unplugged until the process is complete. This will save you the hassle of downloading updates.
- Do not connect all video cards in the farm until the system settings are complete. For the duration of the configuration, it is enough to connect one via a USB riser.
- For the operating system to work, you must use an SSD drive with a capacity of at least 120 gigabytes. It has enough room for the necessary software and swap file. A larger disk will not degrade the performance of the farm, nor will it add performance to it.
- Do not split the HDD into logical drives. This will only reduce the amount of available space.
For mining on Windows 10, the standard OS build is suitable. It’s not worth experimenting by installing pirated versions. This is not only a matter of stability, but also of the security of crypto mining. Start your work by switching the control panel view to “classic”, so it will be more convenient to navigate.
Setting up the operating system
Windows activation
To activate the operating system, we use the utility KMSAuto Net 2021 v1.5.0
Procedure:
- run as administrator;
- press the button “Activation”;
- press the button “Activate Windows”;
- at the end of activation, we will be offered to add a task to the scheduler – we agree;
- reboot the system.
Disable update, apply other settings
To do this, we need the O&O ShutUp10 utility, download from the official website.
The program is updated by the author, so I recommend it. Procedure:
- run as administrator;
- menu “Options”, then select the item “! Apply all settings ”, confirm;
- I recommend that you read the points, in case you need to leave something;
- reboot the system.
Installing drivers for the motherboard
It is necessary to install drivers from the official site on the equipment:
- network card (LAN);
- chipset (Chipset).
Prevent Windows from hibernating your computer
To do this, go to the Control Panel, then Power Supply, then select “High Performance” and select the “Never” mode for Turn off the display and Put the computer into sleep mode.
We also turn off the screensaver, for this we go to “Taskbar Options”, then “Lock Screen”, then “Screen Saver Options” and remove the checkbox from “Start from the login screen” and set “No” for the Screensaver
Increasing the swap file
Press the Windows + PauseBreak buttons, then open the “Advanced system settings”, in the window that opens in the “Advanced” tab, the performance item, press the button
“Parameters …”, in the new window that opens in the “Visual effects” tab, select the item “Provide the best performance”, then go to the “Advanced” tab, the Virtual memory item, click the “Change” button, in the new window that opens, uncheck the box “Automatically select the size of the paging file”, in the unlocked items select “Specify size” and enter the value 16384, which equals 16 gigabytes, confirm the action by pressing the “Set” button. The changes will take effect after the system is rebooted.
Disable the request to restore the system after failures in Windows
If the farm reboots due to any abnormal situation, for example, BDOS, then the next time the system is booted, a window for selecting a method for restoring the system boot appears, where by default the option “Automatic System Restore” is selected with a countdown of 30 seconds.
To disable automatic recovery, use the following procedure:
- Open the start menu, then “All applications”, then “Service – Windows”, then “Command line”, right-click, “Advanced”, and “Run as administrator”
- We execute this code:
bcdedit /set {current} bootstatuspolicy ignoreallfailures bcdedit /set {current} recoveryenabled no pause - Correct answer: “The operation completed successfully.”
Information on this method can be read on the Microsoft MSDN website.
Disable updates
When using Windows for mining, it is not necessary to use the latest version of the system. But downloading updates and, in particular, installing them, followed by rebooting the PC, will cause long downtime. As a result, you will receive less income.
Find the running services in the configuration menu or type “services.msc” in the command line to get directly to this section. In the list of processes, find “Windows Update” and click on it to go to options. Click “Stop” to interrupt the execution of the processes, and select “Status Type” – “Disable” to permanently disable it.

After that, all that remains is to restart the computer.
In this section of the menu, you can turn off other services, but this must be done thoughtfully and carefully.
Also disable Defender. The farm is not a surfing computer, so there is no risk of accessing an infected site or installing infected programs. on the other hand, Windows Defender may conflict with some programs for crypto mining or “prevent” them from accessing the pool addresses.
Windows 10 Professional 20H2 x64 Game OS 1.3 by CUTA
Category:
Windows 10
Software version:
19042.508
Interface language:
Russian
Platform:
x64 (64-bit)
Developer:
Windows 10 Pro
Build / repack author:
CUTA
Medicine:
Everything is cured
System requirements:
Processor on x86 architecture with a clock speed of 1 GHz or higher; RAM with a volume of 2 GB or more; Free disk space at least 32 GB; Video adapter compatible with DirectX version 9.0 or later; Monitor with a minimum resolution of 800×600 pixels.
Description:
The assembly was made from the consumer edition image – Microsoft Windows 10.0.19042.508 Version 20H2 – Original images from Microsoft MSDN. This assembly was primarily created as a game. This implies the maximum release of the OS from the standard set of applications and services, and performance tuning at the expense of energy conservation. It is also convenient in terms of installing and running programs and games, since it does not require permanent launch rights from the administrator. The motto of assembly is speed and minimum control.
Additional Information:
The changes in the original image were made using the DISM utility.
– Completely removed Microsoft Edge, Windows Defender and OneDrive. – During the installation of the OS on the PC, the autounattend.xml response file creates a profile with the username Win10_Game_OS. – Automatic activation of AAct v.4.2.1 with reactivation. – Addresses against telemetry from microsoft to the hosts file. – The old viewer is included, it is selected by default independently. – Added the PushMonitOff utility, by pressing the shift + F1 keys, the monitor will turn off as if the specified time has passed.
Settings and tweaks:
Settings
– Desktop Icons: This PC, User Folder, Internet Explorer and Control Panel. -Display file extension. -Large icons in the control panel. -Disabled animation of windows. -Disable hibernation. -The swap file is fixed at 4 GB. -All power controls are included. – Power plan after installation will be high performance. -Disabled parking of processor cores (from the network). -Disabled disabling the hard drive. -Disabled UAC. -Optimized system loading. -Disable background blur of the login.
Tweaks
-Tweaks to speed up DirectX 3D -Do not unload the system kernel and drivers in swap. -A number of tweaks to improve NTFS performance. -Increased priority for active processes. -Complete USB device stop when safely removed (as in Windows XP) -And a number of tweaks to improve system performance. -Disabled some unnecessary services.
Added:
-Installed old (normal) calculator. -On the desktop there will be a file Uninstall built-in Windows 10 applications, which contains commands for uninstalling built-in applications, such as WindowsStore. You can read the contents of the file by opening it with notepad. -Included NET Framework 3.5.
Changes in 1.3:
– Fixed problem with expired password. Now he has no limits!
Checksums:
Windows 10 Professional 20H2 x64 Game OS 1.3 by CUTA.iso
MD5: 65f8fdfb690d1865abce4c55561eacbc SHA1: d98500854f3b858096a095912b92e2eda6030f25 CRC32: a25ae0b8
Virtual memory
Configuring Windows 10 for mining involves resizing virtual memory. By default, its size is set by the system and ranges from 0 bytes to the maximum free disk space. Such values are not very suitable for mining and operating an OS on an SSD.
Therefore, you should go to the computer properties, open the advanced settings tab, select “Options – Advanced” and check the box next to the manual paging file settings. The minimum size must be at least 16000. The same value must be set for the maximum size.

The changes will take effect immediately after you restart your computer.
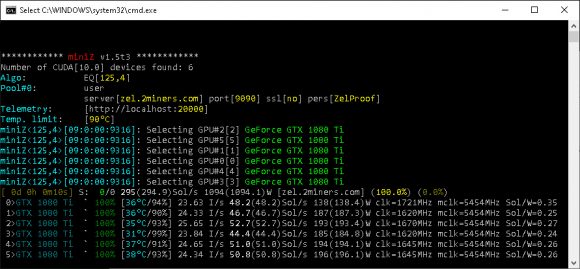
There is not enough virtual memory for mining.
There is not enough virtual memory for mining. First, let’s go to “Options”, where we select the “System” icon.

After that we find the “About System” tab in the left menu, where we scroll to the very end, until we find the “System Information” link, click on it.
Next, select “Additional system parameters”
Now, next to the inscription “Performance”, click on “Parameters”.
We click on “Additional”.
And in the “Virtual memory” window, click change.
Now we uncheck the “Automatically …” box and select the required paging file size, I recommend setting it to 16 GB, prescribing it as follows: Now click “Set” then “Ok” and restart the computer. With the next boot, the swap file size will already meet the mining requirements.

Energy saving
In the “Power” section, which is in the “Hardware and Sound” group, you must select the best performance mode. You should also pay attention to the parameters of “sleep” and transition to standby mode.

To keep your farm from shutting down while it is running, set everything to Off. In advanced options, disable PCI-E management by setting it to “off”.
Restart the farm again and the sleep of the computer will not interrupt mining on Windows.
Creating a backup
If your farm has several rigs, you can not configure each one separately, but clone the ready-made Windows.
To do this, you need Acronis True Image. With its help, you can create an exact copy of the hard disk on removable media and, if necessary, quickly restore it from a backup. It will also come in handy in case of problems with the operability of the operating system.
Now you know how to set up your computer for mining and you can set the optimal parameters for stable productive operation of the farm.
Related posts:
 What is the electricity cost for bitcoin mining?
  What is a bitcoin mining pool – Best Beginner’s Guide
  Equihash Mining – Algorithm for Home Computers (Token and Equihash protocol)
  Top 5 + 2 Best most profitable Asiki for Mining 2019
  List of the most powerful video cards for mining in 2019
  What is PoS mining- How it works | Pros and Cons| Key Features