


How to change the PIN on a Windows 11 computer
To protect your system from any attack like data theft, it is best to have a PIN assigned, which is also required in case fingerprint or face recognition fails. It is good practice to change/update your PIN in their system from time to time. If you wonder how to do it, don’t worry. We have explained in this post how to change a PIN for your Windows 11 PC with a few simple steps given below.
How to change the PIN for Windows using the Settings app
Step 1: Go to the taskbar and right click on the Start button.
Step 2: Then select Settings context menu option as shown in the following screenshot.
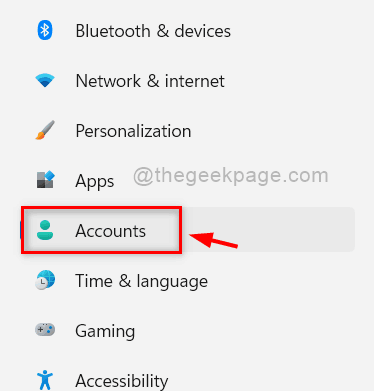
Step 3: Then select accounts option present in the left menu of the Settings application.
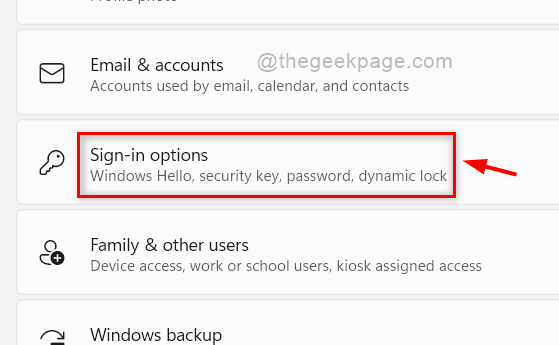
Step 4: Click Login Options function in the Accounts page on the right side as shown in the following screenshot.
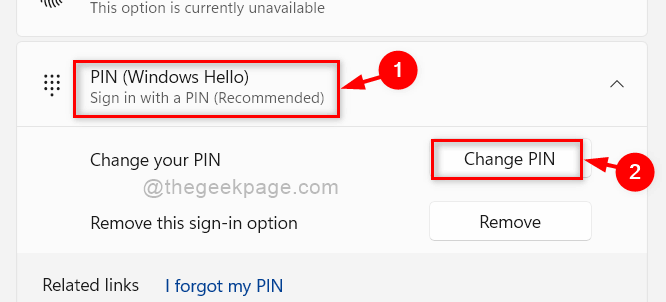
Step 5 – On the login options page, click PIN (Windows Hello) section, and then tap Change PIN button as shown below.
Step 6: In the Change your PIN window, check the Include letters and symbols. cash register.
Step 7: Enter your Current PIN, New PIN, and Confirm New PIN in their respective fields.
Step 8: Finally, click OK button to change the PIN.

Step 9 – After changing the PIN for the Windows system, close the Settings app.
In this way, you can change the PIN for your Windows 11 system.
That’s all guys. I hope this post was interesting and useful.
Please leave us your comments below.
Thanks!
Related posts:
 How to access Steam games without an internet connection
  How to view FPS with Xbox Game Bar in Windows 10: Steps Made Easy
  Hacked account? How to check and remedy
  How to make video calls from WhatsApp Web
  How to increase the RAM memory of a desktop or laptop + Tips and Tricks
  How to organize your YouTube subscriptions into categories
+ Tips and Tricks
How to organize your YouTube subscriptions into categories
+ Tips and Tricks


