


How to change user account type between standard and administrator in Windows 11
Windows 11 gives you the privilege to create multiple user accounts for different users who use your machine. But do all users require all the access privileges that the admin user has? Definitely not! This is where changing user account types comes in. You can limit what other users can do on your PC by sharing your PC with them.
If you have an administrator account, you have unlimited access to your machine. You can install any new software and manage system files. With a standard user account, these privileges are not present. Also, with a standard user account, you cannot perform system-wide operations such as creating a new user. If you want to operate an existing program that needs administrator privileges, you need an administrator account again. Of course, these kinds of restrictions are extremely useful when you share your PC with other people.
In this article, we explain in detail how you can change the user account type of a user account between Standard and Administrator, using 4 different methods.
Method 1: through the settings app
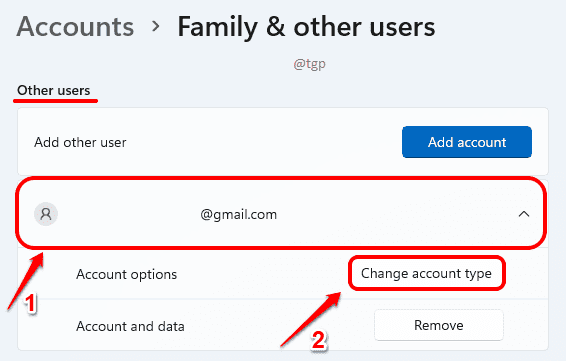
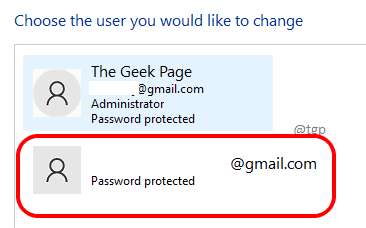
Paso 1: Click on the Accounts option in the left window crystal. At right window panel, click Family and other users.
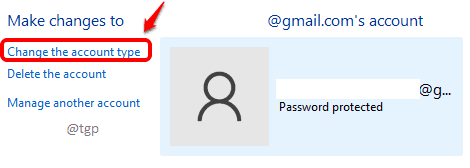
Paso 2: Scroll down and find the Other users section. In this section, click user account to expand it, whose account type you want to modify.
Then click on the Change account type button associated with it.
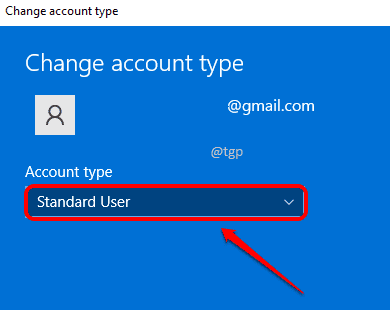
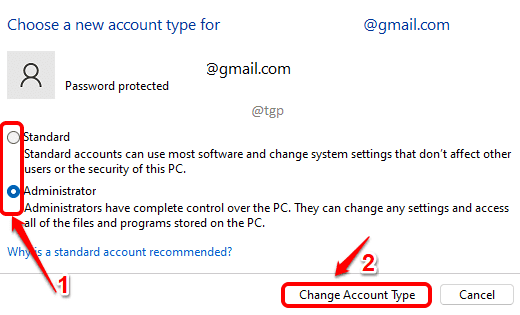
Paso 3: At Change account type window, click the drop-down arrow associated with the option Account type.
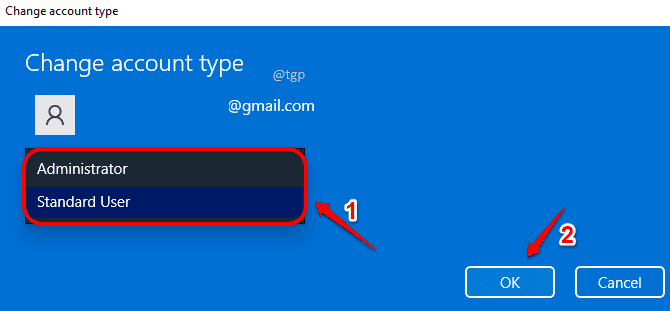
Paso 4: Now you can choose between Administrator O Standard User account types for the selected account. Once done, press the OK button.
Method 2: through user account settings
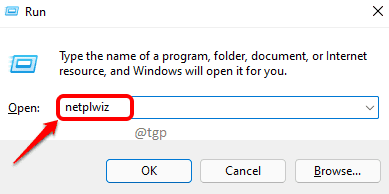
If you are logged in with administrator privileges, you can use another tool called Netplwiz to change user account types.
Paso 1: Start the To run window by pressing the WIN + R hotkey combination. to write netplwiz and hit OK button.
Paso 2: In the User Accounts window, click the user account whose account type you want to change. Once selected, click the Properties button.
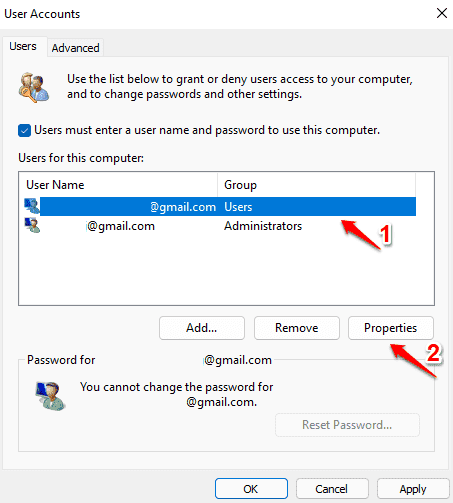
Paso 3: Click on the Group membership tab. Now choose the type of account you want to switch to. Paste Request and OK buttons.
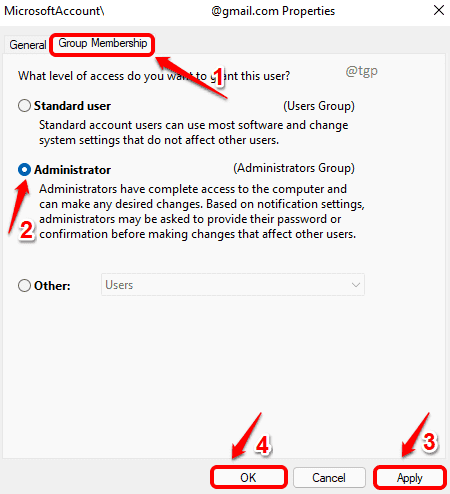
Note: if you select the Other user account type in Group Membership tab, then in addition to standard and administrative users you will have options like Guests user account, Device owners user account, Replicated user account, etc., to choose from.
Method 3: through the control panel
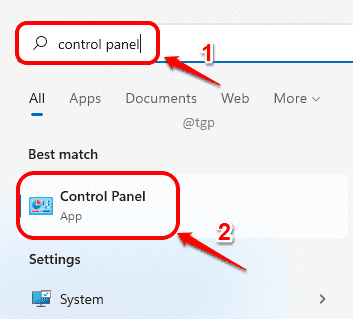
Paso 1: On the taskbar, click the Look for icon.

Paso 2: Now in the search bar, writes on Control Panel and click Control Panel from the search results.
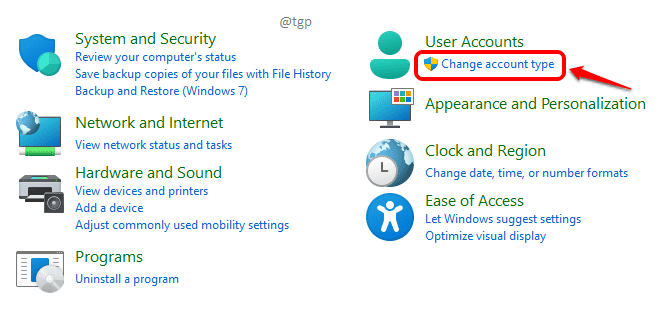
Paso 3: As below, in section User account, click the link that says Change account type.
Paso 4: In the next step, choose the user account whose type of user account you want to modify.
Paso 5: About him left side from the window, click the link that says Change account type.
Paso 6: Here you have the option to choose Standard and Administrator user accounts for the selected account.
Once the required radio button is clicked, click the Change account type button. That is all.
Method 4: via command prompt
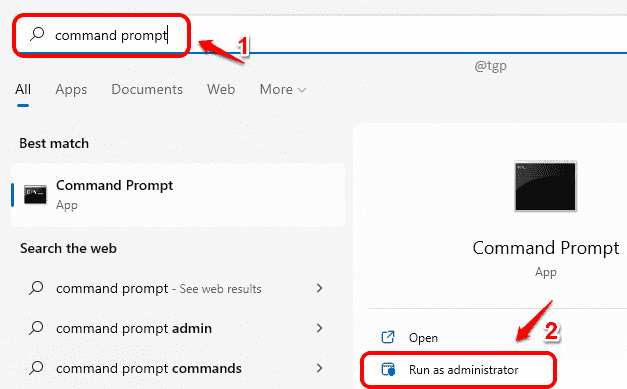
Paso 1: Click on the Look for on the taskbar.

Paso 2: To write symbol of the system in the search bar and click Execute as an administrator option.
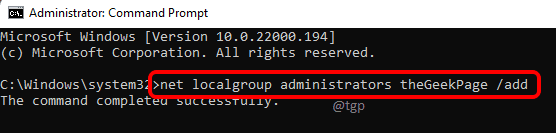
Paso 3: Now to change an account type to a administrator bill, copy get monitoring command and hit Pay in wrench.
net localgroup administrators [USERNAME] /add
Note: be sure to replace [USERNAME] with the real username of your user account.
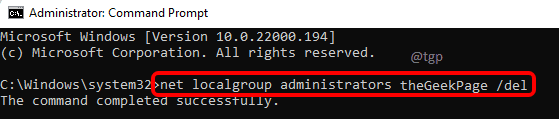
Paso 4: If you want withdraw the administrator privileges of a user account, you can copy get monitoring command and hit Pay in wrench.
net localgroup administrators [USERNAME] /del
Note: just like before, be sure to replace [USERNAME] with the real account.
Let us know in the comments if you had any problems doing any of the steps. Hope you found the article useful.
Related posts:
 How to access Steam games without an internet connection
  How to view FPS with Xbox Game Bar in Windows 10: Steps Made Easy
  Hacked account? How to check and remedy
  How to make video calls from WhatsApp Web
  How to increase the RAM memory of a desktop or laptop + Tips and Tricks
  How to organize your YouTube subscriptions into categories
+ Tips and Tricks
How to organize your YouTube subscriptions into categories
+ Tips and Tricks


