
How to check the temperature of processor and video card: MSI Afterburner| Windows PowerShell – In this guide, there are some simple ways to find out the temperature of the processor in Windows 10, 8 and Windows 7 (as well as a method that does not depend on the OS) both with the help of free programs and without using them.
At the end of the article, general information will also be provided on what the normal temperature of the processor of a computer or laptop should be.
The reason why the user may need to look at the CPU temperature is suspicion that it is shutting down due to overheating or other reasons to believe that it is not normal. On this topic, you may also find it useful: How to find out the temperature of the video card (however, many of the programs below also show the temperature of the GPU).
Viewing CPU temperature without programs
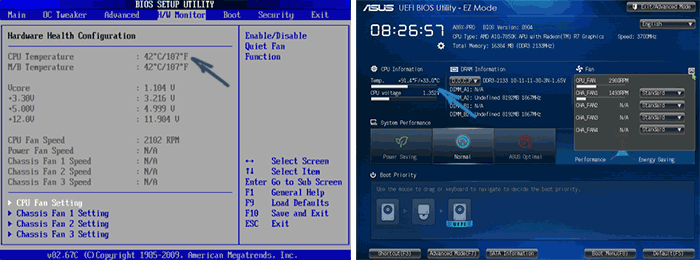
The first way to find out the temperature of the processor without using third-party software is to look at it in the BIOS (UEFI) of your computer or laptop. On almost any device, such information is present there (with the exception of some laptops).
All you need is to go into BIOS or UEFI, and then find the information you need (CPU Temperature, CPU Temp), which can be located in the following sections, depending on your motherboard
- PC Health Status (or simply Status)
- Hardware Monitor (H/W Monitor, просто Monitor)
- Power
- Many motherboards with UEFI and GUI have CPU temperature information right on the first settings screen.
The disadvantage of this method is that you cannot get information about the temperature of the processor during loads and system operation (since while you are in the BIOS, the processor is idle), the information displayed indicates the temperature without load.
Note: There is also a way to view temperature information using Windows PowerShell or the command line, i.e. also without third-party programs, will be discussed at the end of the manual (since there is little on which equipment it works correctly).
Core Temp
Core Temp is a simple free program in Russian for obtaining information about the temperature of the processor, it works in all the latest versions of the OS, including Windows 7 and Windows 10.
The program separately displays the temperatures of all processor cores, and this information is also displayed on the Windows taskbar by default (you can set the program to autoload so that this information is always on the taskbar).
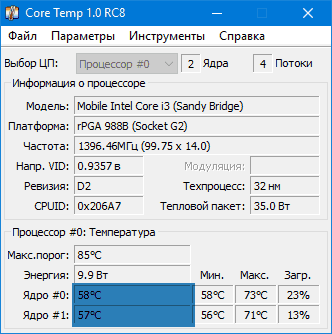
In addition, Core Temp displays basic information about your processor and can be used as a processor temperature data provider for the popular All CPU Meter desktop gadget (which will be mentioned later in the article).
There is also a native Windows 7 Core Temp Gadget desktop gadget. Another useful add-on to the program, available on the official website, is Core Temp Grapher, for displaying load graphs and processor temperatures.
You can download Core Temp from the official website http://www.alcpu.com/CoreTemp/ (there, in the Add Ons section, there are additions to the program).
CPU temperature information in CPUID HWMonitor
CPUID HWMonitor is one of the most popular freeware for viewing data on the status of hardware components of a computer or laptop, which displays, among other things, detailed information about the temperature of the processor (Package) and for each core separately. If you also have a CPU item in the list, it displays information about the socket temperature (the current data is displayed in the Value column).
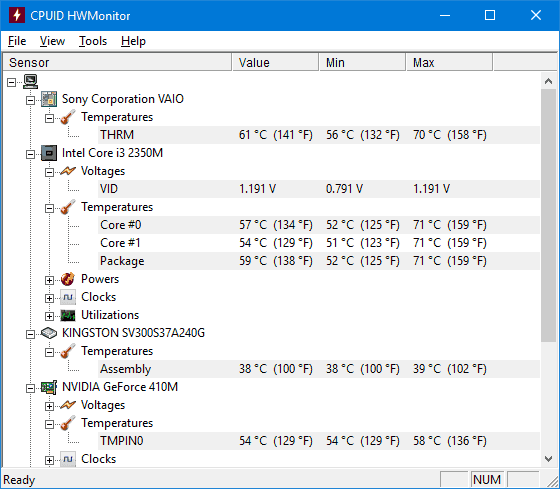
Additionally, HWMonitor allows you to find out:
- The temperature of the video card, disks, motherboard.
- Fan speed.
- Information about the voltage on the components and the load on the processor cores.
HWMonitor official website – http://www.cpuid.com/softwares/hwmonitor.html
Speccy
For novice users, the easiest way to see the temperature of the processor may be the Speccy program (in Russian), designed to obtain information about the characteristics of the computer.
In addition to a variety of information about your system, Speccy also shows all the most important temperatures from the sensors of your PC or laptop, you can see the processor temperature in the CPU section.

The program also shows the temperature of the video card, motherboard and HDD and SSD drives (if appropriate sensors are available).
Learn more about the program and where to download it in a separate review of the Program to find out the characteristics of your computer.
SpeedFan
The SpeedFan program is commonly used to control the fan speed of a computer or laptop cooling system. But, at the same time, it also perfectly displays information about the temperatures of all important components: processor, cores, video card, hard drive.
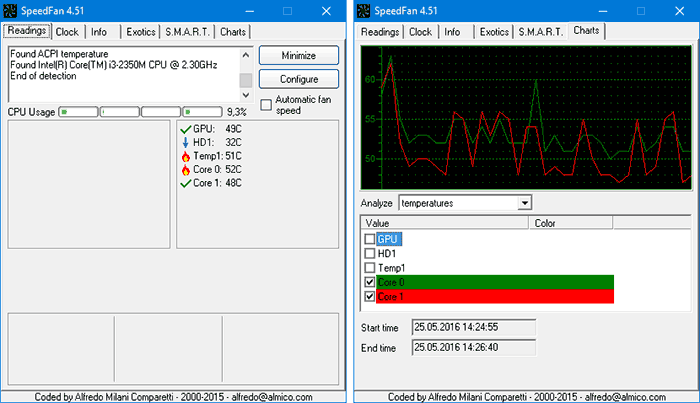
At the same time, SpeedFan is regularly updated and supports almost all modern motherboards and works adequately in Windows 10, 8 (8.1) and Windows 7 (although in theory it can cause problems when using the cooler rotation control functions – be careful).
Additional features include built-in temperature charting, which can be useful to, for example, understand what the temperature of your computer’s processor is during a game.
Official page of the program http://www.almico.com/speedfan.php
HWInfo
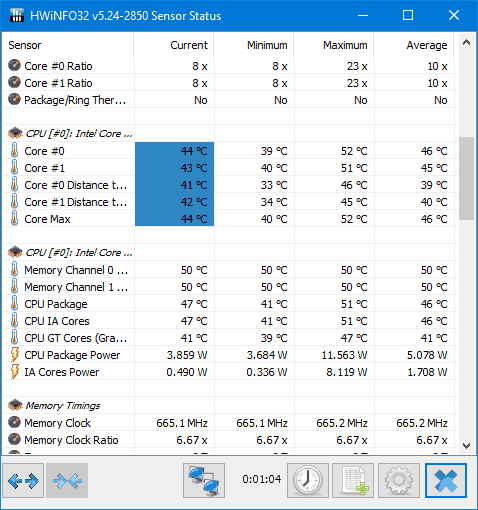
The free utility HWInfo, designed to obtain information about the characteristics of a computer and the state of hardware components, is also a convenient tool for viewing information from temperature sensors.
In order to see this information, just click the “Sensors” button in the main window of the program, the necessary information about the processor temperature will be presented in the CPU section. There you will also find information about the temperature of the video chip if necessary.
You can download HWInfo32 and HWInfo64 from the official website http://www.hwinfo.com/ (the HWInfo32 version also works on 64-bit systems).
Other utilities for viewing the temperature of the processor of a computer or laptop
If those programs that were described turned out to be not enough, here are some more excellent tools that read temperatures from sensors of a processor, video card, SSD or hard drive, motherboard:
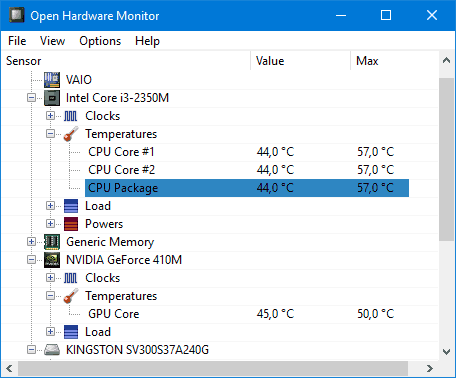
- Open Hardware Monitor is a simple open source utility that allows you to view information about major hardware components. It’s still in beta, but it works well.
- All CPU Meter is a Windows 7 desktop gadget that, if you have Core Temp on your computer, can show CPU temperature data. You can also install this CPU temperature gadget in Windows See Windows 10 Desktop Gadgets.
- OCCT is a load testing program in Russian that also displays information about CPU and GPU temperatures in the form of a graph. By default, the data is taken from the HWMonitor module built into OCCT, but Core Temp, Aida 64, SpeedFan data can be used (can be changed in the settings). Described in the article How to find out the temperature of the computer.
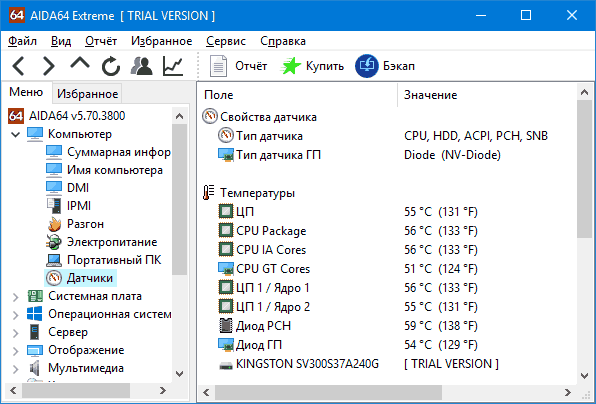
- AIDA64 is a paid program (there is a free version for 30 days) for obtaining information about the system (both hardware and software components). A powerful utility, the disadvantage for the average user is the need to purchase a license.
Find out the processor temperature using Windows PowerShell or the command line
And one more way that works only on some systems and allows you to view the processor temperature using the built-in Windows tools, namely using PowerShell (there is an implementation of this method using the command line and wmic.exe).
Open PowerShell as administrator and enter the command:
get-wmiobject msacpi_thermalzonetemperature -namespace "root/wmi"
On a command prompt (also run as administrator), the command would look like this:
wmic /namespace:rootwmi PATH MSAcpi_ThermalZoneTemperature get CurrentTemperature
As a result of executing the command, you will get one or more temperatures in the CurrentTemperature fields (for the PowerShell method), which is the temperature of the processor (or cores) in Kelvin multiplied by 10. To convert to degrees Celsius, divide the CurrentTemperature value by 10 and subtract from it 273.15.
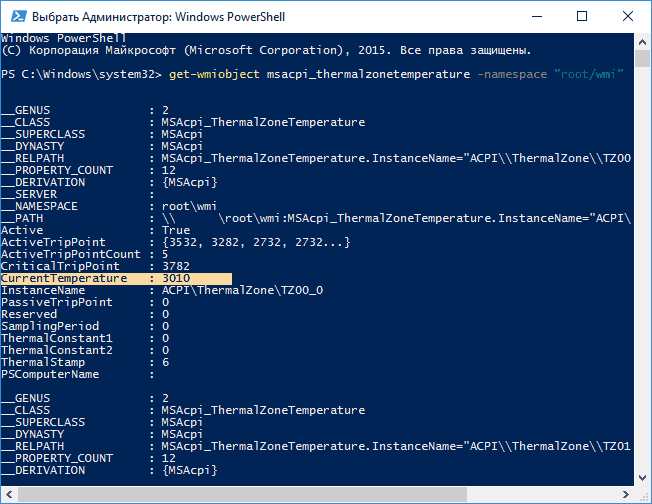
If, when executing a command on your computer, the value of CurrentTemperature is always the same, then this method does not work for you.
normal cpu temperature
And now for the question most often asked by novice users – what is the normal temperature of the processor to work on a computer, laptop, Intel or AMD processors.
The normal temperature limits for Intel Core i3, i5 and i7 Skylake, Haswell, Ivy Bridge and Sandy Bridge processors are as follows (averaged values):
- 28 – 38 (30-41) degrees Celsius – Idle (Windows desktop running, background maintenance operations not running). The temperatures in parentheses are for processors with the K index.
- 40 – 62 (50-65, up to 70 for i7-6700K) – in load mode, while playing, rendering, virtualization, archiving tasks, etc.
- 67 – 72 – the maximum temperature recommended by Intel.
Normal temperatures for AMD processors are almost the same, except that for some of them, such as FX-4300, FX-6300, FX-8350 (Piledriver), and FX-8150 (Bulldozer), the maximum recommended temperature is 61 degrees Celsius.
At temperatures of 95-105 degrees Celsius, most processors turn on throttling (skip cycles), with a further increase in temperature, they turn off.
At the same time, it should be borne in mind that with a high probability, the temperature in load mode will most likely be higher than indicated above, especially if this is not a newly purchased computer or laptop. Minor deviations are not a big deal.
Finally, some additional information:
- An increase in the ambient temperature (in the room) by 1 degree Celsius leads to an increase in the temperature of the processor by about one and a half degrees.
- The amount of free space in the computer case can affect the temperature of the processor in the range of 5-15 degrees Celsius. The same (only the numbers may be higher) applies to placing the PC case in the “computer desk” compartment, when the wooden walls of the table are close to the side walls of the PC, and the back panel of the computer “looks” at the wall, and sometimes at the heating radiator (battery ). Well, do not forget about dust – one of the main obstacles to heat dissipation.
- One of the most common questions that I come across on the topic of computer overheating: I cleaned the PC from dust, replaced the thermal paste, and it began to heat up even more or even stopped turning on. If you decide to do these things yourself, don’t do them from a single YouTube video or a single instruction. Carefully study more material, paying attention to the nuances.
This concludes the material and I hope it will be useful for some of the readers.
An unplanned shutdown and restart of a laptop or computer, slow execution of operations and commands can indicate a number of problems. But before you panic and start deleting unnecessary programs, you should check if the processor of the equipment is overheating. Let’s find out how to find out the temperature of the processor on a computer or laptop using standard system services and easy-to-install third-party software products.
Standard Checkers
The temperature can be read in two ways – through the BIOS and using Windows PowerShell (automation tool). In the first case, the processor temperature readings do not take into account the load. That is, it is difficult to find out whether the hardware is overheating. But the open source system automation tool developed by Microsoft will give a reliable result. To use the service, you need:
- In the Start panel search, type PowerShell and run as administrator;
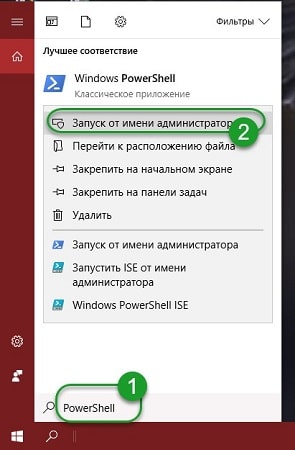
- In a new window enter get-wmiobject msacpi_thermalzonetemperature -namespace “root/wmi” (just copy it);
- Find “CurrentTemperature” in the list on the left.
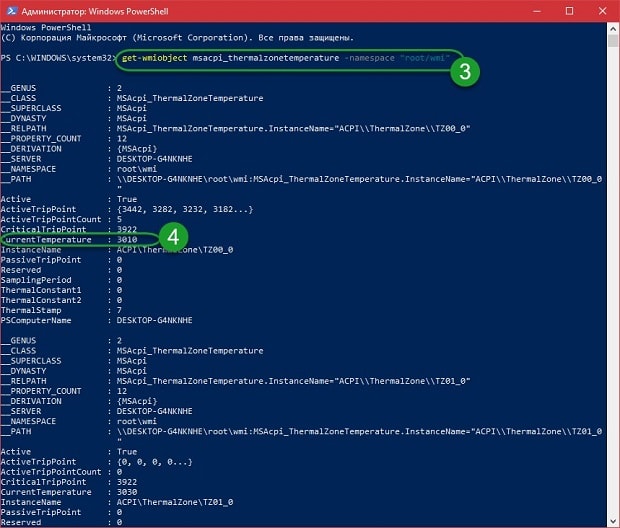
The number opposite will be the desired parameter, but not the value of the actual temperature. To get Celsius, you need to divide the value of 3010 (example from the photo) by 10. Then reduce the resulting figure by 273C. Processor temperature – + 28C. Important!When you enter the command, the tool may throw an error. You need to repeat the input, but before pressing Enter, replace the quotes using the English layout, check if there are extra spaces. Press enter. The above command may not work on some systems. Using the BIOS is just as easy. To get into it, you need to hold down the key on the keyboard F2, F8 or F12, Delete or others at the time of restarting the computer or laptop. Depending on the type of BIOS and motherboard, the data of interest to the user (more specifically, CPU Temp or Temperature) of the system can be located in different sections:
- PC Health Status и др.
After receiving data from the BIOS, you need to exit by clicking Exit. The computer will restart.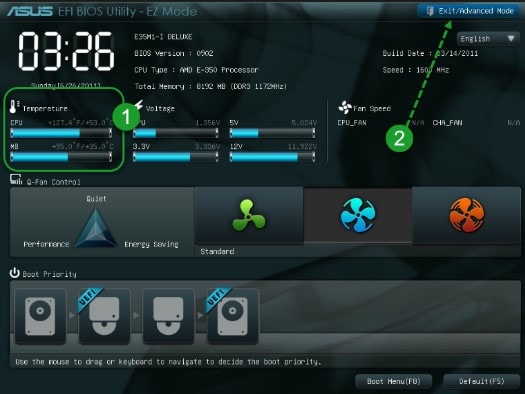
Using Third Party Utilities
Special software products with wide functionality may seem more convenient – you can find out any system parameters. But in order to see the temperature and heating of the processor, they must first be downloaded and installed on the hard drive. There is a wide selection of utilities on the network, but Aida64, Open Hardware Monitor and Core Temp are considered to be tested and safe for the system. Installed on the hard drive in the standard way. After installing the software product, it is better to reboot the equipment. Aida64The utility is considered a full-featured product, and therefore is not distributed free of charge on the network. When downloading the application for free, the user will only have access to a 30-day bonus mode. The latest Russian-language version of the software product is suitable for installation on Windows 10. Among all the existing utilities, Aida64 is the most understandable and easy to manage. After installing and launching it, the main menu will appear on the screen. Here you need: Official website: www.aida64russia.com
- Go to the ” Computer ” tab;
- Go to the ” Sensors ” item;
- In the right block in the ” Temperatures ” field, find the desired parameter.
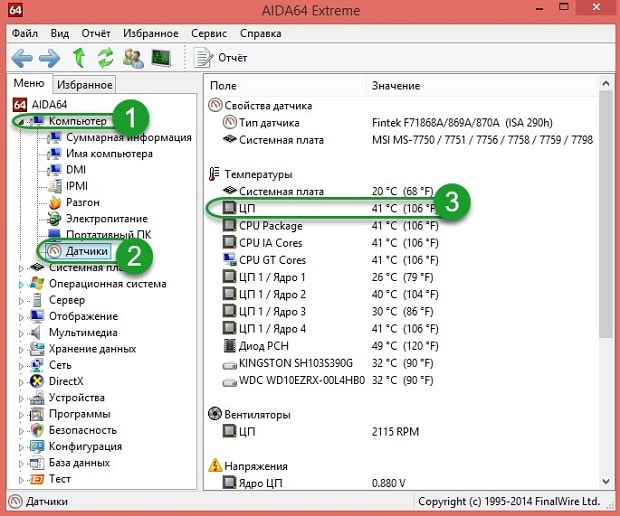
The utility shows values for each core. Open Hardware Monitor Distributed online for free. Endowed with an English-language interface. For those users who have already worked with similar utilities, there will be no problems. And for beginners, it is better to find software with a more friendly interface. The parameter of interest to the user is located in the main menu “Sensor” in the “Windows” section. Here you will need to open the second tab (processor name) and find the “Temperatures” section. Official site: openhardwaremonitor.org Core TempAn excellent visualizer of hardware parameters. She is Russian speaking. The interface is designed in the style of the thematic blocks familiar to the Windows user, so it will be easy even for a beginner to deal with the utility. But the main advantage of Core Temp is data translation in the background. After installing and launching the software product, its main menu opens. In it, the lowest block “Processor # 0: Temperature (Processor # 0: Temperature)” illustrates the necessary parameters for each core. Official website: www.alcpu.com/CoreTemp/
Do I need to monitor the temperature of the processor?
Preferably. Indeed, in case of overheating (when the indicators rise above the mark of 80-87C), the processor applies a skip cycle and the equipment turns off. Operations and commands are executed incorrectly, which can cause various troubles. When monitoring temperature, the data obtained should be compared with the following:
- 67-75C – the maximum allowable temperature for most types of processors.
If the resulting figure is higher, you need to take action. One of them is to improve the performance of the cooling system. It would be useful to check the autorun settings of programs and remember when the system unit was last cleaned. If a computer or laptop is constantly used in load mode, it makes sense to install a functional utility to monitor system and hardware parameters. It will help prevent data loss during overheating and shutdown of equipment. 24 08 2018
If you suspect that the computer has overheated (slowed down, the fan is noisier and you feel overheated to the touch), but you continue to use the equipment at high temperatures, this will negatively affect its life and can lead to serious damage. Therefore, it is worth checking the processor temperature, finding and eliminating the cause of its increase in time. There are several simple ways to assess the degree of overheating, which we will talk about.
Note: You will get a lot of other useful information about the performance of laptops and PCs from the material on how to view computer settings.
BIOS
To determine the processor temperature, you can limit yourself to the capabilities of the computer itself, for example, find it out through the BIOS (or UEFI), that is, the basic information input / output system. This software package displays key data about the operation of the system. To enter the BIOS, you must restart the computer and press one of the keys during boot: F2, F8, F10, Del, or a combination of buttons. Which option to choose depends on the specific model of computer equipment and the motherboard used. To find out the appropriate option, as a rule, it is enough to look at the bottom of the screen during the boot process, where the name of the key to enter the BIOS is displayed.
The next step is to go to the section that displays the temperature. Its name may differ depending on the version of the system (motherboard):
- Main (main page, first BIOS screen).
- Hardware (H/W) Monitor, Monitor, HW Info (hardware monitor).
- Power (food).
- PC Health Status, Status (status, “health” of the system).
There is no need to go into other sections, deeper ones. CPU temperature data is specified in degrees Celsius and Fahrenheit in the CPU Temperature or CPU Temp line. Here you can also see what the temperature of other elements of the system is. If you can’t find the information you need in the listed sections, scroll through everything until you find it. But it should be noted that there are computer models where such data is not indicated.
A clear advantage of this method of determining temperature is its simplicity. No additional programs (both built-in and third-party) are required; to obtain the necessary information, it is enough to properly reboot the computer. But there is also a serious drawback of checking the temperature through the BIOS. Here you can only get information about the processor in a calm state, that is, when all programs are completely disabled. And given that even during the boot process, the computer can heat up significantly, which causes a deterioration in its operation, there is little use for information from the BIOS.
Important: The normal temperature without load (at rest) differs depending on the processor model. For AMD it is about 45°, and for Intel it is about 35°. After launching applications and increasing the load, the temperature may increase from 1.5 to 2 times. For AMD, the maximum is 80°, and for Intel, 70°. The temperature can slightly exceed these figures, but the computer should not be allowed to work for a long time in a state of overheating. In working condition, for most processor models, a comfortable and safe temperature is from 48 to 60 °.
Command line
Another simple way to check the processor temperature is using the Windows command line. It works like this:
- Step 1 – Run the application as an administrator using the Win and R key combination. In the Run utility window that appears, type the cmd command , which launches the command line, and press Enter or OK.
- Step 2 – The application will start, in which we enter the line with the command: wmic /namespace:rootwmi PATH MSAcpi_ThermalZoneTemperature get CurrentTemperature . It remains only to press Enter, and the next line will display the current temperature of your processor.
The convenience of this method lies in the fact that the system provides only the necessary data, and there is no need to look for them among the mass of other parameters. If additional data is required, it is better to choose another way to get it, for example through PowerShell.
Windows PowerShell
Windows 10 has a PowerShell system utility, similar in functionality to the command line, but more modern and flexible. The processor temperature in this case is determined as follows:
- Step 1 – Turning on the utility. It can be launched through the “Start” or using the Win and R key combination. In the window that opens, enter powershell.exe and press Enter or OK.
- Step 2 – Entering the command to determine the temperature in PowerShell. In the program window that opens, enter the following text:
get-wmiobject msacpi_thermalzonetemperature -namespace "root/wmi"and press Enter. The CurrentTemperature line displays the processor temperature in Kelvin multiplied by 10. As the name implies, this is the current data at a certain moment, which is very convenient if you need to measure the temperature while an application is running. To convert the value returned by PowerShell to degrees Celsius, you need to divide it by 10, and then subtract 273.15. Let’s take an example. The program showed 3400. When translated into degrees Celsius, we get 66.85 (3400 / 10 – 273.15).
Advice:
- Before loading the computer to assess the level of overheating, it is worth first measuring the temperature of the processor in a calm state so that you can trace the dynamics.
- If during load changes (starting various applications) the CurrentTemperature indicator remains unchanged, this method of checking the processor temperature is not suitable for you, since it does not fully work for your computer.
Special applications
Previous methods for determining temperature (through BIOS, command line and PowerShell) do not always show a reliable picture of processor heating and do not work on all computers. In addition, the operating system’s native tools provide only basic temperature information, which is often not enough. Therefore, it is best to use specialized programs. Consider some of the most popular applications that allow you to get data on the temperature of the processor and other indicators of computer performance in different operating systems.
HWMonitor for Windows
This program is distributed free of charge, and in order to be able to determine the temperature, it is enough to download the installation file and install the application. In addition, it is possible to use the portable version of HWMonitor, which does not even have to be installed. You just need to unpack the archive and run the program.
The first window will display the information we need. Here you can see the temperature not only of the processor, but also of the video card, hard drives and motherboard. The information is organized by device – to find the processor temperature, you need to go to the AMD or Intel tab (the choice depends on the device model) and open the Temperatures section.
The program displays the temperature for each of the cores, and here you can check not only the current indicator, but also the minimum and maximum that HWMonitor has recorded since its launch. This is a big plus, since such data allows you to better diagnose the operation of the system. It will be possible, for example, after the termination of a resource-intensive application (a game or other program that requires a lot of energy), go to HWMonitor and see what the maximum level the temperature reached.
Among the advantages of the application, one can also name the Russian-language interface, the ability to save data to a file and support for a large number of sensors. Disadvantages – the lack of graphs and data output during the game or other resource-intensive software.
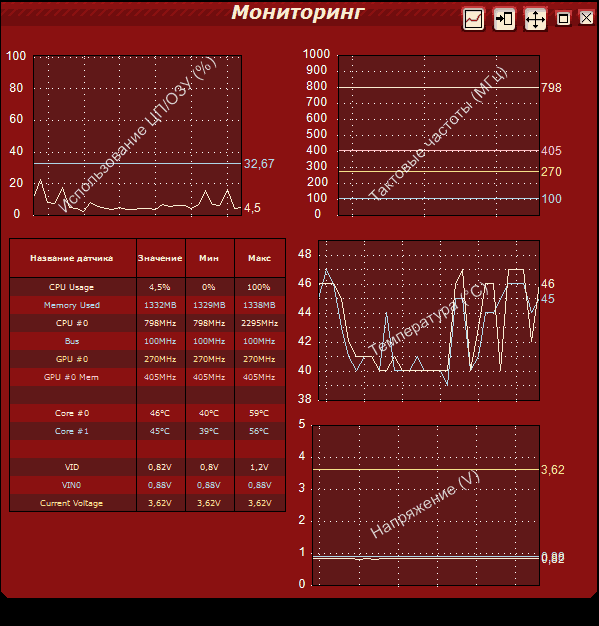
MSI Afterburner
The program is very popular as a tool for overclocking video cards and testing them, but it is also great for checking temperature readings. The main window displays all data about the system operation in the form of graphs. In addition, unlike HWMonitor, this application allows you to constantly monitor the temperature of the processor and video card during the game, which allows you to test your computer under the influence of gaming loads.
Summarizing the advantages of MSI Afterburner, we can highlight the presence of graphs that simplify monitoring, displaying temperature indicators for the processor, video card and RAM, support for overclocking video cards, various parameters for their operation and the ability to display data during games. As a minus of the program, it is worth mentioning perhaps not a very user-friendly interface.
HWinfo64
This professional-grade software gives you a complete overview of your computer’s performance, including temperature, load, and voltage. Reports are generated here, which allows you to diagnose the state of the system. The application works with numerous sensors and reads the temperature information of various system components equipped with sensors, such as the processor, video card, hard drives and motherboard.
Owners of AMD processors especially appreciate this program, as it shows both of their temperature parameters. However, in most other applications, only one indicator is displayed. In addition, there are detailed information about the installed hardware.
Important: AMD processors, unlike Intel, have two temperature parameters: CPU Temperature (CPU temperature) and Core Temperature (core temperature). The first indicator is obtained from a sensor located in the device’s chipset, and more precisely at light loads. And the core temperature is not the level of heating of the matrix or the processor case, but the figure obtained on the basis of the limit indicators – it is more accurate under significant loads. In BIOS, you can only see the temperature of the CPU, and in specialized programs, there is basically only the temperature of the core.
To view the data, you need to click the Sensors button on the main page of the program. For each indicator, a graph opens, according to which you can analyze how the data has changed over a certain period of time.
Thus, the main advantages of HWinfo64 are a lot of sensors and indicators, including temperatures, loads, frequencies and voltages, detailed information about the computer, convenient graphics and excellent support for AMD processors. Cons – the program is not Russified, it has a complicated interface, information is not displayed during games. It can be difficult for the average user to understand the HWinfo64 metrics. If you don’t know what a normal temperature should be, it’s better to choose a simpler application that has data on the minimum and maximum values, such as HWMonitor.
Core Temp
This popular utility is one of the simplest and allows you to analyze changes in the temperature of the processor and video card. You can find the maximum and minimum data, as well as the percentage of processor utilization. The program shows the frequency and temperature of each of the cores, as well as the overall indicator. There is an additional application All CPU Meter that works together with Core Temp, which shows the necessary data while working in other programs.
The main advantages are the simplicity of the interface and settings, data output to the system tray, localization, the presence of a temperature information log and pop-up notifications that the processor has overheated, as well as the ability to monitor the load and frequency of the processor. There are also disadvantages – you can not view graphs, there is no option to view data during games.
Open Hardware Monitor
To get the temperature or information about the equipment through this program, you do not have to install it. Just download and run. In the application, you can find out the current temperature and the level of load on different elements of the system, as well as the maximum performance.
The main advantages of Open Hardware Monitor are the ability to output data to the gadget and tray, the simplicity of the interface and the demonstration of indicators of various components of the system. Disadvantages – the program is not suitable for AMD processors and is not translated into Russian.
MonO System Monitor
The software has an interesting interface: it looks like a widget. Here you can assess how busy the processor, hard drive and memory are, determine which application is the most demanding on the computer and what problem needs to be solved to improve the system. The processor temperature is displayed for each of the cores.
The program attracts users with its appearance and the presence of the Russian language. Cons – download links may not work on the application website, it also tries to install third-party programs.
Speccy
The application is distributed in two versions – paid and free. It is possible to view information about the system and temperature indicators of its various components. Speccy is a program that is nothing special. The only feature is that for Ryzen processors, the temperature is displayed incorrectly.
The main advantages are the availability of graphs, additional information about the system, temperature indicators of various elements and the Russian version of the program. Cons – the program does not work correctly with some processor models and pop-up offers to install the CCleaner application from the same developer.
Cpu Thermometer
The most easy-to-use program with a minimalistic design, specifically designed to determine the temperature of the processor and its load. In it, you can get only these indicators separately for the cores. In the settings, you can change the units of measurement from Fahrenheit to Celsius and vice versa. There is also an option to show data in the system tray.
The program is good mainly because it is very easy to use, and it does not require installation. But there are also disadvantages: the inability to use with new models of AMD processors, the lack of additional options, graphics and the Russian-language interface.
RealTemp
This is a special application designed for Intel processors. If you have an AMD processor, it won’t just not work, it won’t even install. It displays the current load and temperature, as well as the minimum and maximum readings.
The program has such advantages as simplicity, the presence of notifications about exceeding the temperature threshold, as well as the absence of the need for installation. Cons – no graphics and Russian language.
SpeedFan
The app has been designed to adjust the speed of motherboard and CPU coolers. The temperature is also measured here, since the cooler speed depends on it. In addition, you can view graphs and monitor voltage.
Of the advantages of SpeedFan, it is worth noting the ability to overclock, view graphs and control the speed of the cooler. But the software does not have a Russian-language interface and does not support some modern processor models.
CAM
The program has a modern aesthetic interface. It provides information about temperature, frequency and processor load, as well as general information about RAM, graphics card performance and free disk space. An additional feature is overclocking the video card.
Among the advantages of the application, one can single out Russification, an excellent interface, the presence of notifications about exceeding the maximum temperature limit, synchronization with an account, the ability to overclock RAM, monitor the load and frequency of RAM, video card and processor, and view temperature change graphs. The program has one minus, but a rather serious one – here it is impossible to evaluate the temperature during the game.
Fanny for Mac
The Fanny application allows you to control the temperature in computers on Mac OS. When using it, an icon appears in the top menu bar with data on the temperature of the processor and the speed at which the fan rotates. In addition, you can place a special widget in the Notification Center.
To use Fanny, you need to download the archive with it, unzip it and run the program through the Finder. To do this, drag the Fanny.app installation file to the Applications tab in the sidebar. After that, the program will become available along with the rest, and to run it, you need to expand the tab with applications. A Fanny icon will be placed at the top of the menu – by clicking on it, you can call up a panel with the necessary information.
To add a program widget to the Notification Center, extract the sidebar, click on the icon for creating a new widget and add Fanny. Now the temperature and the number of fan revolutions per minute will be displayed.
How to display the temperature and load of the processor and video card in game.
How to monitor performance and get the data you need? Whether it’s overclocking a video card or identifying a “weak” link in components, we need visual information directly in games. This will help information overlay, which provides MSI Afterburner.
MSI Afterburner is a free application that does not require any registration on third-party resources.
The overlay is a graph with data in the corner of the screen:
Installation and settings
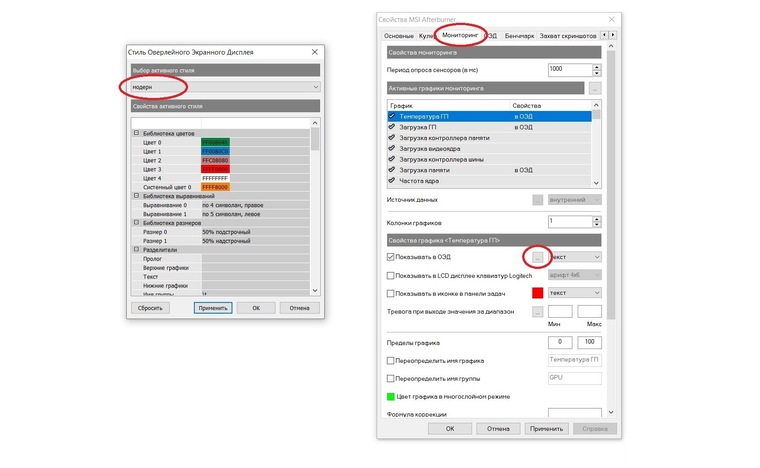
Download the program from the official resource. During the installation process, we will be offered to install another program – Rivatuner Statics Server, we agree and complete the installation. After the end of the process, the main window of the program will appear in front of us. By clicking on the gear icon, go to the menu.
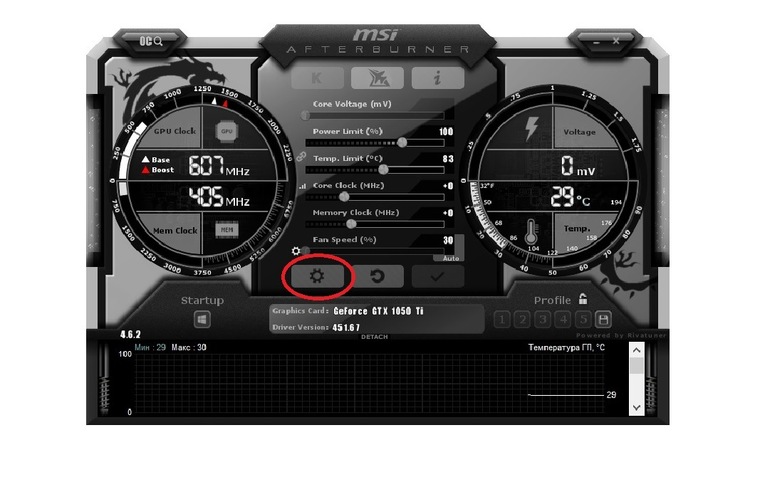
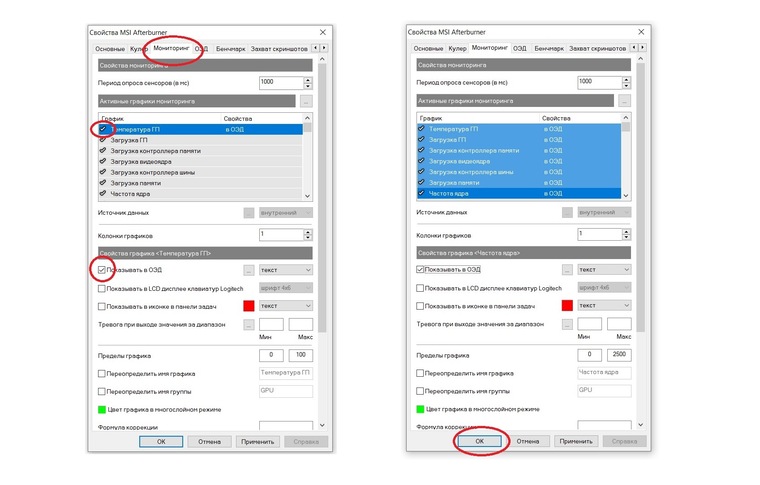
The parameters we need are in the “Monitoring” tab. There is a lot of tracking data here. To include a specific item in the overlay, check the box next to the item and the parameter “Show in OED”. You can also select multiple items at once by holding down the Shift key. To save the settings, click the “OK” button and go into the game.
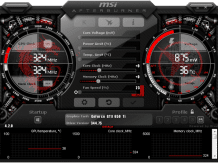
Our information overlay appeared on the left side of the screen. It provides comprehensive information about the status of components. But in this form, it looks bulky and can directly interfere with the game process.

Let’s return to the “Monitoring” tab and leave only the most basic items that we need, namely:
| Items in monitoring | Display in in-game overlay | Purpose |
| GP temperature | GPU | Graphics card temperature in °C |
| Loading GP | Inline GPU | Graphics card load percentage |
| Memory loading | MEM | The number of megabytes of video memory used by the video card |
| CP temperature | CPU | CPU temperature in °C |
| Download CP | On the CPU line | CPU Usage Percentage |
| RAM load | RAM | Number of megabytes of RAM currently in use |
| Frame frequency | D3D11 | Frames per second |
With the changes, the overlay will take the following form:
It has become more concise, but at a specific resolution of the “picture” in 2K, it is still too small. Next, we need more fine tuning.
Fine tuning
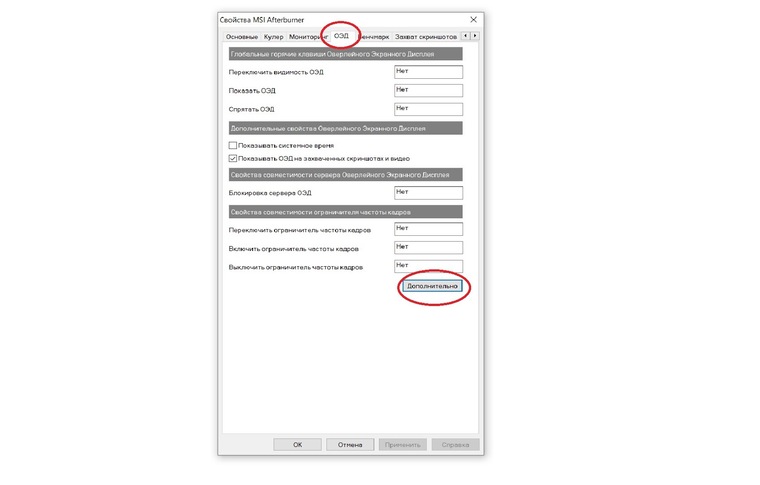
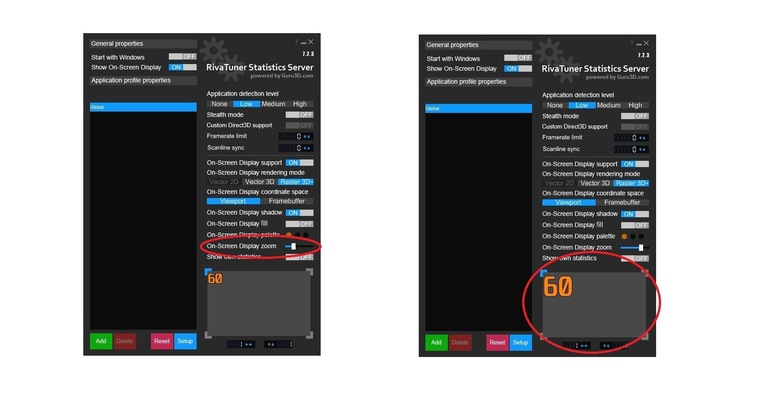
The higher the resolution of the game, the smaller the displayed text in the overlay will be at standard settings. To increase the font, we need to use the previously announced RivaTuner Statistics Server program. You can enter it through the settings of the main program “Properties -u003e OED -u003e Advanced” or by clicking on the corresponding icon in the tray.
In the window that opens, find the slider “On-Screen Display zoom” and move it. The font size will change and the changes will be displayed in the thumbnail below.
View in game:
In addition to increasing the font in this program, there are a number of interesting settings. For example, “On-Screen Display palette”, clicking on which we get to the color settings menu.

If you are not satisfied with the default position of the overlay in the upper left corner, you can change it. Under the miniature window in RivaTuner Statistics Server there are arrows for adjustment, the position is changed by clicking the arrow or entering a number in the column.
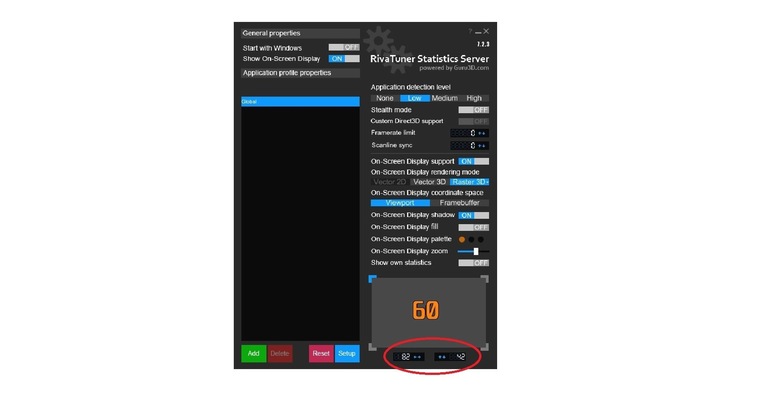
You can place the overlay in any convenient place:
The text style can be adjusted in the “On-Screen Display rendering mode” tab. To call up wider settings, you will need to go to the monitoring tab, click on the “…” icon, after which a window with many adjustments will open.
Available styles to choose from:
- Classic
- Modern
- Modern mono
- Modern web
You can change the color and size of each element, adjust the indents and separators.
The final step is to customize the text displayed in the game. Select the desired item in the “Monitoring” tab, check the box next to the “Override group name” parameter and enter a new name. Only English is supported.

If you want to display some data in one line, then you will need to give the same name for this data. For example, to display video memory in one line with the load and temperature of the video card, you need to specify the name “GPU” instead of the standard “MEM”.
After all the manipulations, the overlay took the following form:

But no one will stop you from adjusting it to your own taste. Fortunately, there are a lot of settings here and the only limiting factor is your imagination and time.
Finally, a demo video of the overlay in several game projects:
https://youtube.com/watch?v=pY_EqHP78Ww%3Forigin%3Dhttps%3A
conclusions
We have clearly seen that it is not at all difficult to monitor the condition of components. MSI Afterburner has an intuitive interface and a large number of settings – it will not be difficult to determine a malfunction or a PC bottleneck.
One of the most common problems is overheating of components, namely video cards. Temperatures above 75 ° C should alert, a sign of overheating are crashes from the game. Heat can be dealt with in a number of ways:
- Ensure good ventilation in the case (installation of supply and exhaust fans, replacing the case with a model with a mesh in the front in case of especially hot versions of the video card).
- Setting the speed of the fans of the video card (available in MSI Afterburner – Fan Speed option).
- Cleaning of dust and replacement of thermal paste.
Do not discount miner viruses. You can find them by running an undemanding game. In the presence of a virus, the power consumption of the card will be disproportionate to the real load. Exit: testing the PC with an antivirus and subsequent cleaning of “harmful” files.
Along with video cards, processors are also subject to overheating. Critical temperatures are 90-100°C depending on the model. In case of overheating of the processor, the methods of dealing with the heating of the video card also apply to them. Another solution would be to buy a more massive cooler or liquid cooling system.
An important point is the amount of RAM. Modern games are quite demanding on the amount of memory, and with its lack, friezes and crashes are possible. If such problems are found, it is worth limiting the parallel launch of programs and games. If this does not help to get rid of friezes, then you should consider buying a more capacious memory bar.
You will probably be interested in our other materials: about:
Sources used:
- https://remontka.pro/cpu-temperature/
- https://droidway.net/453-kak-uznat-temperaturu-processora-4-prostyh-sposoba.html
- https://konekto.ru/kak-proverit-temperaturu-processora.html
Related posts:
 MSI Afterburner download for laptop: overclock video card ( Is it Really Worth it?)
 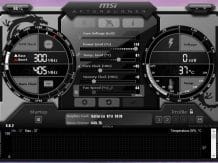 MSI Afterburner not working Windows 10: Won’t Start or Work ( Not Detecting GPU)
 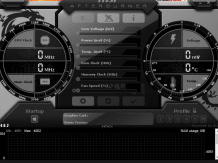 MSI Afterburner how to enable in-game FPS monitoring: FPS counter too fast (Silly Mistake)
 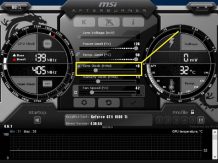 MSI Afterburner how to use: Setup instructions | What to do if won’t download or update?
 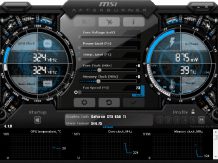 MSI Afterburner won’t download from the official website: Stuck / Won’t open Or Update
 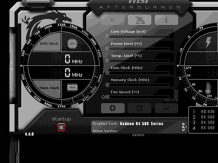 How to unlock fan speed in MSI Afterburner: laptop / Can’t Change/ Not Saving/ Resetting