


How to convert a basic disk to a dynamic disk in Windows 11
Depending on your need to use your Windows computer, thinking about converting your basic disk to a dynamic disk is a good idea, as you may find many functions that are not available when using a basic disk. This article takes you through a general idea of what basic and dynamic disks are, along with the different methods used to convert a basic disk to a dynamic disk.
What are basic and dynamic disks?
Generally, there are two types of hard drives (basic disk and dynamic disk) in a computer. Basic Disk uses partitions as primary partitions and logical controllers that can be formatted with a file system. These are best suited for home users who do the basic ordinary things on the computer. On the other hand, Dynamic Disks uses a logical disk manager (LDM) or virtual disk service (VDS) to track dynamic disk partitions. These are generally used by IT professionals / administrators as they offer more functionality and help increase reliability and performance.
The main advantages of using a dynamic disk over a basic disk are:
- Dynamic disks help create volumes that span multiple disks. With this, you will be able to make better use of your available disk space by combining areas of unallocated space that are shared among many disks.
- With dynamic disks, you can only create fault tolerant volumes (RAID-5 or mirrors).
- You can also save data to different hard drives and create stiped volumes. These volumes improve disk performance by allowing more than one disk to read and write data.
How to convert a basic disk to a dynamic disk?
In this section we will look at the different methods that will allow you to convert a basic disk into a dynamic disk. But before going through the steps involved in the different methods, be sure to back up your data to an external disk. This is done because there could be a loss of data as a result of this operation.
1. Use disk management
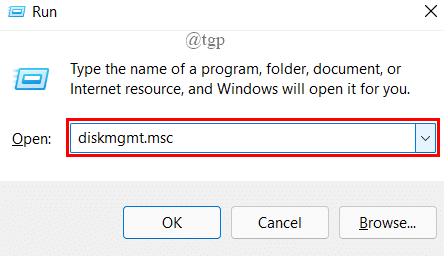
Step 1: open the To run window pressing Win + R, writes diskmgmt.msc, and hit Pay in.
NOTE: Sometimes, you will be asked User Account Control (UAC) message, click Yes to grant administrator access.
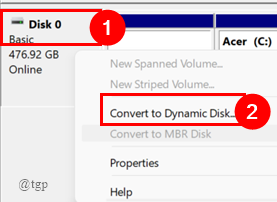
Step 2: Once the Disk Management window opens, the right button of the mouse on the basic disk you want to change and click Convert to dynamic disk.
Step 3: a pop-up window opens, tick the box against the basic disk and click it’s okay.
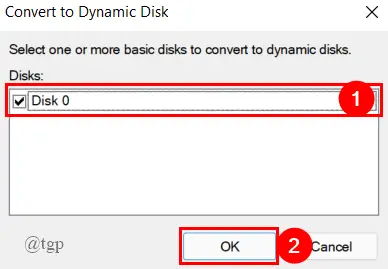
NOTE: Make sure to double check the basic disk that you want to convert to a dynamic disk. Here, I only have one disk, so it is selected by default.
After all the steps are done, your basic disk becomes a dynamic disk. This is a simple technique used for conversion. If you want to use another way, see the next method.
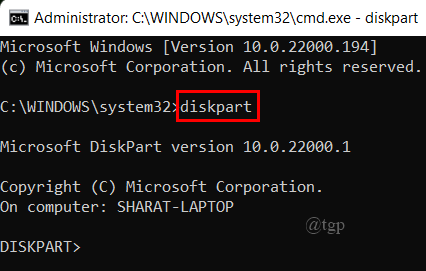
2. Use the command window
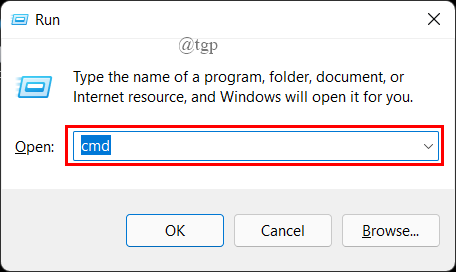
Step 1: open the To run window pressing Win + R, writes cmd, and press Cltr + Shift + Enter to open an elevated command prompt window.
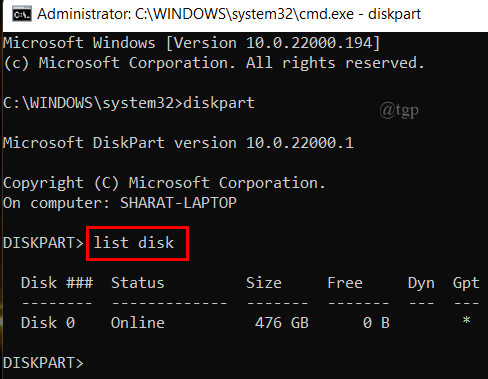
Step 2: Once you are inside the command prompt, type and run the given commands in the same order as shown below and press Enter after each command.
diskpart

list disk

select disk X

convert dynamic
Let’s go through the steps one by one below.
Writes diskpart at the command prompt and hit Enter.
Now write disk list at the command prompt and hit Enter.
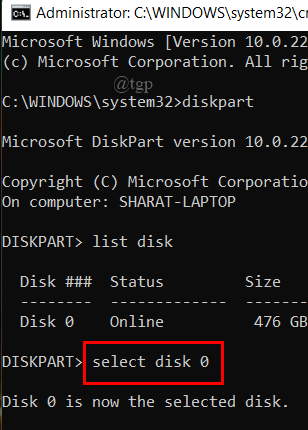
Now type Select disk X (Here, it’s disk 0) and hit Enter.
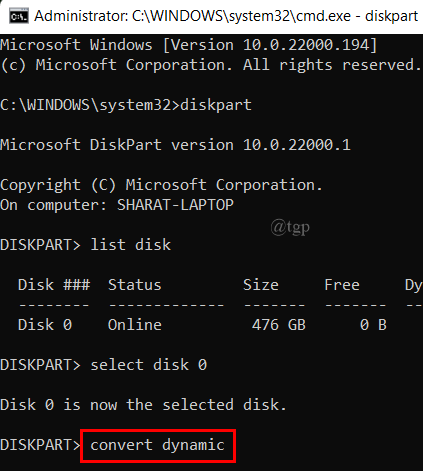
Finally, write convert dynamic at the command prompt and hit Enter.
Step 3: Finally, type exit and hit Enter to finish the disk conversion process.
Step 4: Close the elevated command prompt window.
This is also an easy process and performs the conversion without data loss. If you want to convert the disk using a third-party software tool, please proceed to the next method below.
That is all.
I hope this article is informative.
Thank you for reading.
Related posts:
 How to access Steam games without an internet connection
  How to view FPS with Xbox Game Bar in Windows 10: Steps Made Easy
  Hacked account? How to check and remedy
  How to make video calls from WhatsApp Web
  How to increase the RAM memory of a desktop or laptop + Tips and Tricks
  How to organize your YouTube subscriptions into categories
+ Tips and Tricks
How to organize your YouTube subscriptions into categories
+ Tips and Tricks


