


How to create a restore point in Windows 10 and 11
– Learn these tips and tricks on how to use your devices in a much easier way as well as solved some of your common problems that are difficult.
Restore points in Windows they help solve a computer malfunction, restoring the operating system to a certain date when it worked perfectly without errors. They are in effect archives, where documents, applications, drivers and settings present on the computer are stored on a given day, which can be restored by users according to their needs.
Up to Windows 8.1, restore points were active by default. Later, starting with the arrival of Windows 10, Microsoft’s policy has changed: if you want to proceed with the creating a restore point, both in Windows 10 and in Windows 11 you must first enable this feature. It is therefore an extra step compared to the past, which may have confused a good part of users who used to rely on the default function of the operating system.
That’s why we decided to prepare a detailed guide to explain how to create a restore point in Windows 10 and Windows 11, illustrating the step-by-step procedure to be taken to successfully create a complete backup of documents, programs, settings and drivers always ready for use. ‘use.
Activate restore points in Windows
As mentioned in the introduction, on Windows 10 and Windows 11 the function that allows you to create a restore point is disabled by default. Therefore, before being able to take advantage of the convenient function of the operating system, it is necessary to proceed with its activation.
Here are the steps to take to enable restore points in Windows:
- Click on the Start menu.
- In the search bar, type the word “control Panel” and select the corresponding result, namely the Control Panel app.
- Within the Control Panel select the tab “System and security”.
- Cheap with “System”.
- Click now on “Advanced system settings”.
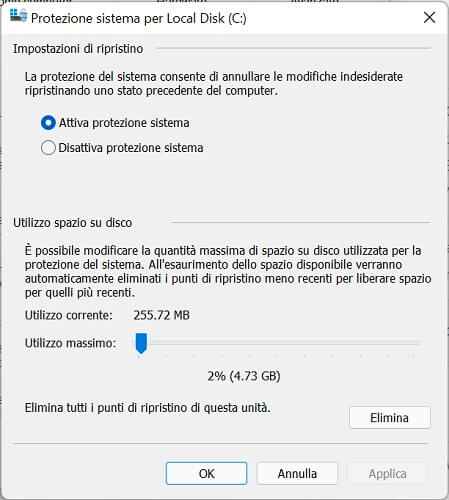
- Select “System protection”.
- Choose the system disk (you can find it next to “System”).
- Press the button “Sets up”.
- Click on the entry “Enable system protection”.
- Press on the button “Applica” and then on “OK” to store changes made to the operating system.
Well, you have just successfully activated the function that will allow you from now on to take advantage of the restore points created automatically by the Windows operating system or created by you manually following the procedure that we will now describe in the next chapter.
Create a restore point in Windows manually
Once the feature is enabled, Windows automatically creates restore points whenever the user makes a significant change to the operating system, such as installing a program or driver. That said, nothing prevents you from creating a restore point manually, perhaps after adding a folder with important documents inside the computer’s internal memory, or before installing software or downloading a Windows update, obviously not before having the certainty that the system works 100% without any hitch.
In the bulleted list below you will find the step-by-step procedure for create a restore point in Windows manually:
- Open the Start menu.
- In the search bar, type the word “control Panel” and select Control Panel from the search results.
- Select “System and security”.
- Click “System”.
- Choose the voice “System protection”.
- In the new window that opens, click on the button “Crea”.
- Type a name you want to give the restore point.
- Click the button “Crea” to finish creating the restore point.

The operating system will complete the operation within a few minutes: when the restore point is ready, you will receive an on-screen notification that will confirm that the procedure has been successfully completed. At this point, all you have to do is press the button “Close” to close the warning window.
Important: when choosing the name to assign to the restore point, for convenience we suggest you identify the archive by adding the date it was created (including the day, month and year). By doing this, when you need to restore the operating system, you will immediately know what date you are bringing it back to.
Note: the duration of the operation depends on the amount of data that the system is called to archive. For example, if your computer hosts a large number of programs and documents, it may take up to ten minutes to create the restore point. If, on the other hand, the device contains little data, then the operation is completed in a few moments.
How to use a restore point
In the event, not so remote, a computer problem arises, due to which serious difficulties are encountered in everyday use, such as sudden system shutdowns, forced closure of programs, exasperating slowness (in this regard take a look at the guide on programs to speed up your PC), one solution is to use a previously created restore point to bring back the operating system to a date when it worked perfectly.
Here’s how to restore system settings and files using a restore point:
- Open the Start menu.
- Type the word “restoration” via the search bar, then select “Restoration“ from the list that appears automatically.
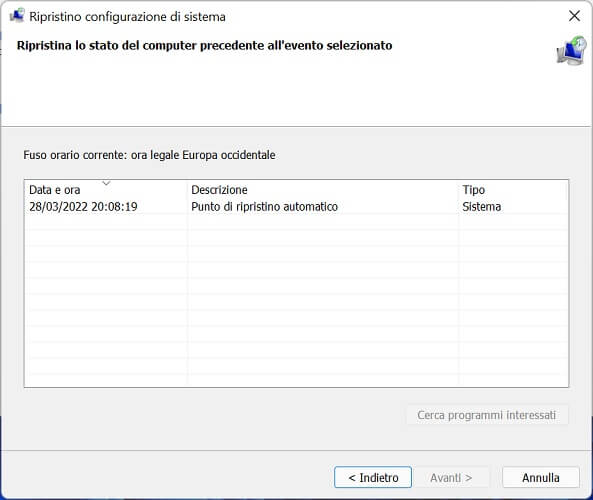
- In the new window that opens, choose “Open System Restore”.
- Press the button “Avanti” to continue.
- Manually enter the date you want to roll back the Windows system to.
- Click on the button “Avanti” to start the restore procedure.
- Cheap with “Fine”.
- Click on the button “Yup” in the notice confirming the successful restoration that appears automatically after a few moments.
The duration of the operation depends on the date of the selected recovery point. In fact, the more you go back in time, the more changes the operating system is called upon to make, consequently the time required to restore Windows to the desired date will also expand.
How to view restore points
Sometimes, instead of the list of available restore points, the system only shows the option “Recommended restore”, through which Windows is restored to the last state prior to the current one. If this is not what you are looking for, you should know that there is a simple and intuitive way to view the complete list of all the restore points previously created manually or automatically by the Windows operating system.
To find the restore points Windows just add a check mark next to the entry “Choose a different restore point” and press the button “Avanti”. Once this is done, the system will load the list of all available restore points after a few seconds.
How to find old restore points
It may also happen that the system shows the list of the most recent restore points, hiding the oldest ones instead. This can be a problem, especially if you need to restore your system to a different date than each of the auto-appearing restore points. Fortunately, however, there is a very simple solution.
To find the oldest restore points just add a check mark next to the option “Show more restore points”.
And with that really it, our guide on how to create a restore point in Windows ends here.
On the same topic you might also be interested: How to reinstall or restore Windows and keep personal data

Related posts:
 How to access Steam games without an internet connection
  How to view FPS with Xbox Game Bar in Windows 10: Steps Made Easy
  Hacked account? How to check and remedy
  How to make video calls from WhatsApp Web
  How to increase the RAM memory of a desktop or laptop + Tips and Tricks
  How to organize your YouTube subscriptions into categories
+ Tips and Tricks
How to organize your YouTube subscriptions into categories
+ Tips and Tricks


