


How to Make Collages From ‘Google Photos’ with my Best Photos?
–
A few years ago the platform was launched Google Photos or Google Photos, that allows you to store and save photos on the network, without limits on storage space.
In it you can group all the photos you want from different times and find them when you need them, you can create photo collages and entire albums with filters, among other functions. here you will learn how to make collages with Google Photos.
How many photos can be added to the new collage maker feature in Google Photos?
There is a quick way to create a collage on the platform, where Google Photos organizes, arranges and decides the order of the photos for you, collages can be used minimum two images and maximum nine. In this ‘quick version’ you only have to click on the photos that you want to include and that are already in the cloud.
By last click on ‘Create’ and you will have finished. Google Photos doesn’t support making any changes with this quick build and does all the work for us.
In addition to collages, the tool allows you to create albums, animations and movies, but one disadvantage of the application is that does not allow major changes to the newly created collages and on the other hand, by favoring the platform you can access to save and copy the photos safely for greater protection.
How to start creating your first collage in Google Photos?
A collage is basically several photos put together on the same subject. With Google Photos you will not need to download different programs for a certain function, incorporate the creation of a collage, offer filters, movies and albums in the same place. This way you can start creating a collage with your own photos:
- Install and open the Google Photos app, it is also available on the website if you are using a computer.
- On the main screen of the application, above the bottom panel of the device screen go to the Library option, which is represented by an icon with four blue books together.
- In the new tab that will be displayed, you will see four options: Favorites, Archive, Utilities and Trash. You must click on the Utilities option, represented by a small box marked with a check mark (✓).
- In the series of options that will be displayed on the next tab, create section Click on the ‘Collage’ option.
- On the new page it will show you all the available images and photos that are uploaded to the cloud, if you haven’t uploaded one there you can click on a cloud icon with a small arrow to choose those stored in the device memory.
- Mark the photos or images that you prefer and once you select the photos that you want to be part of the collage, click on the Create option, which is located on the upper right side of the screen. You must select at least two photos, but do not exceed the limit of nine.
- In a short time Google Photos will create the collage with the selected images and various options will appear to do, such as share, delete or add an accessory. This is all up to your discretion and preference.

How to insert your favorite photos in the collage that you are going to create in Google Photos?
To make a collage you can use images or photos that you have uploaded to the Google Photos network and join indelible memories in a single image, this process is not very different from the previous one explained. To add or insert the photos you just have to follow these steps:
- Open the Google Photos app, either from a mobile device or computer. Once there, go to the Library section and Click on Utilities.
- When the new window loads, click on ‘Collage’ and select the photos you want to insert into the collage.
- When you finish marking the photos, tap on Create and the platform in seconds will have the new collage ready, along with other options such as share work on social networks if you wish.
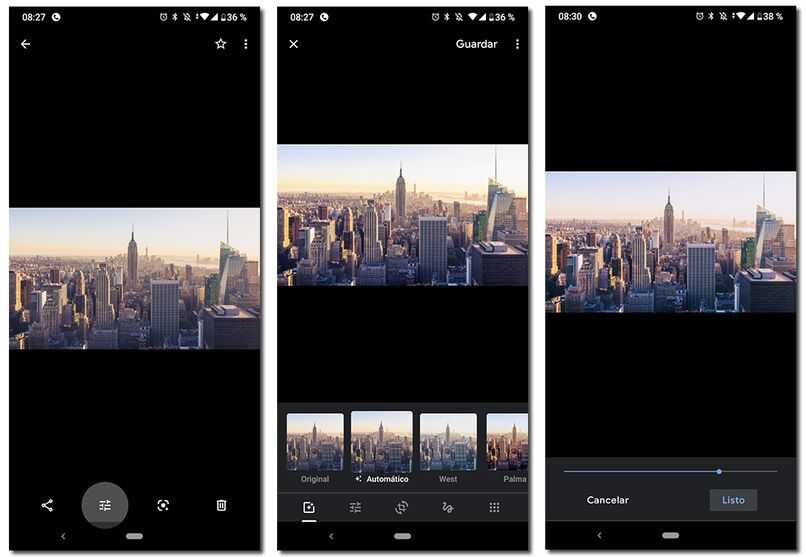
How to edit the collage you made in Google Photos with filters?
When you have the collage created, a series of functions will appear at the bottom of the screen, there you will find the alternatives to share, edit, delete, among others. You should click on the Edit option and a new screen will be displayed with the collage and next to it a panel of various types of filters and their intensity.
Apart from Google Photos, there are also other platforms or applications to apply filters to photos or collages with more variety and colors.
The filters on this platform range from the brightest and most vivid tones to the darkest and most opaque, you can find filters called Palma (highly striking colors), Metro (more opaque), Eiffel (black and white), among others. when you have finished editing click on Done at the top of the screen and you’re done.
To share your newly created collage press on the icon indicating Share, you will get a box with the social networks available to share with other users. Select the medium where you want to send it and the people to share it with, finally press Send.
Related posts:
 How to access Steam games without an internet connection
  How to view FPS with Xbox Game Bar in Windows 10: Steps Made Easy
  Hacked account? How to check and remedy
  How to make video calls from WhatsApp Web
  How to increase the RAM memory of a desktop or laptop + Tips and Tricks
  How to organize your YouTube subscriptions into categories
+ Tips and Tricks
How to organize your YouTube subscriptions into categories
+ Tips and Tricks


