


How to Repair the Hard Drive of your MacBook Pro or Mac or How to Change It for an SSD
–
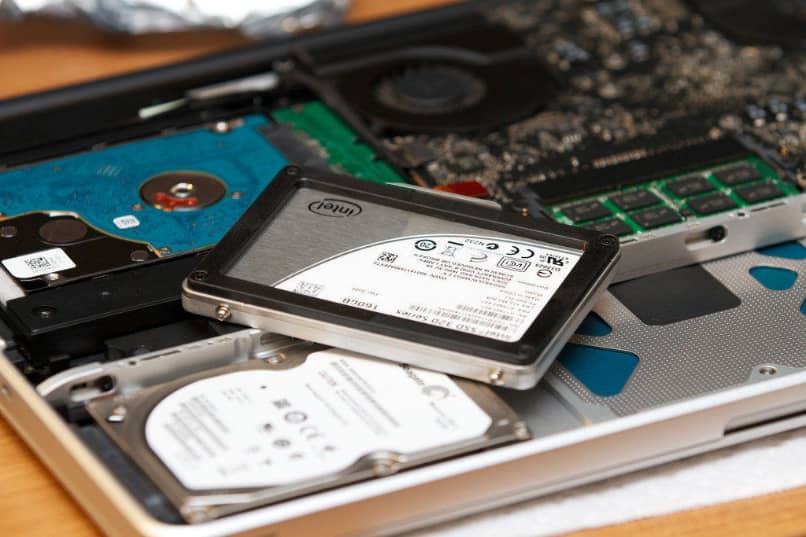
Looking For repair your MacBook hard drive or change it for a new one? Removing the hard drive from a MacBook Pro is one of the easiest maintenance tasks you can perform and you can remove the hard drive in just a couple of minutes.
What to do to repair or change my macbook hard drive?
If you have been with your MacBook for a long time, surely you have had one or another problem with this equipment. The most common is that several applications crash, that a file is damaged or that the computer simply does not start. This could be caused by a damaged hard drive the corrupted.
We will review the different options you have to try to repair the hard drive on your Macbook and in case we cannot do it, we will show you how you can change it.
How to Repair a Disk with Disk Utility on a MacBook
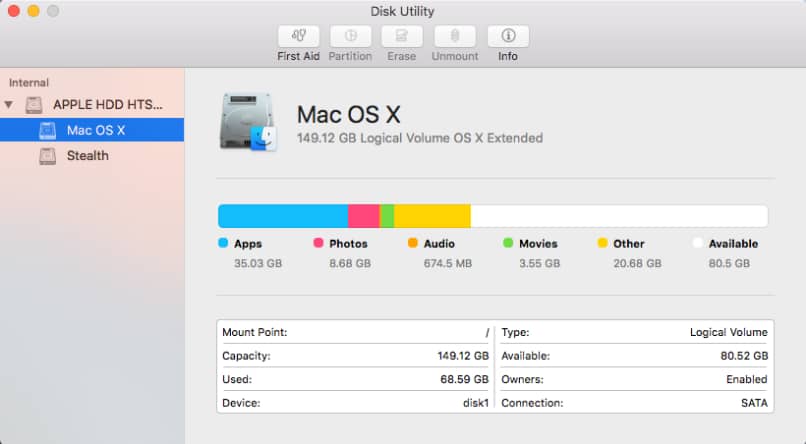
Despite all the good reputation that Apple products have, they can still come with factory defects or cause inconveniences as such. But fortunately there is a tool called disk utility with which we can manage the content of internal disks and other external storage devices.
The first thing we should try when we detect a problem with the hard drive is try to repair the disk with the disk utility tool on our MacBook. To achieve this you just have to follow the steps that we show you below:
- First of all you have to select the “Disk Utility” option in the “Utilities Mac ”. To carry out this step quickly you have to open the spotlight and type “utilities”
- Then you will see that a pop-up window opens with the disk utility and there you have to click on the disk you need to fix.
- Later you must select disk which is in the list on the left and then select the first tab called “First aid”
- Now, you must click on the option “Repair Disk” that appears in the window that appeared earlier. In this way you will have finished the procedure to repair the desired disk or partition.
- In the case that disk utility cannot repair the disk error, you should do the following.
- First you have to make a backup of all the information you don’t want to lose. Then you must follow the indications that appear in the option “Restore, repair or reinstall Mac OS X software ”.
- In case this is not enough you have to open the Disk Utility part of MacBook. This option is located in the utilities folder on the launchpad. Now to finish, click on “Help” and then on “Disk Utility Help”
After completing these steps, you can successfully repair a disk with disk utility on a MacBook.
What other actions can you do with Disk Utility?
- You can organize the data on your internal drives by defragmenting them. For this we must format each of the partitions appropriately and then they will appear to us as a separate volume. In this way we can better distribute the information stored on our computer.
- On the other hand you can build a disk image, that is, a file that gives you the ability to pass information from one computer to another. At the same time, you can also create and store backup copies of important information.
- Also Disk Utility allows you to find errors in the respective devices storage so that you can correct them.
- Gives you the opportunity to merge many hard drives into one group RAID serving as a single independent drive.
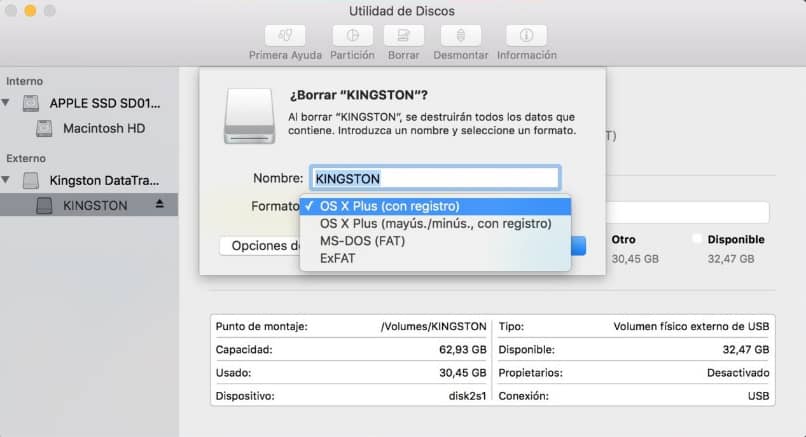
- It allows format external disks that have problems reading, is not recognized or is corrupted.
How to Change the Hard Drive of a MacBook?
- Turn off the MacBook.
- Remove the cable from the power adapter.
- Turn off your Mac before opening the panel, or you risk shorting out its components.
- Flip the MacBook over on a work surface.
- You will access the back panel of the MacBook.
- Place it on a table or workbench that gives you easy access without having to bend over.
- Remove the ten screws holding the rear panel. These run along the edges of the bottom panel. The exact location of these screws varies by model, but there are always ten.
- Lift the bottom panel.
- Place your fingers in the space between the vent and the lower case and lift the panel up.
- You will release two clips that secure the panel as you do so.
- Disconnect the battery connector.
- This connector provides power to the logic board and must be disconnected before proceeding to avoid shorting the components. It’s black and it’s located along the edge of the logic board, and it’s the largest connector attached.
- Be sure to pull the connector out to avoid damaging the connection.
- If there is a tab attached to the battery connector, use it to remove it from the socket.
- If there is no tab attached, you can use a spudger or cocktail picker to remove the connector.
- Locate the hard drive. The hard drive is rectangular and will be located in one of the corners.
- Most hard drives have labels indicating their storage and speed. Check the label if you are not sure. Many hard drives have shiny metal exposed, although not all do.
- Remove the screws holding the unit.
- There will be two small Phillips screws that secure the hard drive in place. These two screws run along one edge of the hard drive and must be removed to release the drive. The screws will remain attached to the bracket that holds the drive in place.
- Lift the bracket out.
- Once you have loosened the screws, you can pull the bracket they are attached to directly from the box.
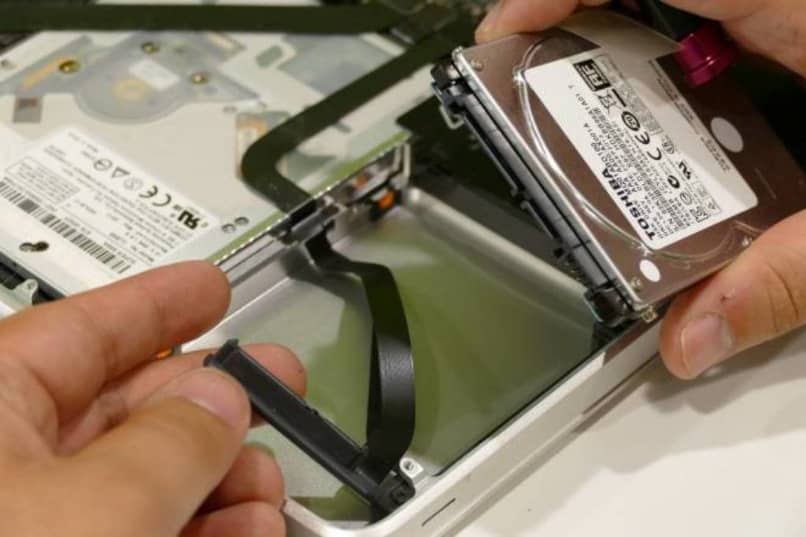
- Pull out the tab that is sticking out from under the unit.
- Gently pull the tab to remove the hard drive from the casing. Do not pull it out all the way as there is still a wire attached underneath. If there is no tab attached, you can use your fingers to gently lift the unit.
- Disconnect the hard drive.
- Grip both sides of the connector attached to the top of the hard drive.
- Take it out directly from the hard drive. It can be well connected, so “pull out” the connector gently pulling on the alternate sides of the connector.
- Completely remove the hard drive from the MacBook so that you can access the screws on the sides of the drive.
- Remove the screws from the hard drive. The hard drive will have four Torx T6 screws, two on each side. These are used to secure the drive in the bay.
Installing a New Hard Drive
- Screw in the four screws Torx on the drive. Install the four Torx screws in the same holes that came out on the old drive. Tighten them by hand, but do not over-tighten them as you may damage the hard drive cage.
- Connect the hard drive cable.
- Insert the large hard drive connector directly into the slot at the top. It can only go in one direction. Make sure the connector is secure and fully inserted.
- Put the hard drive in the bay. Gently rest the hard drive in the bay, making sure it is aligned correctly. The Torx screws on each side should fit into the slots that hold the hard drive in place.
- Secure the bracket.
- Reinsert the bracket on the side of the drive and secure it with the two screws.
- Again, hand tighten but do not overtighten the screws.
- Connect the battery.
- Reconnect the battery connector to the logic board.
- be sure that do not touch any of the circuitsespecially after reinserting the connector.
- Close the case.
- return to attach the rear panel and secure it with the ten screws.
- Make sure the rear panel is hooked in place.
Related posts:
 How to access Steam games without an internet connection
  How to view FPS with Xbox Game Bar in Windows 10: Steps Made Easy
  Hacked account? How to check and remedy
  How to make video calls from WhatsApp Web
  How to increase the RAM memory of a desktop or laptop + Tips and Tricks
  How to organize your YouTube subscriptions into categories
+ Tips and Tricks
How to organize your YouTube subscriptions into categories
+ Tips and Tricks


