


How to Repair the Start menu of my Windows 10 PC – Effective Solution
–
Learning to repair the Windows start menu has its advantages and importance, since from it we can access settings and the operating system, there are several ways to repair and solve the problem, for this we will show you a series of steps and thus you will avoid this error frequently.
- You can log out and back in
- You have the option to Repair Startup
- see if not there are corrupt files in windows
- You can reset the device
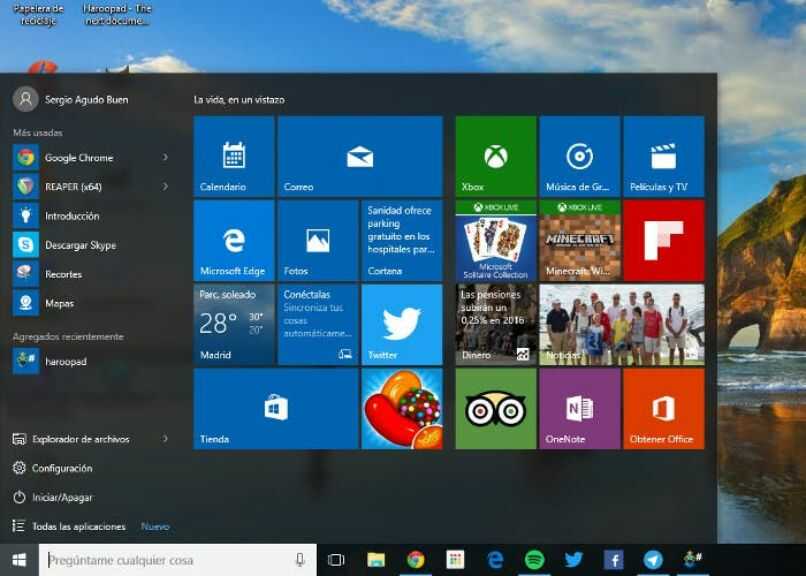
The start menu gives us access to multiple Windows functions such as: documents, images, videos, music, programs, among other options. But sometimes it fails due to the system updates. Also keep in mind that Cortana should not be left behind, if Cortana fails, the Windows start button will fail.
However, with the updates that Windows has had, has given us a way to work In a better way, it has innovated its dark mode design for the taskbar, start menu and windows and thus it is customized to the user’s taste.
If our start menu is failing because of the applications that interact with it, you don’t need to use a CD or USB of windows installation, just following these steps will solve the problem of starting your computer
- Turning on your computer when Windows is loaded will restart several times
- Then the Windows logo will appear on the screen with the message: Automatic Repair
- Next, a window will appear with the name of advanced options
- several will come out options and select Troubleshoot
- Again a screen with more options will appear and select advanced options again
- Once inside this new tab we are going to select the Startup Repair option
- Once this option is accepted, we wait for the repair process to begin
- Finally, the equipment will be restarted and the problem will be solved.
In case you wanted to get a faster boot in your start menu, with the option to disable the startup programs in Windows you can achieve it. In this way, the start will not take long to show up once you run it.
From your taskbar
If you have problems at enter the menu of your computer and you don’t know how to repair Windows startup, we will give you a series of steps to guide you and you can solve it easily and quickly
- First you have to right click on the start bar and select the task manager option.
- A menu will open where you will have to select the Start option.
- Then select where it says Update and Security
- We hope that this window loads and we go to where it says Windows Update and we are going to check for updates
- Once Windows updates everything, we will restart the equipment from the restart button on your computer
This way when your computer is turned on, and the whole system has been updated, the problem will be solved and you will be able to continue enjoying your computer.
![]()
Using CMD
Windows has many functions that allow us to manage our PC in different ways, so with this command it will be easier to repair your computer’s start menu, here we will show you how to do it.
- With the keyboard you will press the Windows button and then the R key
- A window will open and press OK
- A small black screen will appear where you are going to write the word Powershell and you will give Enter
- Luego escribirás este comando: Get-AppXPackage | Foreach {Add-AppxPackage -DisableDevelopmentMode -Register “$($_.InstallLocation)AppXManifest.xml
- Once this process is finished, you will only have to Restart your computer
Although we know that Windows has countless options to repair the problems that arise with our operating system, it is very easy to verify that everything is repaired and solved, we verify that the menu is working correctly when using our equipment, if the problem persists and it has not been solved yet an error message will appear stating that the Start menu does not work.
Why am I getting a critical error on my Windows 10 computer?
With the latest updates that Windows has had, there have been several problems with some functions of this operating system, causing it to not be possible to access the desired programs or files on our computer, so we will explain how to fix critical error with these simple steps that you will see below:
- At the start of Windows 10 you will have to press the Windows key + L.
- You are going to click on the power button and you are going to press the Shift key
- you click on Reboot and the boot option will come out
- Then you go to the part where it says Troubleshoot and select Advanced Options
- You will get the start configuration option and you will press the Restart button
Once all these series of steps have been applied, the computer will restart and while it is in restart mode you will press the letter F5 so that access the safe mode in networks, once in safe mode to end the Critical Error issue.
You will only have to restart the computer and the problem will be solved and you will be able to use the Windows start menu, it will probably be useful for you to put a startup password on your computer.
Related posts:
 How to access Steam games without an internet connection
  How to view FPS with Xbox Game Bar in Windows 10: Steps Made Easy
  Hacked account? How to check and remedy
  How to make video calls from WhatsApp Web
  How to increase the RAM memory of a desktop or laptop + Tips and Tricks
  How to organize your YouTube subscriptions into categories
+ Tips and Tricks
How to organize your YouTube subscriptions into categories
+ Tips and Tricks


