


How to turn off transparency in Windows 11
– Learn these tips and tricks on how to use your devices in a much easier way as well as solved some of your common problems that are difficult.
In this in-depth analysis we will explain to you in detail how to turn off transparency in windows 11.
The arrival of Windows 11 brought in new dowry transparency effects of the menus, the taskbar and the apps themselves.
This is not a real novelty, since the concept of transparency has already existed for many years in the Windows operating system: in the beginning it was adopted in Windows 7 and Windows 8.1 through the Aero effects, then resumed in Windows 10 and now revived. in a more advanced form in the latest version of the Microsoft operating system.
In Windows 11, transparency effects are enabled by default. There are those who consider them useful for a more intuitive management of the desktop, while others prefer to disable transparency in Windows 11.
Some consider the transparency effects of Windows 11 to be like a fish out of water in terms of graphics.
In addition, some users also point the finger at excessive overload of the interface, preferring by far a more practical and light one, in order to improve the general usability of the system.
If you are reading our article, most likely you are also on the list of people who cannot stand such graphic effects and would like to remove them once and for all. Let’s see together all the ways to turn off transparency in Windows 11.
Disable transparency in Windows 11 via the Personalization tab
The first solution for turn off transparency in Windows 11 is to remove the check mark next to the option “Transparency effects” included in the card “Personalization” Settings app.
Here is the procedure to follow:
- Open the Start menu.
- Select the Settings app.
- Click on the tab “Personalization” from the left side menu.
- In the new screen that opens, click on the option “Colors”.
- In the right pane, locate the entry “Transparency effects” and move the lever next to it from right to left to proceed with deactivating the effects. There is no need to save the changes, since they are saved automatically.
Once transparency is turned off, windows, menus, and the taskbar will become opaque, providing an understated look and a lighter interface.

Disable transparency on Windows 11 via the accessibility settings
Another way to disable transparency effects in Windows 11 provides for the use of the system accessibility settings, through which the option can be deactivated “Transparency effects”.
Here is the step-by-step procedure:
- Open the Start menu.
- Click the Settings app to open the Windows settings screen.
- In the new screen displayed, move to the side menu on the left and select the item “Accessibility”.
- Now locate the option “Transparency effects” and move the lever next to “Activated” right to left to turn off transparency.
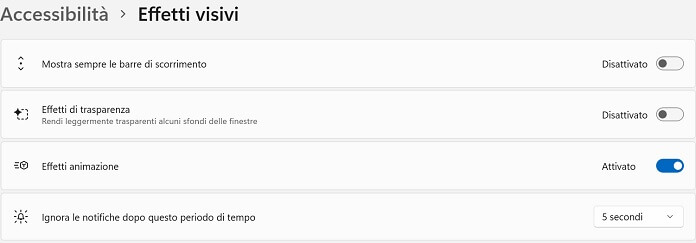
Also in this case the changes are automatically saved by the operating system and take effect immediately, so you do not need to press any button “Salva” or something similar. Transparency effects are removed: windows, menu screens and the taskbar are now opaque again.
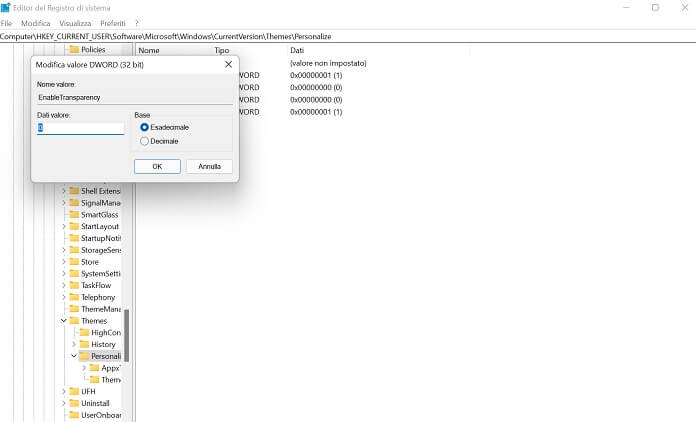
Remove transparency in Windows 11 via registry
There is also a third way. Instead of working through the Settings app and the “Personalization” and “Accessibility” tabs of the main menu, it is possible disable transparency effects in Windows 11 using the registry editor.
Although it is not the simplest solution among the three proposed in our guide, we believe it is right to explain how to move to disable the transparency on the new version of the Microsoft operating system through the Registry Editor.
Here’s how to do it:
- Move the mouse cursor to the Start menu icon.
- Click with the right mouse button and, from the drop-down menu that opens, select the item “Run”.
- In the white field type the command regedit.
- Press the button “Yup” to allow the registry app to make changes to the operating system.
- Open the drop-down menu next to the folder “HKEY_CURRENT_USER”.
- Expand the folder “Software”.
- Now select the folder “Microsoft”.
- Go to the folder “Windows”.
- Click the arrow next to the folder “Current Version”.
- Choose the folder “Themes”.
- Click on the folder “Personalize”.
- Right click on the entry “EnableTransparency” and select “Edit”.
- Under the field “Value data” replace the number 1 with 0.
- Press the button “OK” to confirm the changes made.
Like the two procedures described in the previous chapters, the change made through the registry editor is immediate. Some application windows, menus, taskbar and screens will no longer have transparency effects and become opaque.
Do transparency effects in Windows 11 slow down your PC?
In conclusion, let’s answer a question posed by several users on this specific topic.
No, the transparency effects do not affect the performance of the computer in any way. When activated, they only give a new look to the menus and taskbar.
When in the introduction of this article we talked about “interface overload”, we were referring to a mere aesthetic aspect, far from us bringing up a possible decrease in PC performance for simple transparency effects.

Related posts:
 How to access Steam games without an internet connection
  How to view FPS with Xbox Game Bar in Windows 10: Steps Made Easy
  Hacked account? How to check and remedy
  How to make video calls from WhatsApp Web
  How to increase the RAM memory of a desktop or laptop + Tips and Tricks
  How to organize your YouTube subscriptions into categories
+ Tips and Tricks
How to organize your YouTube subscriptions into categories
+ Tips and Tricks


