Review: How to Mine RaveOS configuring & Installation – Windows 10/ 11 and Linux – Find out RaveOS. Installation, configuration, mining, commands, updating. RaveOS is one of the most popular cryptocurrency mining systems. RaveOS is based on Linux, which makes this system as stable, fast, energy efficient and reliable as possible. In this detailed article, we will consider all questions about the operating system, we will understand the nuances of installation, configuration, mining, commands, management and updating. Let’s analyze the causes of most of the problems and the main mistakes in working with RaveOS.
Register in RaveOS
To start working with RaveOS, you need to register. Follow the link and go through the registration procedure. Register in RaveOS
Registration is standard, fill in the login, e-mail, password and confirm the password. After creating an account, you will be taken to the RaveOS Web management interface.

In our case, there are two workers and two rigs, you will have everything zero.
We are finished with the registration, we are going to download RaveOS.
System requirements for installing Rave OS
Minimum system requirements:
- Intel® Core ™ 2 or better / AMD am2 + or better
- 4 GB RAM *
- 4 GB storage media (HDD / SSD / M2 / USB
- To mine ETH on RX Vega 56, RX Vega 64, Radeon VII, RX 5700, 6 GB of RAM is required
Recommended system requirements:
- Intel® Core ™ i3-3220 3.3 GHz / AMD FX-6300 3.5 GHz
- 8 GB RAM
- 8 GB SSD storage
BIOS settings for the motherboard under Rave OS
- Update BIOS to the latest version!
- Please install HDD / SSD / M2 / USB bootable device depending on OS media.
- Turn on the 4G encode.
- Set PCIe support to Auto.
- Turn on embedded graphics.
- Set your preferred boot mode to Legacy mode.
- Disable virtualization.
How exactly to do this in BIOS, read the article on setting up a BIOS for mining.
Downloading the RaveOS image
In the same window of the Web interface of the operating system, look for the Download link on the left. This link always leads to the latest and most current version of RaveOS. I recommend not downloading the RaveOS image anywhere else, except the official website.
The name of the image will be something like this – raveos-v1.0.24-8340-1698.img.zip. When you download, the version will already be newer.
The RaveOS image is downloaded in a zip archive, after downloading the archive, unzip it to write the image to an SSD, HDD, M.2 or a USB flash drive.
Install the RaveOS image to the media: SSD, HDD, M.2 or a USB flash drive
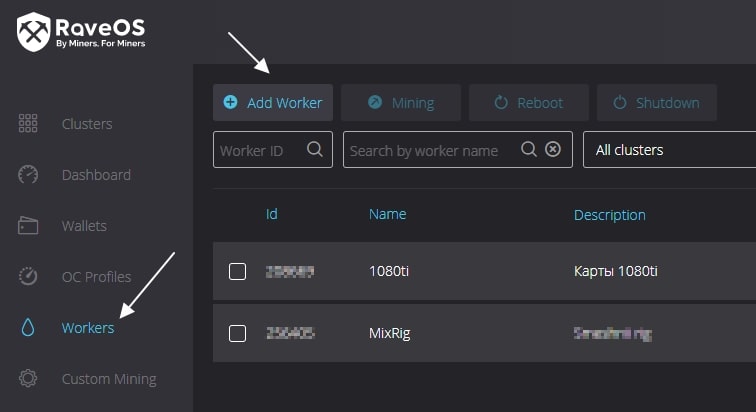
Before installing RaveOS, we need to add a Worker. This is necessary in order to bind the installed RaveOS system to the created worker. So when loading RaveOS from the media, we will see the running system in the Web interface.
In the RaveOS web interface, go to the Dashboard or Workers tab and add a Worker by clicking Add Worker.
You can also add a Worker through the Workers tab.
When adding a worker, fill in the following fields:
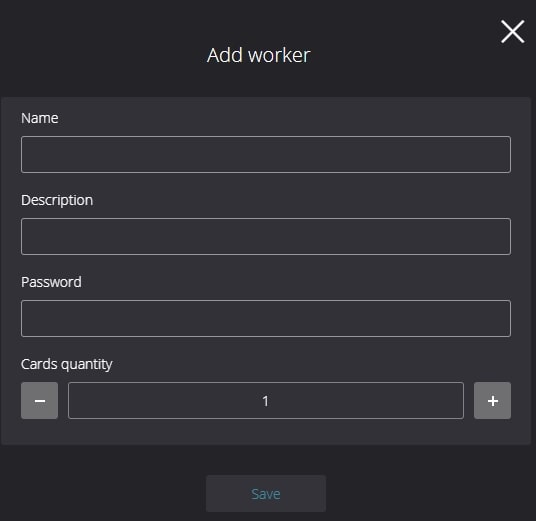
- Name – the name of the worker.
- Description – the description of the worker.
- Password – the worker’s password, in case of transferring access to other people.
- Card quantity – the number of cards that will be in the worker.
After downloading the RaveOS image to your PC, you need to install it on the media. The media must be at least 16Gb. We highly recommend using SSD drives, because they work much faster than flash drives and are more stable. If possible, you can use an M.2 SSD, but this port in the motherboard can be used for an additional video card, and choose an SSD as a medium.
If you still stop at a flash drive, be sure to make sure that it has a minimum USB 3.0 interface and is inserted into a motherboard port that supports USB 3.0, and also make sure that the flash drive has at least 16Gb of memory.
To write the image, we need an unzipped RaveOS image. Install HDD Raw Copy Tool.
Using the HDD Raw Copy Tool, write the RaveOS image.
Run the program, select the RaveOS image in the FILE field.
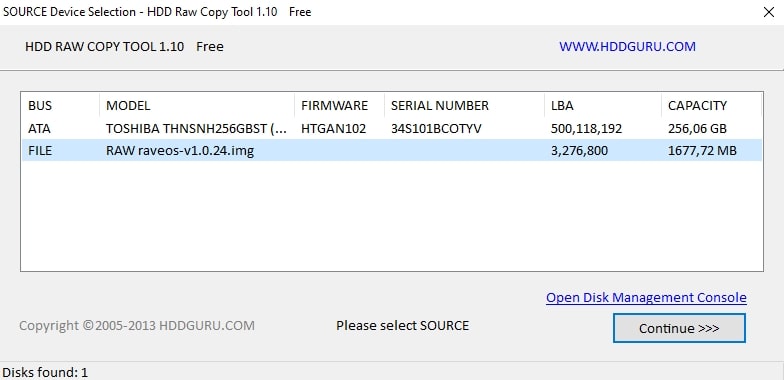
In the next window, open the ATA field and select the medium to which we will write the image.
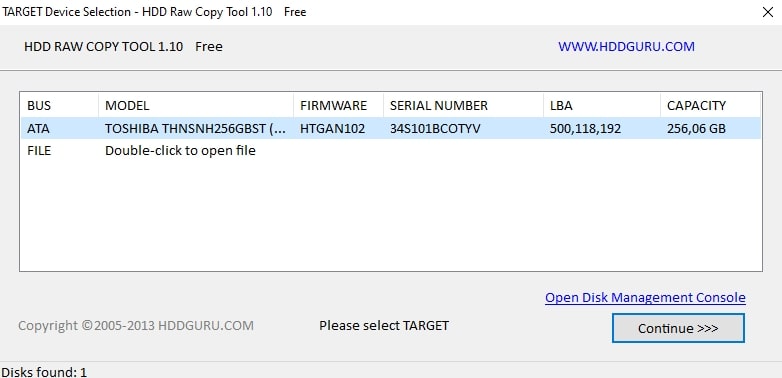
Next, click Continue and confirm the entry.
After recording the image, you need to register the token of our rig in the configuration file, this will connect our system with the rig on which RaveOS will be launched.
Go to the Web interface, i.e. we enter our account in the RaveOS system, and go to the Workers tab.
Select Edit, enter the worker settings and look for the SYSTEM INFO tab. We are interested in the Worker Token field.

Copy the Worker token.
We need to insert it into the OS file (disk with the RaveOS operating system): / config / token.txt, insert the Worker’s token and save it. That’s it, by this action you connected your worker in RaveOS with the image, now when you run this image in the farm, you will see it through the control panel (web interface) of RaveOS.
After recording the image, we set up the bios of the motherboard for mining, making our media with the image a priority for recording as well.
Launch RaveOS
After recording the image to a hard drive or USB flash drive, and inserting the worker’s token into the token.txt file, connect your image to the farm, read how to build and configure the farm on the website. The farm can be connected to the monitor or not. It doesn’t matter, after starting the farm in the RaveOS web interface, you will see that your worker is online. If so, then you did everything right.
RaveOS does not see the video card, especially the 3060 Ti, 3070, 3080
If RaveOS does not see video card 3060, 3070 or 3080, make sure you have installed the latest version, at least raveos-v1.0.24-8340-1698. Because older versions do not support these video cards. We will discuss how to update rave os later.
If RaveOS does not see other video cards, give it the opportunity to initialize them. At the first boot, the system may take a very long time to initialize video cards, especially if there are a lot of them, 6 or more.
In this case, start the farm one map at a time, i.e. leave only one card in the motherboard, start the farm and wait for it to start. After starting and initializing the video card, turn off the farm and connect the second card, and repeat this for each farm card. This usually helps.
If this does not help, make sure that you have correctly set the BIOS settings, read how to do this in the article on setting up the BIOS for mining.
How to start mining in RaveOS
After successfully launching the farm, you need to create a wallet, select a pool and a miner.
We create a wallet in RaveOS
To create a wallet, go to the Wallets tab and select Add Wallet.

In the Wallet name field, enter the wallet field.
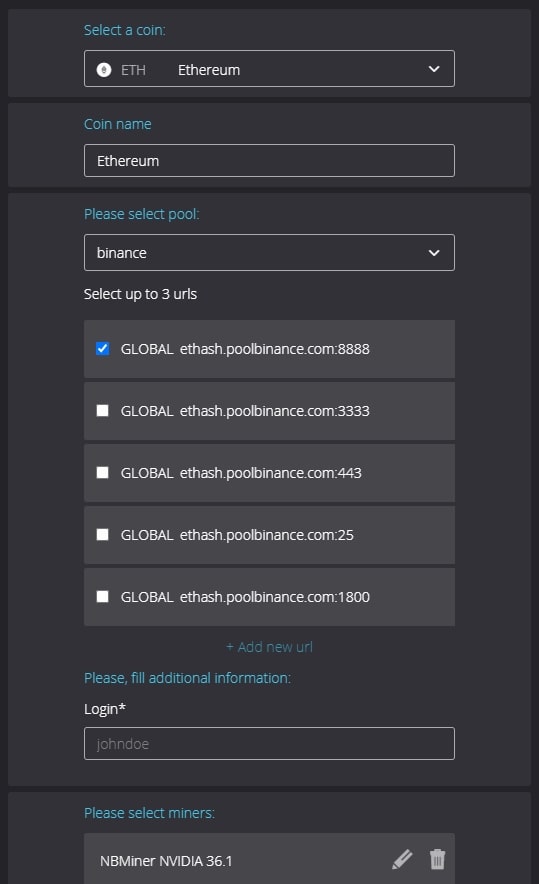
- Select a coin – select the coin you are going to mine.
- Coin name – the name of the coin.
- Please select pool – select the pool. We recommend registering on the Binance boule, this is the best solution for ether mining. After choosing a pool, select servers, you can have several.
- Please, fill additional information – enter the name of the mining account in the binance pool in this field. Read how to mine on the Binance Pool on the website.
- Plese select miners – in this field we select a miner, or several miners. We recommend NBminer.
And click Save.
After creating the wallet, you can start mining in RaveOS.

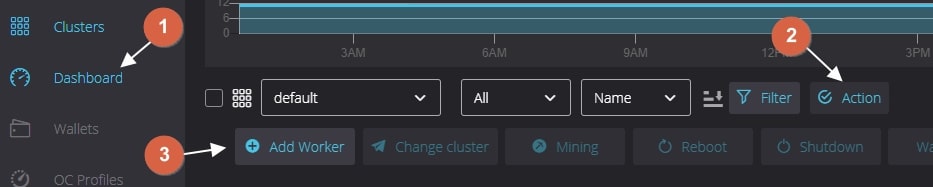
- To do this, go to the Dashboard tab
- Choosing our worker
- Press the Action button
- Choosing Mining
In the next window, select a wallet, coin, pool, server, miner and start mining.
Object structure (clusters, workers, video cards) in the Rave OS system
To understand the correct setup of your Rave OS farms, let’s explain the hierarchy of objects in the farm.
Clusters – think of this as an object, for example a garage or a room in which your workers or rigs are located (we’ll get to the rigs or workers later). Organize your workers into clusters that replicate the physical layout of your devices. By combining rigs into farms, you can divide them by geolocation, for example, if you have rigs in different garages, offices, apartments, rooms. This is more needed for those with many farms and rigs.
Workers are your rig itself. Those. motherboard with processor, power supply and video cards. In ordinary life, this is called a farm. Read how a mining farm works on the website.
Setting up an account, cluster and worker in Rave OS
Creating and configuring a cluster
All clusters are located in the main “Clusters” tab. What can we do with clusters in Rave OS:
- Create a new cluster. + Add Cluster.
- Change mining settings for the selected cluster. You can select all graphics cards, or only Nvidia cards, only AMD cards, or ASICs. For these devices, change the wallet, mining coin, miner. This is great if you have a lot of cards. To do this, select a cluster and click the Mining button.
- Apply different overclocking profiles for different clusters. Select the required cluster and click Set OC. Next, select an overclocking profile. We’ll talk about the overclocking profile later.
- Remove the overclocking profile from the cluster.
- Edit and delete a cluster. To edit a cluster, click on the pencil to the right of the cluster name. Recycle Bin removes the cluster. In the cluster settings, you can do the following things:
- Change the name of the cluster.
- Select the default wallet for the cluster. (for all new workers in this cluster).
- Cluster token. (will be available soon).
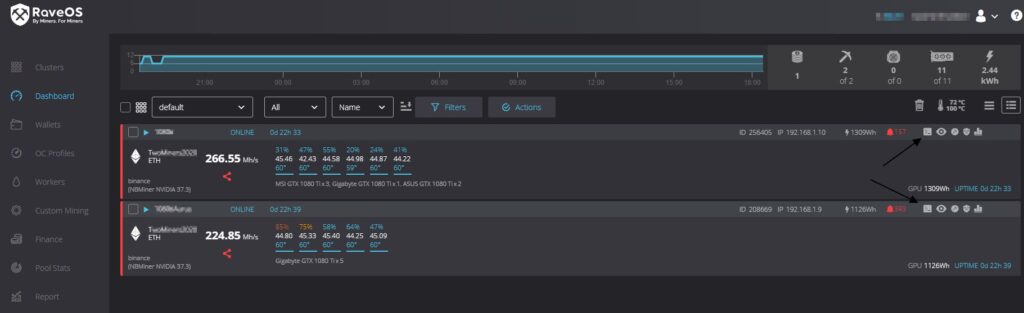
Creating and configuring a worker. Dashboard
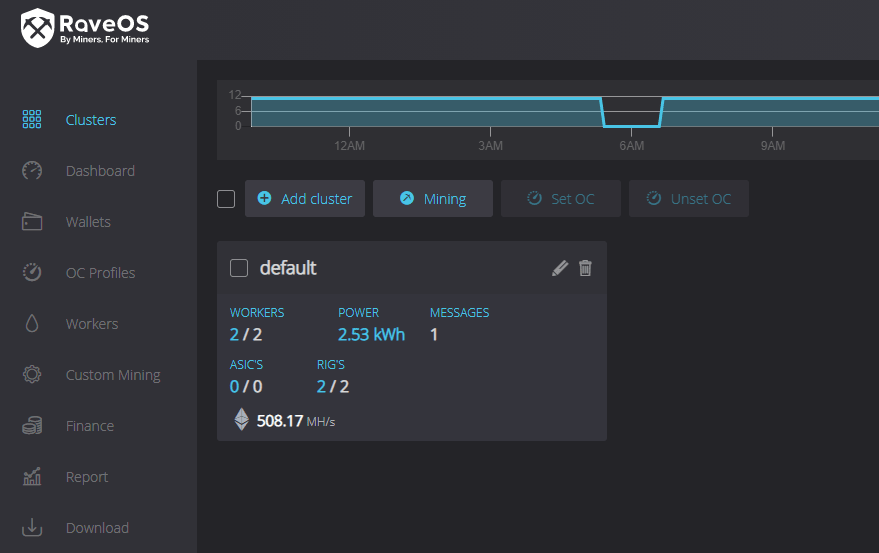
Clicking on the desired cluster takes you to the Dashboard tab. General panel features:
- All important information in real time and actions on workers on one page.
- View your list of workers and get a complete picture of your mining activity.
- Actions with multiple workers. Select one or more devices and complete the required dives.
- Search for devices by ID, worker name, wallet name, coin, miner or tag. The ability to use several filters at the same time.
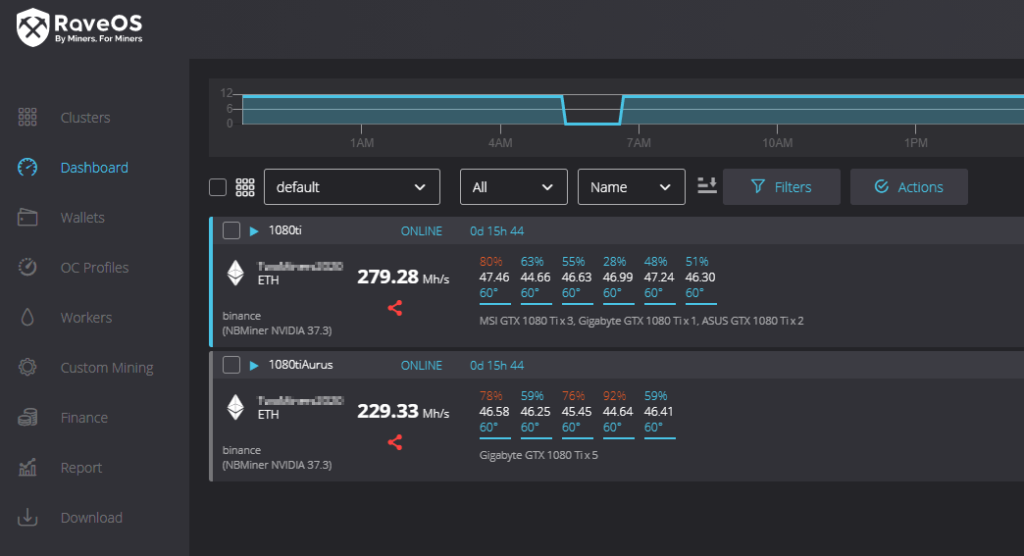
List of workers, important information in real time, full picture of mining activity
In the Dashboard tab, you can see in real time the status of your rigs, namely:
- Worker name, status (online or offline), how long has passed since the last successful launch.
- A wallet and a coin to be mined in the worker.
- Exchange where to mine and the miner.
- Current hash rate, successful shares and rejections (click on the red image under the hash rate).
- Information on each card: cooler speed (first line), card hashrate (second line), card temperature (third line) and card models and manufacturers (fourth line). If there are tags, then so are the worker tags.

To the right of each worker, you can see the following information:
- Worker ID.
- The worker’s IP address.
- Consuming the entire worker.
- Time of continuous work since the last start.
- System messages by worker.
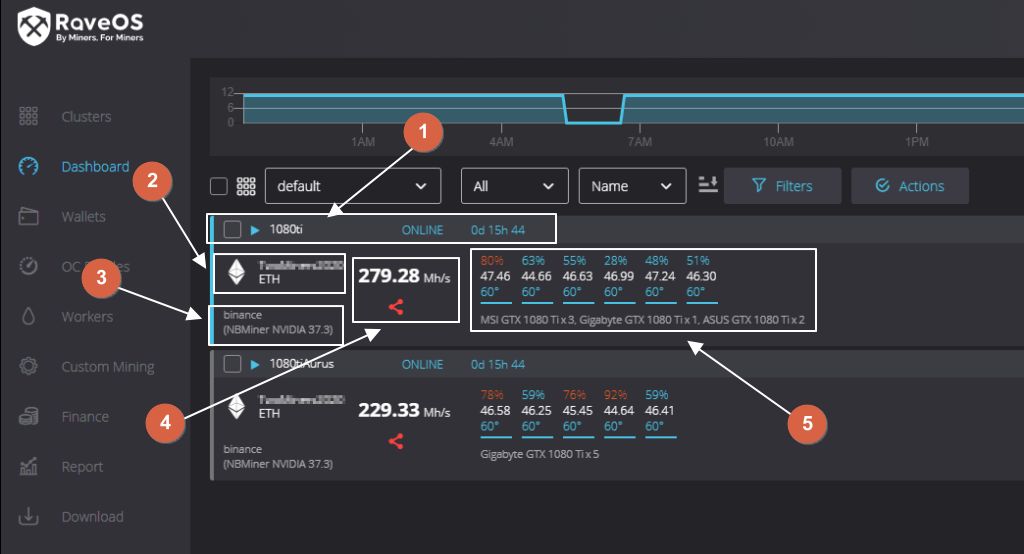
Actions on workers
Actions can be performed on each worker separately, or you can select several workers and perform some actions. What can be done with a single worker:
- Call the worker’s console to execute various commands.
- View the worker’s log.
- Change mining settings (change wallet, coin, miner).
- View the version of Rave OS the worker is running on.
- View worker statistics.
We will consider these actions in more detail later in the article, when we consider the worker settings and each possibility separately.
If you select a separate worker, check the box to the left of the name and clicking the “Action” button you will see the following actions:
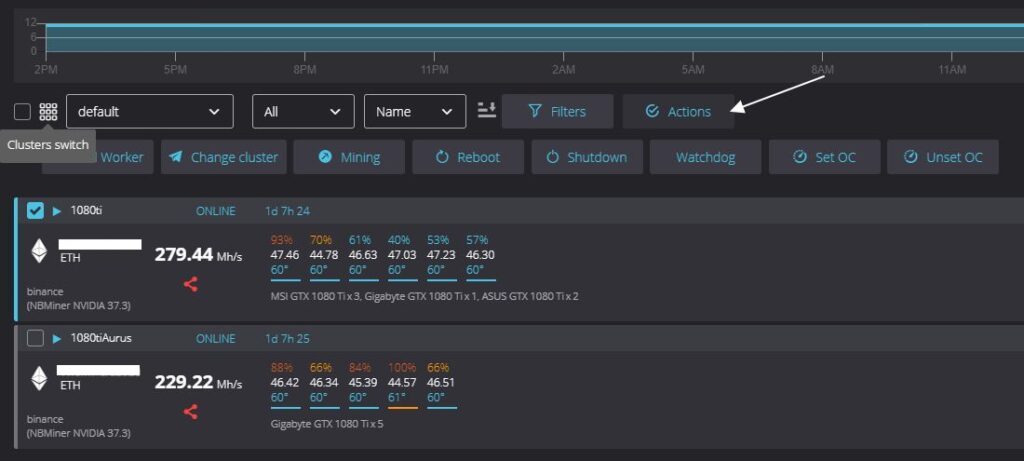
- Change cluster – move the worker to another calster.
- Minign – change mining settings (wallet, coin, worker).
- Reboot – reboot the worker.
- Shutdown – turn off the worker.
- Watchdog – set up a watchdog. Those. tracking hashrate and temperatures in automatic mode. More on this later.
- Set OC – set the overclocking profile.
- Unset OC – remove the overclocking profile.
Rave OS worker settings
In order to get into the worker settings, just go to the Workers tab and click on the pencil images on the required worker. Or click on the name of the required worker in the Dashboard tab.
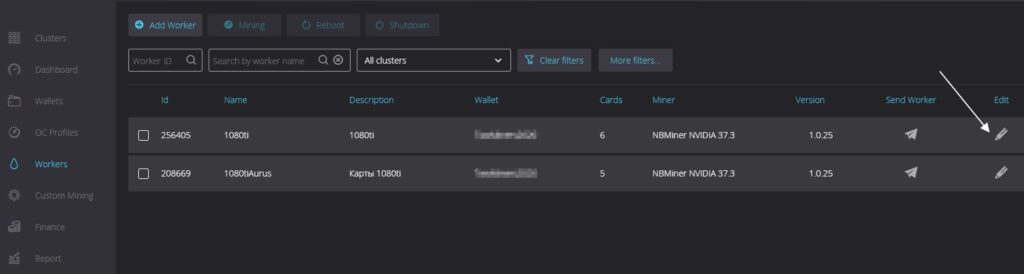
What information can be found and what actions can be done by logging into a specific worker in Rave OS? Worker name, current hash rate, current consumption, mining button Mining, which makes it possible to quickly change mining settings (wallet, coin, miner). And the Actions panel, available in the upper right corner.
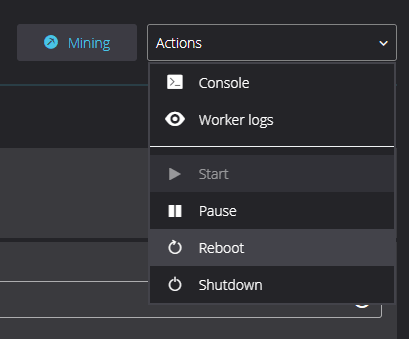
In this panel, the following actions are available on the worker:
- Console – Console.
- Worker logs – work log.
- Start – start the worker.
- Pause – stop the worker.
- Reboot – reboot the worker.
- Shutdown – shutdown of the worker.
6 tabs are available below:
- HARDWARE tab – monitoring cards and the main control panel for worker and video cards.
- TUNING tab – graphics cards overclocking settings.
- SETTINGS tab – worker settings.
- SYSTEM INFO tab – system information on the worker.
- STATISTICS tab – worker statistics.
- NOTIFICATIONS tab – worker system notifications.
HARDWARE tab
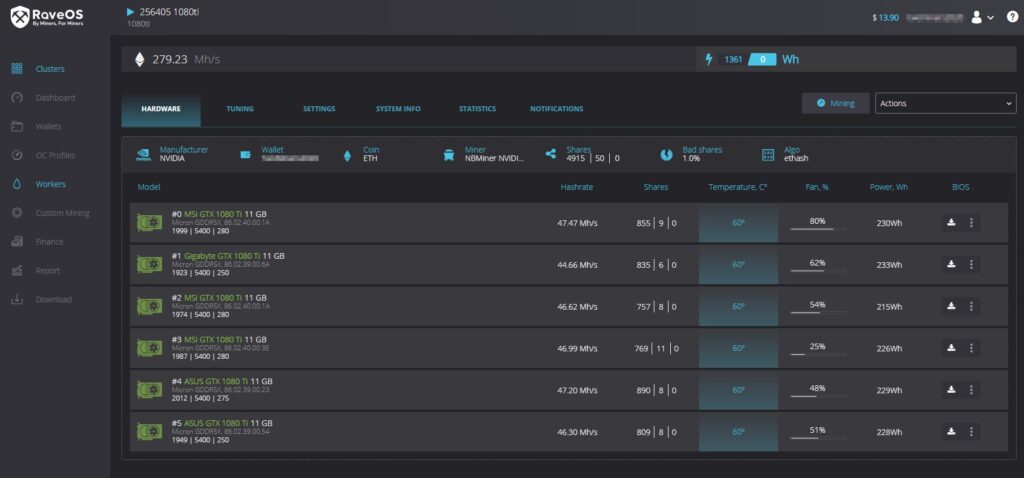
In this tab, which opens in the default workers section in Rave OS, you can see the card manufacturer (Manufacturer), wallet (Wallet), coin (Coin), miner (Miner), the number of accepted and not accepted shares (Shares) , the percentage of unaccepted shares (Bad shares) and the algorithm on which the worker is running (Algo). This is the top line below the tabs.
Next is a table with detailed data for each card in the worker. In our case, this is mining on a GTX 1080 TI. The table is divided into 7 columns:
- Model – the model of the video card. Here you can see the model, type and manufacturer of video memory, factory core frequency, video memory frequency, maximum consumption in watts.
- Hashrate – the current hash rate of the card. Refreshed every 5 seconds by default.
- Shares – the number of accepted, rejected and invalid shares.
- Temperature – temperature.
- Fan,% – fan speed.
- Power, Wh – card consumption.
- Bios – the ability to tell and update the bios of the card (only for those who know what they are doing, it can lead to irrevocable loss of the card).
TUNING tab
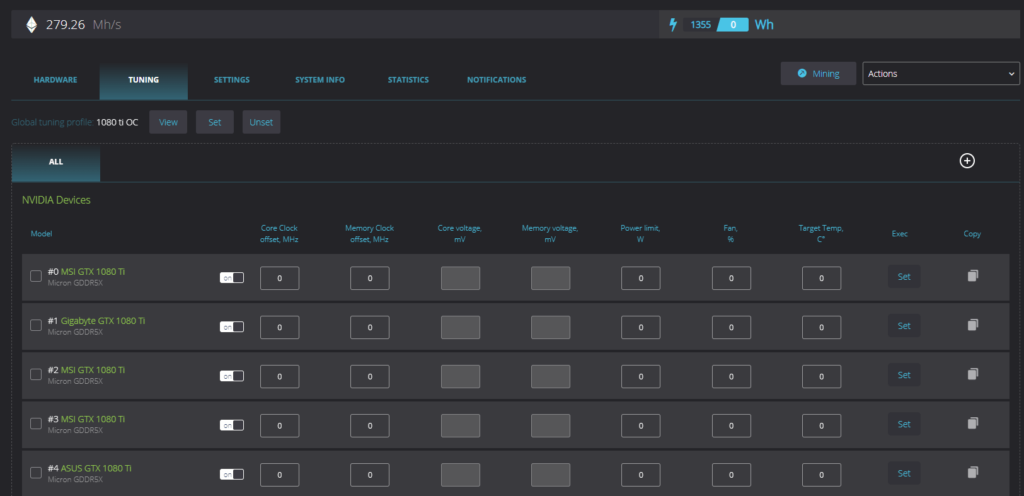
This tab allows you to configure video cards in Rave OS, i.e. overclock and downvolt them. You can overclock the cards one by one, or apply the overclocking template for all cards or only certain cards that you select with the checkbox on the left. We’ll talk about overclocking video cards in Rave OS below.
SETTINGS tab (Watchdog, auto fan, auto reboot, NV-pill) in Rave OS
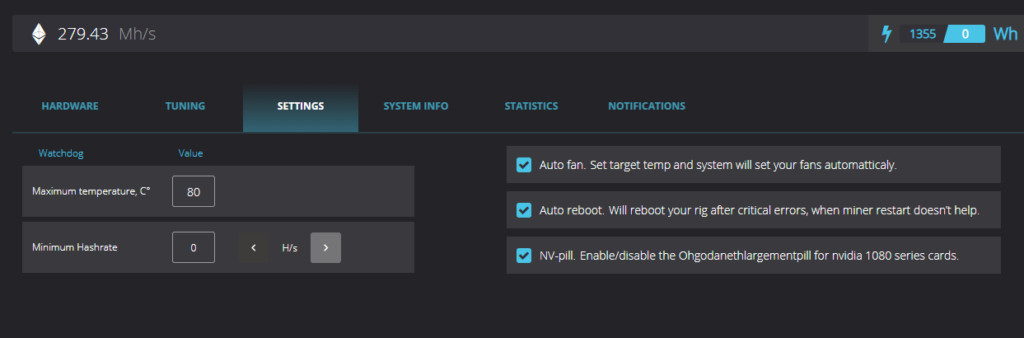
This tab contains Watchdog settings for temperature and hash rate.
- Maximum temperature, С ° – the maximum temperature, after reaching which the worker will be rebooted.
- Minimum Hashrate – minimum hashrate. When this value is reached, the worker will reboot. This setting is useful if you know your constant hash rate and if one or more video cards are dumped, the value will be below the minimum hash rate and the worker will reboot.
Also in this tab there are the following settings:
- Auto fan. Set target temp and system will set your fans automatticaly – This function automatically adjusts the fan speed to keep the set temperature. Those. you set the desired temperature of the video card, and Rave OS, thanks to Auto fan, selects the required fan speed.
- Auto reboot.Will reboot your rig after critical errors, when miner restart doesn’t help – The function reloads the worker if critical errors occurred in the miner and the miner restart did not help.
- NV-pill.Enable / disable the Ohgodanethlargementpill for nvidia 1080 series cards – Includes pill. This function is only needed for 1080 and 1080Ti video cards. If you have such a card, read about the tablet for 1080 and 1080 ti on our website.
SYSTEM INFO Tab
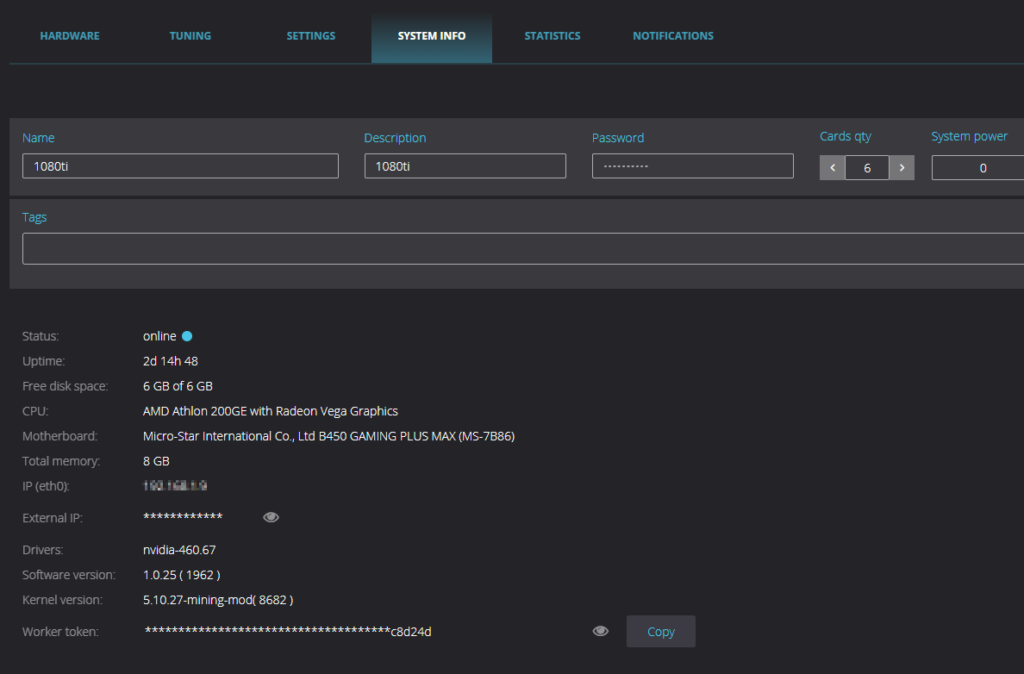
This tab contains system information for your worker. Namely:
- Name – the name of the worker.
- Description – the description of the worker.
- Password – the worker’s password. If you give control access.
- Card qty – number of cards.
- System Power – how much the carcass system consumes. You can set the consumption value of your carcass, if you know it, and you will see the full picture of consumption.
- Tags – tags. You can use tags to filter your workers. Useful if you have a lot of them.
- Status – the worker’s status. Online or not.
- Uptime – uptime since the last successful launch.
- Free disk space – free space on the disk where the worker is installed.
- CPU – processor.
- Motherboard – motherboard.
- Total memory – random access memory.
- IP – local ip worker.
- External IP – external IP address.
- Driver – video card driver.
- Software version – Rave OS version.
- Kernel version – linux kernel version.
- Wrker token – worker token. Needed when installing the system. Described above in the section on creating a bootable disk and installing Rave OS.
STATISTICS tab

This tab shows statistics for the worker for the last 24 hours. What can be analyzed here:
- MPUs count – video card count.
- Ethereum hashrate, MH / s – hashrate.
- Power, Wh – consumption in watts.
- Average 1 min – average load on the system for 1 minute.
- Average 5 min – average load on the system for 5 minutes.
- Average 15 min – average load on the system for 15 minutes.
NOTIFICATIONS tab
The Notification tab contains system messages. What messages are there and what they mean, let’s talk in more detail later in the article.
How to update RaveOS version
There are two ways to update the RaveOS version:
- Download the latest version from the official website and physically install it on the media. This is a long way, there is a simpler and faster one.
- Update Rave OS via command line in terminal.
It is clear how to update Rave OS in the first way, it is described above in the RaveOS installation.
To update RaveOS to the latest version via the terminal, you need to do the following:
We go to the Dashboard and on the right of each rig there will be a Console button. We press not on it.
As a login, enter – root, as a password, enter – admin.
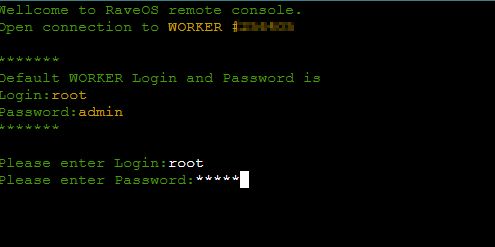
We enter the upgrade command and update to the latest version.
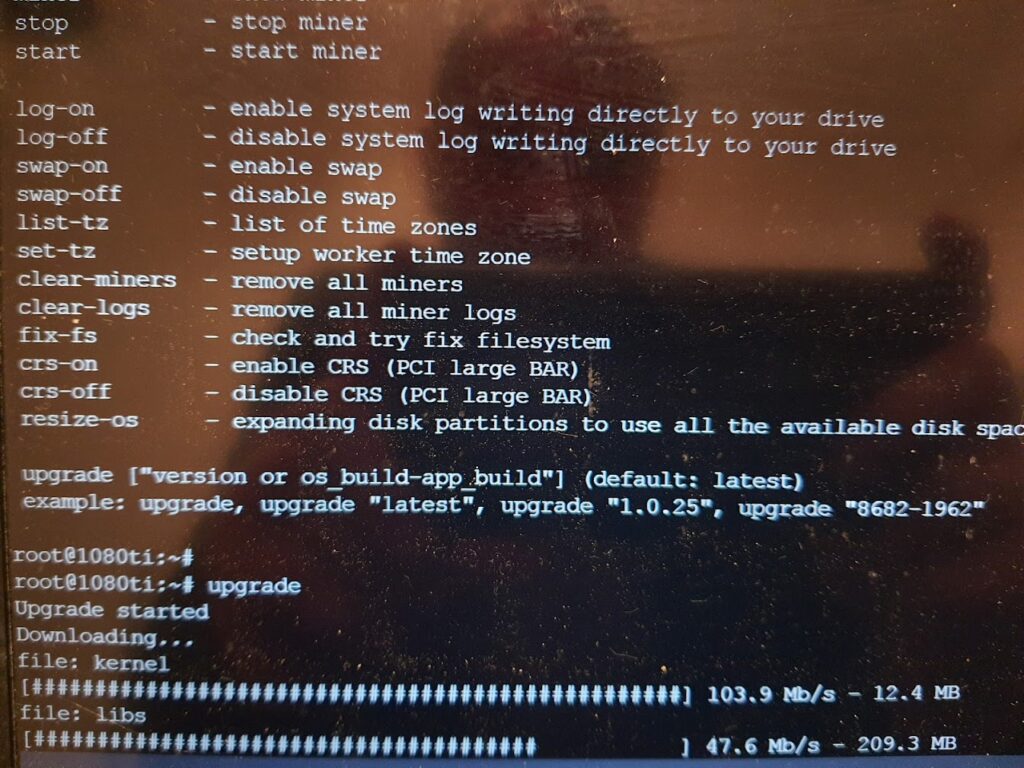
The update will proceed automatically, after which your rig will reboot.
Related posts:
 Bitmain Antminer r4 Review – Benefits Profitability Payback Specification
 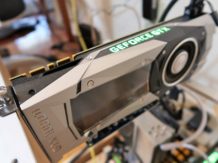 Nvidia GTX 1080 ti Hashrate – Review | Overclocking |Ethereum |Profit (sky high)
  Antminer S5 ASIC Hashrate – Review Profitability Payback Period
  Asic Antminer S1 Hashrate – Review | Test| Specs| Pros & Cons | Set-up|
  Miner Baikal Giant x11 – Hashrate|Profitability| Specs
  Radeon Hd 7970 Hashrate -Review|Profitability | Specs | Pros and Cons