
How to Optimize Power Consumption with MSI Afterburner – To overclock the video card, we will use the MSI Afterburner program. This is free software developed by MSI and based on RivaTuner. The MSI Afterburner program allows you to overclock any modern video cards from NVIDIA and AMD, starting from the NVIDIA GeForce 8X00 and AMD Radeon 3000. You can download this program from the official MSI website or from the Guru3d website.
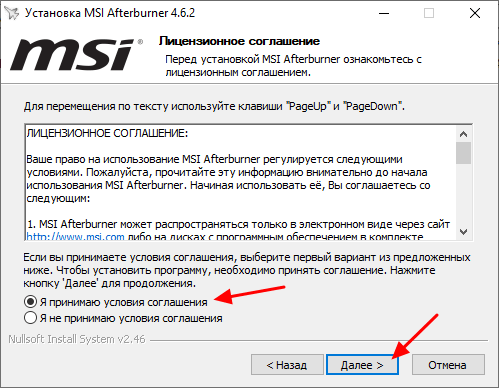
Installing MSI Afterburner shouldn’t be a problem. Just agree to the license agreement and install.
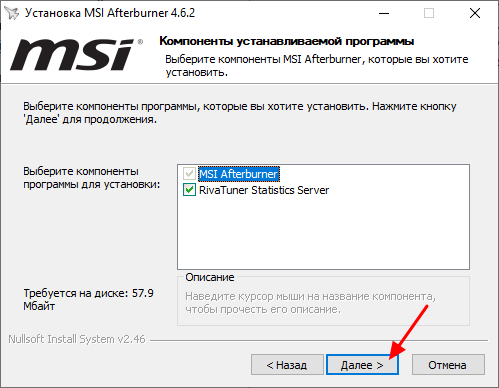
Preparing to overclock your graphics card with MSI Afterburner
At the stage of selecting components, we do not change anything and continue the installation.
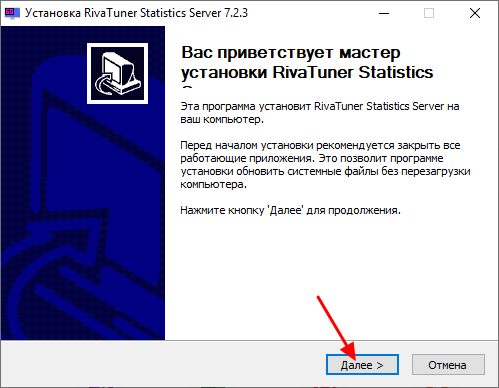
After the installation of MSI Afterburner is complete, you will be prompted to install RivaTuner Statistics Server. We agree and install.
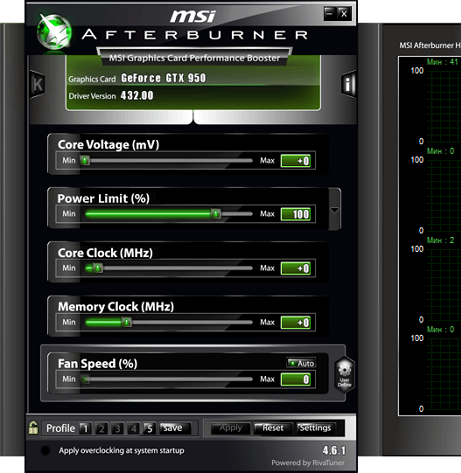
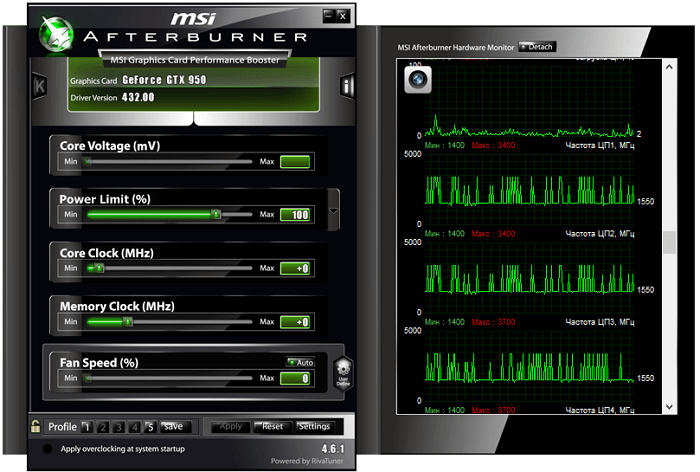
After installing and launching the MSI Afterburner program, you should see an interface similar to the one in the screenshot below.
If in your case the interface of MSI Afterburner differs from the screenshots, then you can change it in the settings. To do this, click on the settings button, go to the “Interface” tab and activate the “Default MSI Afterburner v3 skin” option.

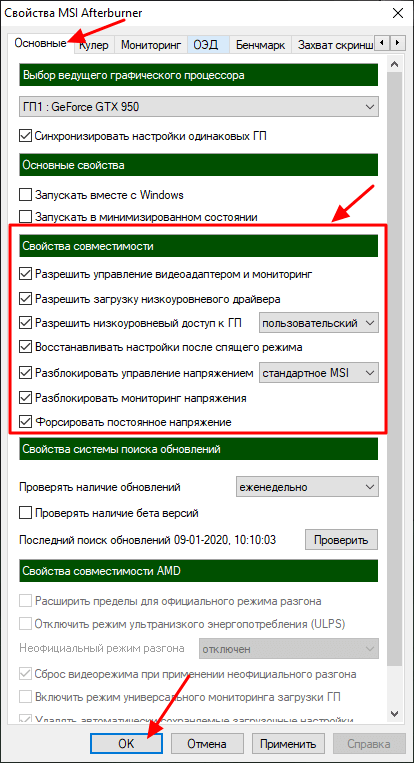
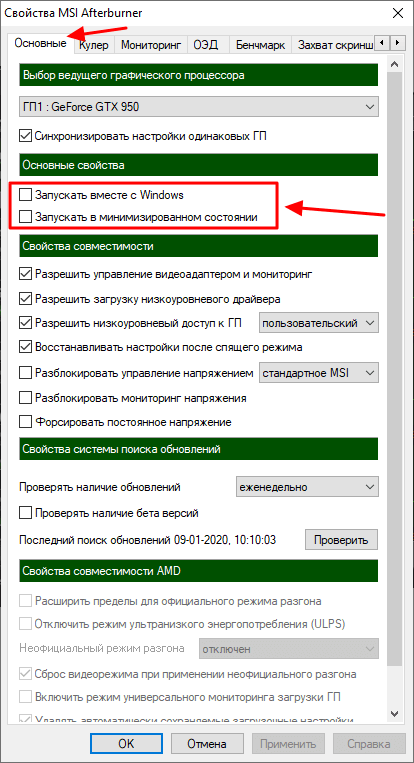
Also in the settings you need to enable all compatibility properties. To do this, go to the “Basic” tab and check the boxes as shown in the screenshot below. After that, the settings of the MSI Afterburner program can be closed and proceed directly to overclocking the video card.
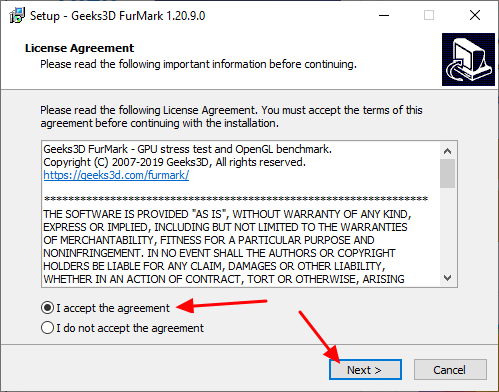
Also, to overclock the video card, we need the FurMark program. This is a free graphics card stress test that can be downloaded from the official website. Installing FurMark is also not difficult, run the installer, agree and install.
After launching FurMark, you will see something like this window.
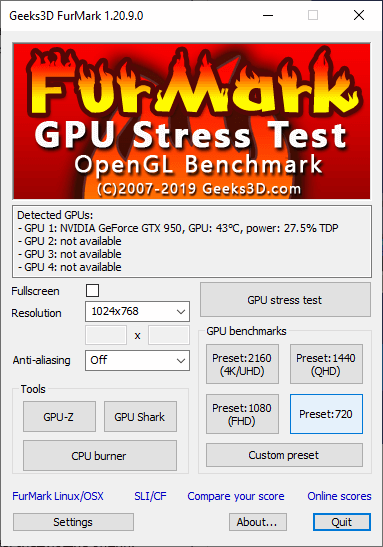
FurMark has graphics settings and a “GPU Stress test” button that starts testing.
Overclocking an Nvidia graphics card
Unlike a similar procedure with a central processor, overclocking a graphics card is carried out not using the BIOS, but through programs and utilities. Currently, there are three types of overclocking:
- With software;
- With the use of special software for overclocking, released by the manufacturers of graphics chips;
- With additional software.
The optimization process is similar for all types of cards, be it Nvidia, AMD or ASUS. The very principle of the technology is to increase performance by increasing the frequency of the core and memory. It is also necessary to balance the operation of the cooling system.
Let’s talk about optimization using the popular RivaTuner B programs.
Overclocking Rules
We look for a suitable software package on the Web and download it to your computer. In addition to the RivaTuner B program, you need to install the Everest utility, which is designed to track temperature indicators, as well as the 3 Dmark tester, which provides an effective performance assessment. After that, you can proceed to install the software .
First of all, we launch RivaTuner.
To do this, click on the triangular sign on the right side of the screen and select “System Settings”.
In the open window, select the “Cooler” item and the option for low-level cooler control. A window will appear on the screen with a notification about the upcoming reboot. We tick the line “define all” and agree. At the next stage, you need to select manual cooler settings by choosing a constant mode and setting it to 95%. If the cooler is too loud when the device is running, you can try lowering the values to 80-85%. Then click on the item “Load settings from Windows”.
Again, open the video card overclocking window and launch the “low-level overclocking control” function. We also repeat the “define all” option, as a result of which both sliders will be activated. We begin to move the slider, which changes the core frequency. We increase the frequency gradually in increments of 10 percent. In parallel, after each change, we test. If the test results are positive, click on the “ok” item and wait until the new parameters are applied.
Then we launch the Everest program and 3 Dmark. We start testing the graphics chip with the settings already changed. Using the Everest utility, we evaluate the temperature. It is important that it is no more than 90%. When testing, we monitor the screen: if there are any defects and artifacts during the display of the picture, it is better to stop testing, reducing the frequency by 15 MHz. Then we start the tester again.
A similar action must be carried out at high temperatures.
Using existing tests, we determine the threshold frequency, that is, the highest rates at which artifacts do not appear. If the results are optimal, you can increase the frequency until the display begins to show artifacts.
What to do next
If you become interested in the question of whether it is possible to overclock the video card, carefully follow the further instructions. We continue to reduce the frequency by small values to make sure that there are no distortions and defects in the picture. Thus, we will be able to determine the maximum operating frequency. Write them down on a piece of paper and click on the “reset all settings” item in the settings.
Let’s start optimizing memory. It is carried out in the same way as overclocking. It is necessary to gradually increase the value by 10 percent, taking into account the temperature and the likelihood of image distortion. As in the previous case, it is necessary to determine a good memory value and write it down.
- Try not to change the maximum memory value by setting the frequency to the limit (use the indicators recorded earlier);
- Click on the “test” item. If it shows positive results, you can start testing. Pay close attention to the behavior of the display when testing. If there are no artifacts, overclocking was successful, so it remains to evaluate the situation in practice by running a complex toy.
With proper overclocking, FPS performance will increase significantly. If distortion is noticed after the test, it is necessary to lower the memory frequency by 10 MHz and repeat the action. If artifacts are still present after multiple frequency reductions, you should leave the current memory frequency and reduce the core frequency by 10 MHz. Repeat the action once or twice until the defects and distortions completely disappear. Then we increase the memory frequency again.
By the way, you can choose the right software for overclocking, monitoring and testing yourself. Among the most popular programs, the famous tester 3 Dmark takes the leading place. It is customary to call it the standard of quality . However, there are many other equally useful utilities and applications in the world.
Overclocking a graphics card with MSI Afterburner
Experienced computer owners have long appreciated the unique properties of MSI Afterburner. It is known that it allows you to overclock a chip from MSI, AMD or NVIDIA with particular simplicity and ease, achieving maximum performance. To do this, just follow these instructions:
- We start the utility. By the way, you can download it directly from the official website of the developer or from a third-party resource. Choose the most convenient way;
- We install and run the program;
- To make it easier to use, you can change the interface language by opening the “Settings” subsection. Looking for native Russian language. If it is provided by default, then this item can be skipped;
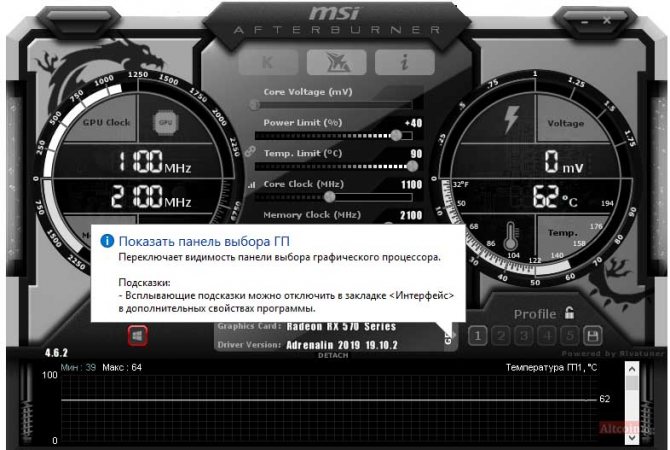
- In the “Settings” in the “Select the leading video processor” item, specify your video card model. But don’t forget that some laptop manufacturers may build such a chip or make it discrete. Therefore, if your device has two video cards at once, do not forget to activate the “Synchronize settings of identical GPUs” function by checking the box;
- On the “Basic” tab, check the box next to “Unlock voltage monitoring”. Then go to the cooler tab at the top of the window and activate “Enable software user auto mode”. This will allow you to independently select the appropriate cooler speed indicators for specific temperature indicators, guided by a special schedule where you need to move the points. However, you cannot set the speed to 100%, because the risk of damage to the video card in this case will be maximum;
- Close the settings and return to the sliders in the main menu of the application. In this case, the Fan Speed item must be left in the automatic mode, which is provided by default. But as for the Core Clock parameter, it is increased by 10-20 MHz.
- Ultimately, it remains to increase the frequency of the GPU memory by moving the corresponding slider.
If we talk about other models of video cards, then they are overclocked by other methods. For example, you can upgrade your computer with additional RAM slots. Having one more stick of RAM will prevent the reallocation of memory between the processor and the video card, which can damage the last component.
If you have an integrated graphics card, try overclocking it using the motherboard BIOS. It is not difficult to perform such an action. The main difficulties are noticed only in the BIOS interface, which looks different on different laptop models. Because of this, an inexperienced user cannot always find the necessary section.
Everything else is very easy to do. It is enough to follow the step-by-step guide, and the end result will exceed all your expectations.
That’s it, now you know how to improve the GPU performance of your laptop.
Brief Introduction to MSI Afterburner Interface
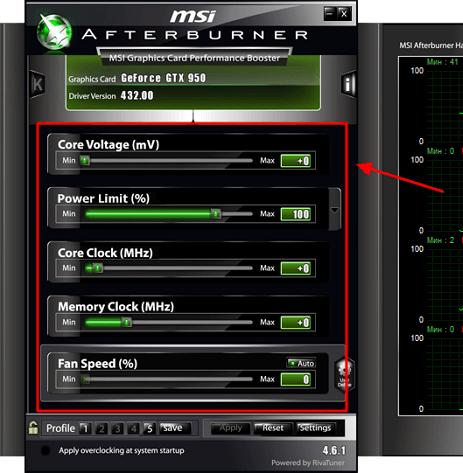
Overclocking the video card is done using the sliders on the main screen of the MSI Afterburner program. The following options are available here:
- Core Voltage (mV) – voltage of the graphics chip (GPU). Increasing the voltage can improve the stability of the graphics card after overclocking. But, increasing the voltage also increases the heat and increases the risk of damage to the GPU. Therefore, it is better to leave this parameter as it is, moreover, on many video cards it is not available at all.
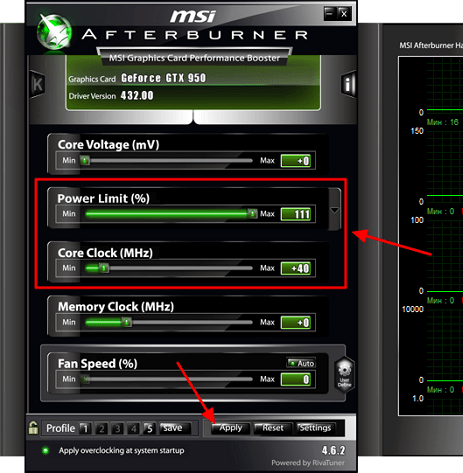
- Power Limit (%) – limiting the power consumption of the video card. Increasing this parameter improves the stability of the video card after overclocking. Changing this parameter is relatively safe, so when overclocking, it is all set to the maximum.
- Core Clock (MHz) – the clock frequency of the graphics chip (GPU). The main parameter for overclocking. Increases in small steps with regular stability testing.
- Temp.Limit (C) – the maximum temperature of the video card graphics chip. Potentially dangerous parameter, so it is better to leave it as is.
- Memory Clock (MHz) – video memory clock frequency. The second most important parameter for overclocking a video card. Also increases in small steps with regular stability testing.
- Fan Speed (%) – rotation speed of video card coolers. There is a separate article on setting this parameter on the site.
To change any parameter, just move the slider and click on the “Apply” button.
On the right side of the MSI Afterburner window, you can see a huge list of graphs that display the state of the video card in real time. Here you can monitor the temperature of the graphics chip, load level, power consumption, cooler speed, etc.
Configuring MSI Afterburner

- Gpu Clock
is a measure of the clock speed of a graphics card. If you have a multi-card farm, the selected video card will be shown. - Core Voltage (mV)
– this slider is responsible for the power consumption of the video card, you can either overclock or lower this figure. The lower the Core Voltage, the lower the cost of electricity: lowering this indicator will save on electricity, and if you hit the “ceiling” in terms of power consumption, this function will reduce the current consumption of video cards, and will make it possible to install additional cards if you are a miner . - Power Limit
– is responsible for the power consumption of the card. With higher overclocking, that is, if you want to greatly overclock the video card, then the power consumption must be added, otherwise the card will not hold the frequencies and reset them to the factory ones. The indicator is often blocked. Below we will tell you how to unlock it. - Temp. Limit
– the slider responsible for the critical temperature of the video card. If this indicator (set by you) is exceeded, the video card will reset the frequencies (go into throttling). - Core Clock (MHz)
– this is the overclocking of the frequency of the GPU (graphic processor) of the video card. This overclocking is necessary to increase the hashrate of your video card during mining or to increase performance (FPS) in games. - Memory Clock (MHz)
– This is the overclocking of the video card memory. Usually this gives a small increase in games, but in mining the increase is noticeable. Especially in ethash algorithm. - Fan Speed
- slider responsible for the speed of rotation of the fans of the video card. Where 100% is the maximum rotation speed and 0% is the minimum rotation speed. If Fan Speed is locked, then it must be unlocked by clicking on the word “Auto”, which is located next. In the “Auto” mode, the fans will automatically set the percentage of the load, depending on the temperature of the GPU. But when mining in the “Auto” mode, this indicator will almost always be 100%, since the mining process itself heats up the video card a lot. Fan Speed - if your video card gets very hot, we still do not recommend setting 100% speed, as this will exhaust the cooler resource faster (and this is one of the most common breakdowns). - Button that opens advanced settings
. - GPU core temperature.
If there are multiple video cards in the farm, the last selected video card and its temperature are displayed. - Start Up
– allows you to add msi afterburner to startup. If the icon is circled (in this case, red, but it can also be a different color, since you can install a different theme), then MSI Afterburner will automatically start when you turn on the computer (farm). - Profile
– These are indicators from one to five. They are responsible for saving your configuration. That is, you can set the desired overclocking (memory, core), the desired fan speed, and so on, and save it to any number from 1 to 5. If the “Start Up” function is active, then when you reboot or turn on your farm, it will immediately apply all settings to the video cards you have specified.
When increasing the overclocking of the video card in memory and in the core, it is best to add 10 units each.
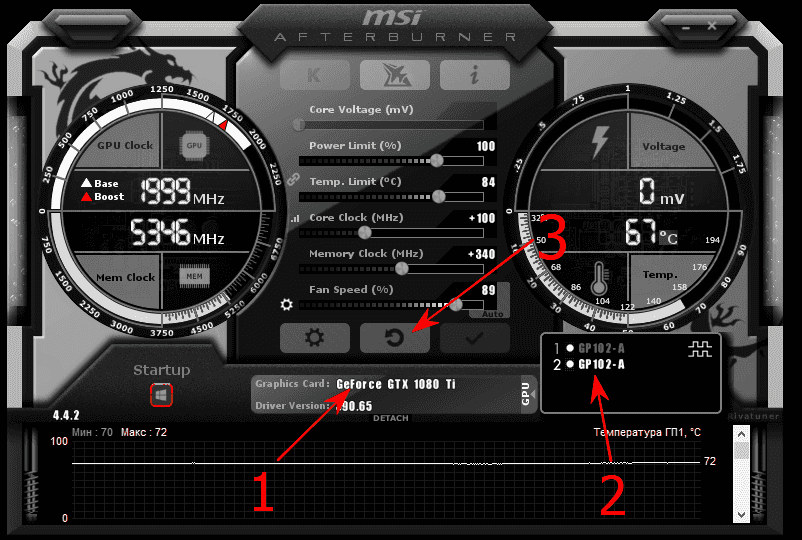
- Name of the selected video card
- When you click on the word “GPU”, a list of all video cards will appear. Choose each card in turn and set overclocking and cooler rotation speed for it.
- Reset all overclocking settings to factory settings.
You can also overclock video cards directly in the miners. See overclocking examples:
How to overclock and reduce card voltage in PhoenixMiner
How to overclock and reduce voltage in Claymore Dual Miner
how to overclock msi afterburner graphics card
With the AF app, you can adjust:
- Memory and core frequency.
- Cooler rotation speed.
- Power consumption limit.
- Core voltage.
After installation, open the program as an administrator and make sure that it correctly displays all the video cards in the rig.
By default, the panel will display the parameters of the first graphics accelerator. If all cards are of the same model, you don’t need to configure msi afterburner overclocking for each of them separately. The settings of the first map will be applied to the rest. But, if you want to set the frequencies of each device separately, click the gear icon button on the left under the Fan Speed bar to open the settings menu, and uncheck ” Synchronize same GPU settings “.
In the same window, unlocking voltage control and expanding overclocking parameters are available. To avoid malfunctions, the last option is not recommended when setting up mining farms assembled from radically different models of video cards. Now let’s start setting up msi afterburner for mining. We start with Core Clock and Memory Clock.
Important ! The parameters should be changed gradually by no more than 5-10 points. A sharp change in the frequency of the memory and core will lead to a freeze, a reboot, a driver crash, and, possibly, to a breakdown of the video card itself.
The easiest way is to first look for the parameters recommended for this GPU model on thematic forums and set them before launching. If the result does not suit you, or you do not find the information you need, select the frequencies yourself. Just keep in mind that memory from different manufacturers, such as Hynix or Samsung, can be installed on the same model, and then the overclocking parameters will be slightly different.
This is interesting: How to restore Skype – return access to your account
GPU overclocking
Now you can proceed directly to overclocking. The process of overclocking a video card through MSI Afterburner includes 3 stages:
- Overclocking the GPU (Core Clock).
- Overclocking video memory (Memory Clock).
- Overclocking the GPU and video memory together.
The first two stages allow you to determine the maximum overclocking values that can be used for the GPU and graphics card memory. And at the last stage, it is checked how it all works together. At each stage and after each change of parameters, the video card is tested. If everything is fine, you can continue, but if problems arise, then you need to return and reduce overclocking.
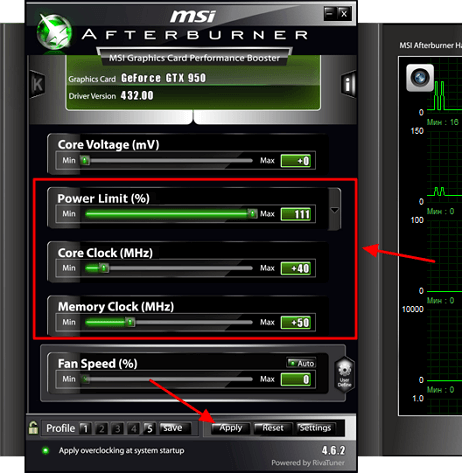
Step #1 We will start by overclocking the GPU. To do this, set the Power Limit to the maximum and increase the Core Clock by 40-50 MHz. After that, save the settings using the “Apply” button.
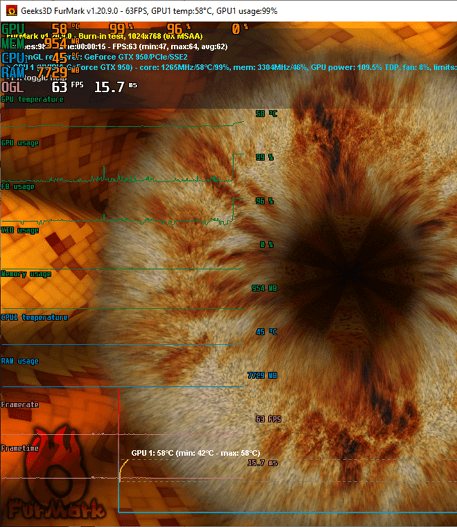
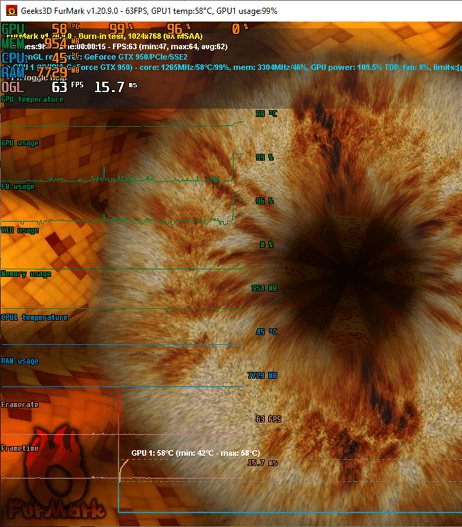
Step number 2. We start stress testing the video card in the FurMark program and observe for about 5 minutes. If there are no problems during stress testing (artifacts, crashes, freezes, overheating), then we launch some heavy game and play for 30-60 minutes . At the same time, we regularly monitor the temperature of the video card. It is desirable that the temperature does not go beyond 80 degrees. If there are problems during stress testing, then we slightly reduce the Core Clock and run the stress test again. If everything is fine, we test in games.
Step number 3. After the first successful increase in Core Clock, you can repeat the procedure. We again increase the frequency of the graphics chip (this time by 10-20 MHz), click “Apply” and go to step number 2 (stress testing and then games).
Then we repeat steps 2 and 3 until we determine the maximum Core Clock frequency with which the video card can work. It is very important to increase the frequency gradually and in small steps while testing after each step. This is the only way to correctly and safely determine the maximum overclocking at which the video card remains stable. After determining the maximum frequency, it must be reduced by 10 MHz just to get 100% stability.
Overclocking the video memory of the video card
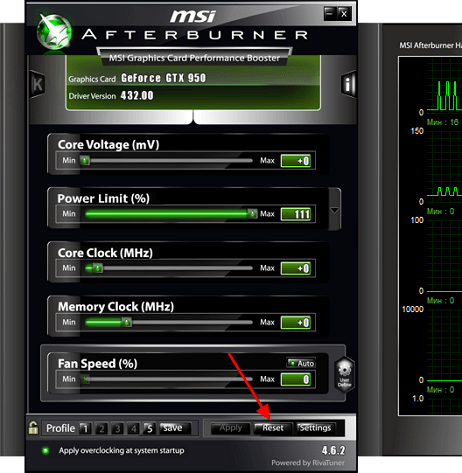
Step number 4. Now let’s move on to overclocking the video memory (Memory Clock). We remember the maximum value of Core Clock, which we determined earlier, and reset the settings using the “Reset” button.
Step No. 5. Increase the Power Limit again to the maximum and slightly increase the Memory Clock value (for example, by 50-80 MHz). Then apply the settings.
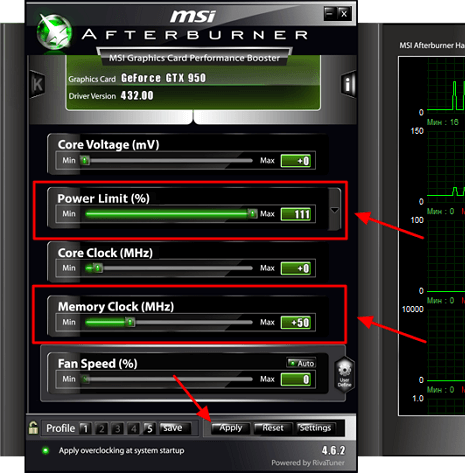
Step #6. We test the stability of the video card first in the FurMark stress test, and then in games. Everything is exactly the same as in step number 2. If there are problems, we reduce the memory frequency and test again.
Step 7. If no problems are found, then go back to step 5 and increase the memory frequency a little more. Then we test again (step number 6). Then we repeat steps 5 and 6 until we find the maximum frequency of video memory with which the video card works stably.
The resulting maximum video memory frequency can be further reduced by 10-20 MHz to ensure stable operation.
Final overclocking test
Step #8. After determining the maximum frequency for the GPU and video memory, you need to check how it all works together.
Therefore, we set the Power Limit to the maximum and indicate the maximum values \u200b\u200bof Core Clock and Memory Clock, which were determined earlier. After that, we apply the settings and repeat the testing in the stress test and games. If there are problems, then we slightly reduce the frequencies of the GPU and memory to increase stability, and test again.
You can also improve stability by increasing the voltage using the Core Voltage parameter. You need to be especially careful here, as increasing the voltage can lead to overheating or damage to the GPU. We do not recommend using this option unless you have sufficient experience.
If there are problems with temperature, then you can increase the speed of the coolers. This will increase the noise level, but improve cooling. More details about this in the article “How to set up coolers in MSI Afterburner”.
This completes the overclocking of the video card. We determined the maximum frequencies for the GPU and graphics card memory and tested how the overclocking of these two components works together. Now you just need to save the results of your work.
Saving video card overclocking results
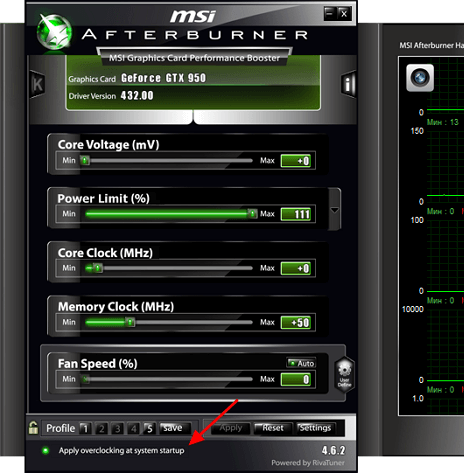
In order for the current graphics card overclocking settings to work every time you start MSI Afterburner, you need to enable the “Apply ovecloking at system startup” option, which is located at the very bottom of the program window.
You also need to go to the settings and on the “General” tab, enable autoloading of the MSI Afterburner program.

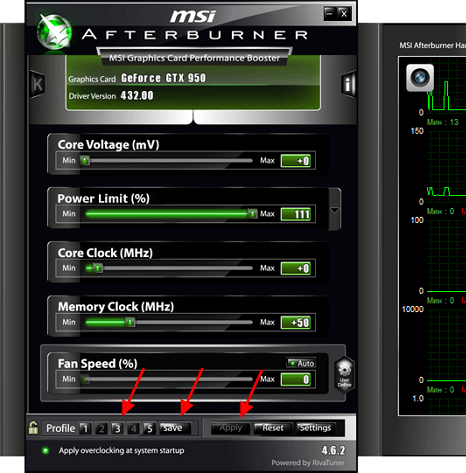
In addition, it will not be superfluous to save the current graphics card overclocking settings as a profile. To do this, click on the “Save” button, double-click on the profile and click “Apply”.
If necessary, the graphics card overclocking profiles saved in MSI Afterburner can be activated using key combinations or automatically when starting games. To do this, go to the program settings and go to the “Profiles” tab.
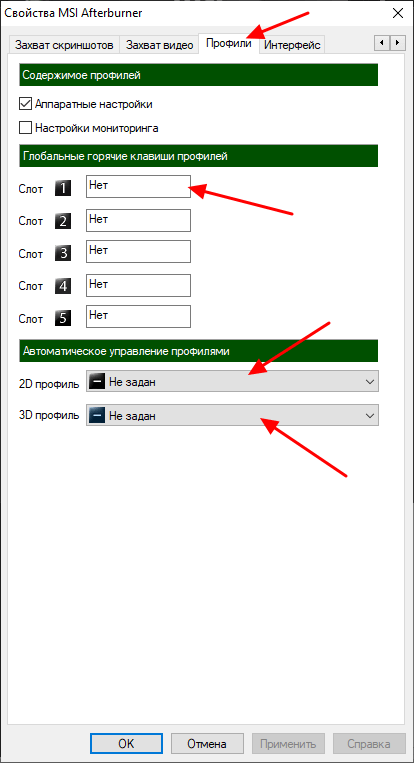
Here you can specify keyboard shortcuts for each of the 5 profiles, as well as select 2D and 3D profiles. The 2D profile is the profile that will work normally, while the 3D profile is the profile for games and other 3D applications.
Creating an Overclocking Profile
All overclocking profiles are created individually for each farm and cannot be shared with other farms. You can create an entire farm profile or a specific worker profile. Work settings will always override any farm-wide settings. For example, this way you can set the optimal desired settings for the entire farm, and then fine-tune each installation individually.
To add a new profile, go to the Overclocking Profiles tab of your farm and click the Add Overclocking Profile button. In the Save Overclocking as Template window, enter a name for the profile and click Save.

You have created a template that will later be used by specific workers or your entire farm. This template can then be copied and modified for different combinations of miners or algorithms.
The template we created will be used by all your GPUs, but the settings are different for Nvidia and AMD. You can have separate sets of settings for both GPU types in the same profile if your setup works with both Nvidia and AMD GPUs, and they will apply to each GPU type individually.
To change the overclocking profile, click the plus sign next to your profile name and follow the instructions below depending on your GPU type.
OC Template Editing
How to Optimize Power Consumption with MSI Afterburner
There are two ways to reduce power consumption on Nvidia graphics cards using MSI Afterburner:
- By reducing TDP – power limit (power limit);
- By manually setting a constant voltage and frequency on the GPU core on a curve (curve) of voltage and frequency. In common parlance, this method is called “curvy” from the consonant English name of the graph – curve.
This is interesting: How is online learning of fast typing by touch typing on a typing simulator
Reducing the power limit (Power Limit) of Nvidia video cards in MSI Afterburner
This is the easiest way to manage the power consumption of Nvidia graphics cards, which allows you to achieve good results and optimize consumption.
To reduce consumption, you need to reduce the voltage on the GPU core to such a value that the stable operation of the miner is still ensured. For algorithms that are not demanding on the core frequency (Ethash, formerly called Dagger Hashimoto), to reduce consumption, you can reduce the core frequency further (to about 1100 MHz), which will further reduce power consumption.
Other algorithms may require a higher core frequency. Typically, most Nvidia graphics cards can handle about 150 megahertz (+150 Mhz) core clocks and +500 megahertz or more memory clocks (if you’re lucky with the memory chips).
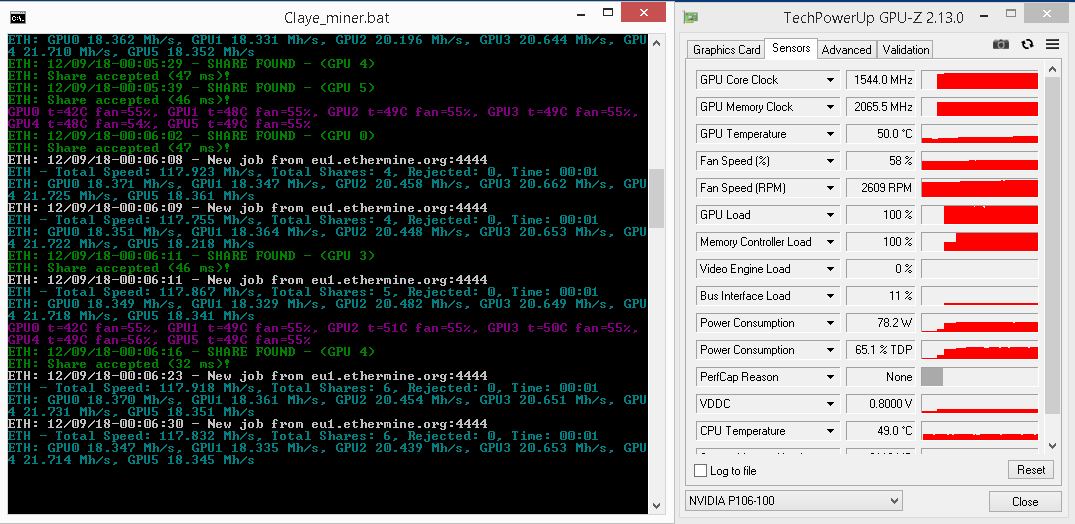
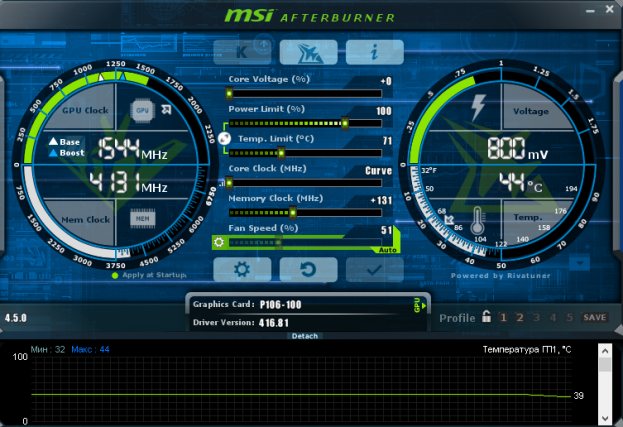
Screenshot of the MSI Afterburner program when downvolting the P106-100 (MSI GTX1060 6 Gb mining edition) video card by lowering the power consumption limit to 65% (800 mV core voltage reached):
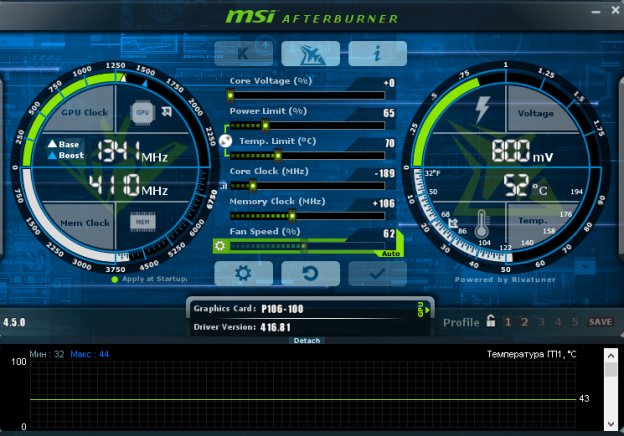
After setting the core and memory overclocking parameters using the frequency sliders, to reduce the consumption of video cards during mining, you need to lower the TDP of video cards .
A value of 100% Power Limit gives the largest hash rate at high consumption, heat generation and noise from coolers. Setting this value in the range from 50 to 75% allows you to set the optimal voltage on the core with a slight decrease in the hash rate. At the same time, the voltage on the core and its frequency will automatically fluctuate to maintain the set limit value, which will also be reflected in the hashrate.
Screenshot of Phoenix Miner mining Ethereum solo at 65% TDP:
To ensure a stable voltage on the core, a method is used to set a constant voltage and frequency on the core on the curve (curve) of the voltage and frequency of the GPU core.
Downvolting Nvidia graphics cards with a whore
With this method, set the desired video memory overclocking with the slider in the main window of MSI Afterburner, leave 100% Power Limit, move the core frequency all the way to the left (-400Mhz) and click on the graph in the form of three columns in the core frequency line (Core Clock):
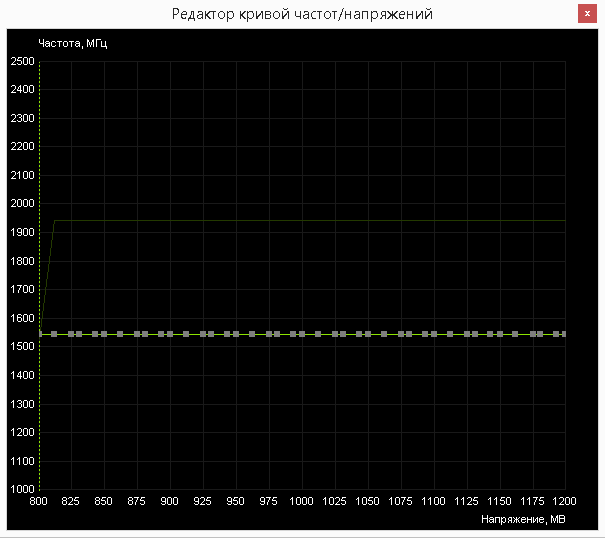
A window will appear that allows you to adjust the dependence of the frequency and voltage on the core of the video card:
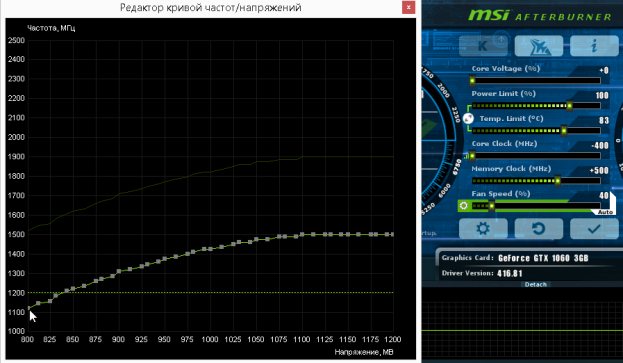
In the window that appears, drag the beginning of the graph of the core voltage and frequency from the value of 800 mV to the frequency value a couple of megahertz higher than the maximum values of the graph:
Then click the Apply button in the MSI Afterburner window:

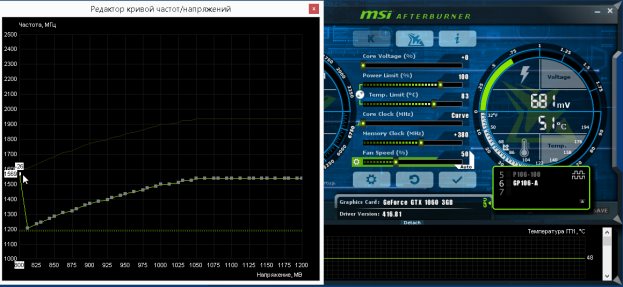
A stable graph of the dependence of the frequency and voltage on the core of an Nvidia video card in the MSI Afterburner program (core voltage – 800 mV at a core frequency of 1550 MHz) looks like this:
Similarly, you can set a stable value for any frequency and voltage at which the video card can operate.
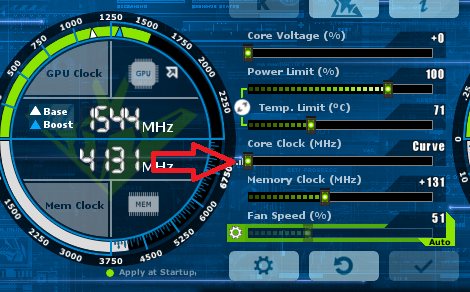
Screenshot of MSI Afterburner for P106-100 graphics card with 800mV curvy value at 1544MHz core clock:
Cooler speed settings in MSI Afterburner
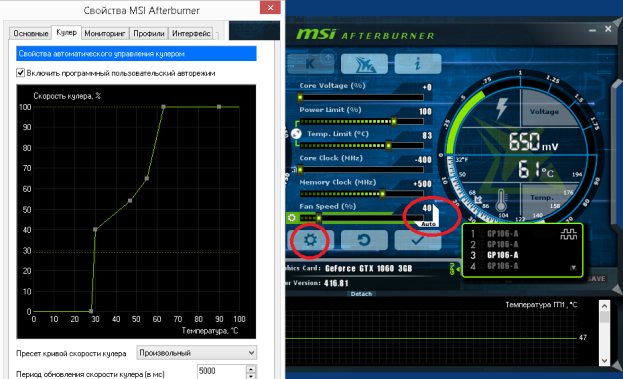
In MSI Afterburner, you can also set a graph of cooler speed versus temperature. To do this, click on the gear button in MSI Afterburner, set the desired shape of the cooler rotation graph depending on temperature, and do not forget to activate the button for automatically applying these values (the Auto button should turn green).
Screenshot of MSI Afterburner when adjusting the rotation speed of the coolers:
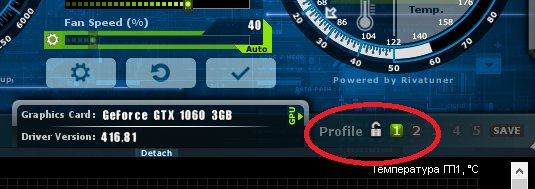
Overclocking, downvolting and cooler speed values can be written to overclocking profiles, which will be automatically loaded when the rig is turned on (when the corresponding items are activated in the program settings window):
Managing the consumption of Nvidia video cards with the Nvidia Inspector and NVIDIA Profile Inspector programs
The main advantage of NvidiaInspector is the ability to set the GPU Core voltage to less than 800 mV, which significantly reduces the gluttony of video cards.
The NVIDIA Profile Inspector utility can be downloaded here: https://www.guru3d.com/files-details/nvidia-profile-inspector-download.html.
Both of these programs require NET Framework 2 or higher to be installed on the operating system.
In order to manage the core voltage of Nvidia video cards using the Nvidia Inspector and Nvidia Profile Inspector utilities, it is advisable to disable other video card management utilities on the required GPUs, including MSI Afterburner.
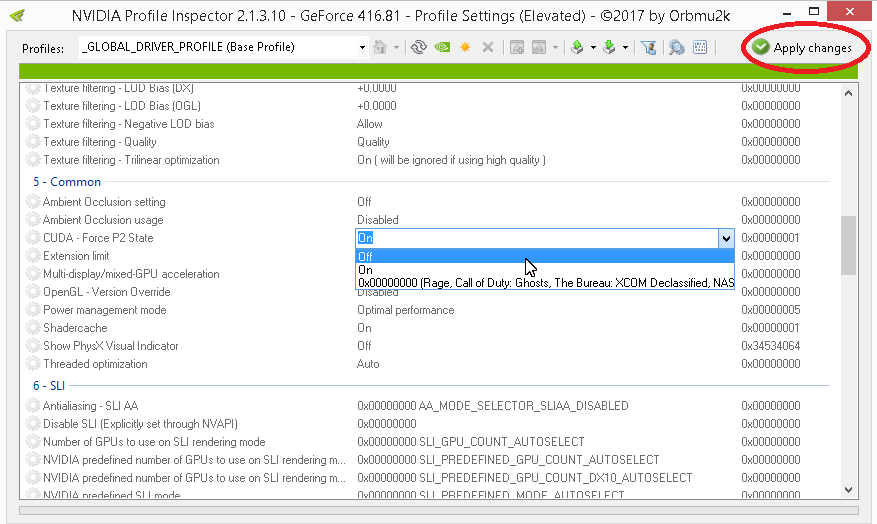
If the CUDA – Force P2 State (maximum performance) mode is enabled on video cards, it is turned off using the NVIDIA Profile Inspector program. With the P2 mode always on, you need to use twice the core and video memory overclocking values. If this mode has not been manually disabled, then it is usually enabled by default.
Screenshot of NVIDIA Profile Inspector in the CUDA – P2 State mode control section:
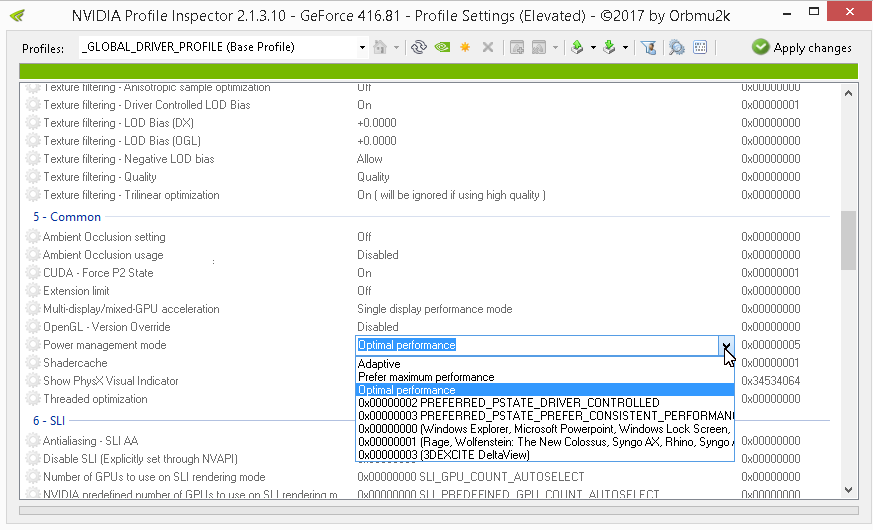
In addition, to increase the hashrate in the NVIDIA Profile Inspector program, you can adjust the power management mode value by setting it to Prefer Maximum Performance. To save energy, this value can be set to optimal or adaptive.
Screenshot of the NVIDIA Profile Inspector in the Performance mode control section:
The Nvidia Inspector program allows you to do the following:
- Lower core voltage to save electricity.
- Overclock the core of the video card to increase the hashrate.
- Set the desired rotation speed of video card coolers to maintain the desired temperature (preferably up to 60 degrees, which minimally wears out the electronic components of the video card).
This is interesting: How to completely remove Yandex browser from a computer and Android
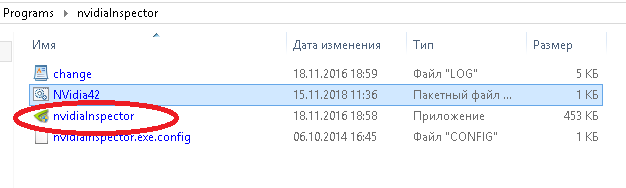
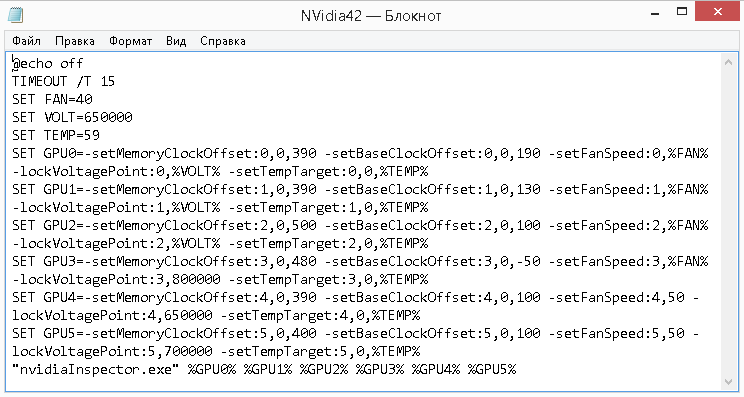
To use NvidiaInspector, you need to create an empty text file in the same folder where it is installed. In its text part, you need to insert the following lines (for a rig of 5 video cards, they are counted from 0 to 4):
@echo off
- TIMEOUT /T 25
- SET FAN=44
- SET VOLT = 660000
- SET TEMP=60
- SET GPU0=-setMemoryClockOffset:0,0,380 -setBaseClockOffset:0,0,190 -setFanSpeed:0,%FAN% -lockVoltagePoint:0,%VOLT% -setTempTarget:0,0,%TEMP%
- SET GPU1=-setMemoryClockOffset:1,0,380 -setBaseClockOffset:1,0,130 -setFanSpeed:1,%FAN% -lockVoltagePoint:1,%VOLT% -setTempTarget:1,0,%TEMP%
- SET GPU2=-setMemoryClockOffset:2,0,510 -setBaseClockOffset:2,0,100 -setFanSpeed:2,%FAN% -lockVoltagePoint:2,%VOLT% -setTempTarget:2,0,%TEMP%
- SET GPU3=-setMemoryClockOffset:3,0,490 -setBaseClockOffset:3,0,-50 -setFanSpeed:3,%FAN% -lockVoltagePoint:3,800000 -setTempTarget:3,0,%TEMP%
- SET GPU4=-setMemoryClockOffset:4,0,380 -setBaseClockOffset:4,0,100 -setFanSpeed:4,50 -lockVoltagePoint:4,650000 -setTempTarget:4,0,%TEMP%
- «nvidiaInspector.exe» %GPU0% %GPU1% %GPU2% %GPU3% %GPU4%
Then change the extension of this file to BAT, create a shortcut to this file and place it in the startup folder of the rig. Typically this is C:UsersusernameAppDataRoamingMicrosoftWindowsStart MenuProgramsStartup.
To set up a batch file for a specific mining rig, set the following parameters in it:
- TIMEOUT /T 25 – time in seconds to delay the launch of NvidiaInspector (in this case 25 seconds);
- SET FAN=44 – video card fan speed, in percent (here – 44%);
- SET VOLT=660000 – voltage at the core of the video card, in millivolts (in this case, 660 mV);
- SET TEMP=60 – target video card temperature (60 degrees);
- SET GPU0 – parameters for the first video card (numbering starts from zero);
- -setMemoryClockOffset:0,0,380 – GPU memory overclock (+380 MHz in this case). Usually Hynix memory can be overclocked up to 400-550 Mhz, Micron – up to 500-700 MHz, and Samsung – up to 650-850 Mhz;
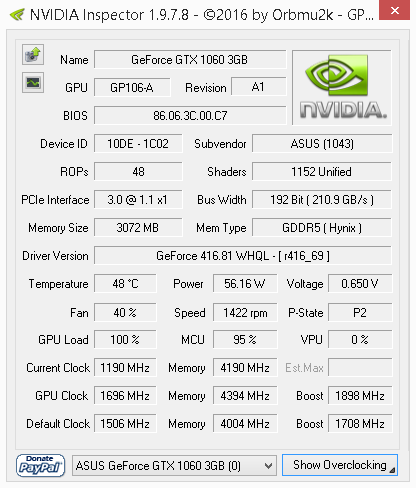
- -setBaseClockOffset:0,0,190 – core clock overclocking (+190 MHz here). To ensure a high and stable hash rate, it is better to set the frequency of video cards to at least 1100 MHz (for some video cards, including the 1080 series, this value can be higher). The voltage can be controlled in the Nvidia Inspector window (or in the HWinfo, Aida64 programs), which is launched by double-clicking on its file.
Screenshot of the Nvidia Inspector utility window, which controls the core voltage (Voltage = 650 mV), memory frequency and fan speed (to set the desired values, run a BAT file with the necessary parameters):
- -setFanSpeed:0,%FAN% – fan speed (in this case, for a zero-score video card, it is equal to the value set in SET FAN=);
- -lockVoltagePoint:0,%VOLT% – core voltage (in this case, for a zero video card, it is equal to the value set in SET VOLT=);
- -setTempTarget:0,0,%TEMP% – target temperature (in this case, for this video card it is equal to the value set in SET TEMP=).
Screenshot of the BAT file for using NvidiaInspector for a rig with 6 video cards:
By properly lowering the core voltage, you can significantly reduce the consumption of video cards while maintaining an acceptable hashrate. This is especially true now, with the low exchange rate of most cryptocurrencies and a general decrease in the profitability of mining.
When the rig is unstable, you need to look through the miner logs, find the problematic video card and either increase the voltage on its core, or reduce the overclocking of the core and video memory. Usually, with a strong overclocking on the core, the entire rig hangs, and when overclocked from memory, only the miner freezes.
Pch core voltage what is it
Table of contents
Introduction
This article will provide a general guide to overclocking Intel Core processors with Haswell architecture for the LGA 1150 socket.
After reading the above articles, beginners or even experienced overclockers may have questions: “Where is the best place to start overclocking Haswell K series?” and “What is the sequence of steps needed to overclock a Haswell K series?” The answers to these and other questions are given below in the format of a simpler presentation of the experience of the forum participants already accumulated at the moment and the results of the laboratory tests.
A bit of theory
Before starting the overclocking process itself, it is necessary to brush up on the features of the new Intel solutions.
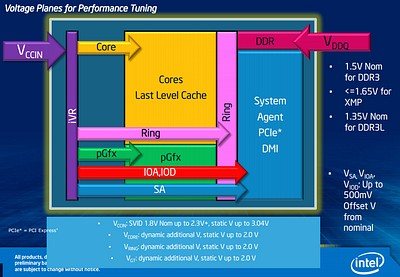
What does it change for the user? First of all, now four-phase, relatively budget motherboards are capable of a serious level of CPU overclocking, to achieve which previously it was necessary to purchase expensive motherboards with six or more phases of the CPU power subsystem. This became possible due to the fact that now a higher level of supply voltage is supplied to the processor by the motherboard – 1.8 V, instead of the previous 1 V. In the picture above, the voltage input is designated as Vccin.
Vccin 1.8V is fed into the CPU by the integrated iVR power regulator, where it is last converted by 320 phases to various voltage levels for various nodes within the CPU.
From school, we should have known that power is equal to the product of voltage and current. Let’s compare the load on the CPU power subsystem of the motherboard at different voltages for 77 watts Ivy Br> Now let’s take the consumption data from the article “Studying the nuances” and calculate the loads for serious Haswell overclocking when the processor consumes 200 watts:
- 200 W / 1.8 V = 111.11 A.
It is the high current that dictates the need for a large number of power phases for successful overclocking. Looking ahead, I note that the Vccin level can be raised to 2.4 V (which was actually implemented in the laboratory), thereby unloading the power subsystem (VRM) even more:
- 200 W / 2.4 V = 83.3 A.
Since motherboard manufacturers today typically use a power subsystem (VRM) with an operating current of about 40 A per phase, it is easy to calculate that even for such overclocking, Haswell needs at least three phases of power supply. A sufficient amount, with a small margin, will be four phases. Of course, not marketing virtual phases, but real ones.
Prior to the integration of iVR under the CPU cover, phases on the motherboard were divided into different CPU nodes, such as iGPU, CPU cores, integrated memory controller. But now Haswell doesn’t have dedicated phases, all the power phases on the motherboard work together to provide power for the iVR CPU. RAM, as before, runs on a separate power phase, usually located next to the memory slots.
The integration of iVR under the CPU cover got rid of Vdrop – a drop in the supply voltage of the processor cores under load. Such a drop negatively affects the stability of the CPU, introducing it into an unstable voltage range. To eliminate this effect, the motherboard previously used a voltage drop compensation scheme – Load-Line Calibration. During overclocking, the compensation level had to be selected manually. Now iVR takes control of the voltage into its own hands, making life easier for the user.
Overclocking in practice
Good overclocking requires good cooling. So, to reach the heights of the frequency potential, BOX-versions of coolers are definitely not suitable and you should pay attention to tower structures on heat pipes in the price category from
$40. Many of these solutions have previously been considered in the laboratory.
In addition, as the practice of previous overclocking articles has shown, it is difficult to achieve high frequencies on a Haswell CPU due to the standard thermal interface under the CPU cover.
Before overclocking, you can try to evaluate the potential of your processor. To do this, you need to reset the system board settings to the factory state. This can be done with a jumper on the motherboard or from the BIOS by loading the default settings. At the same time, it should be noted that some manufacturers equip their motherboard models with physical switches for power saving modes and preset overclocking profiles. Economy and overclocking must be disabled. For details, please refer to the instructions for the board.
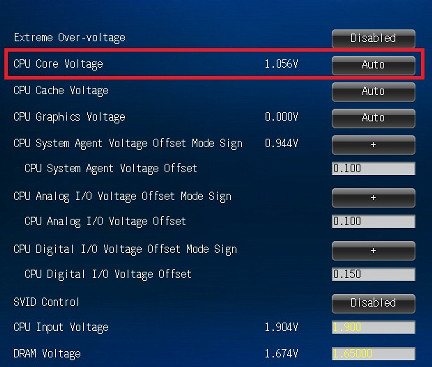
After resetting the processor, the processor will operate at its nominal frequency and iVR will assign it a base voltage, which can be seen as Vcore in the BIOS and in the voltage monitoring section.

There is some dependence of the Haswell overclocking potential on the base voltage. Exact statistics have not yet been collected, due to the novelty of the platform, but the following approximate trend can already be traced, seen on scalped processors with “liquid metal” under the lid.
| Base Voltage | Processor rating | Overclocking forecast |
| 0.900-0.999 | Very lucky | 4800-5000 at 1.3 V |
| 1.000-1.020 | Good | 4800 at 1.35 V |
| 1.020-1.040 | Middle | 4600 at 1.4 V |
| 1.040-1.060 | Below the average | 4600 at 1.4 V |
| 1.060-1.100 | Bad | 4400 at 1.4 V |
| 1.100 and above | No comments | 4200 at 1.4 V |
However, there is a contradictory practice among several owners of Haswell models on our forum, when a CPU with a frankly bad forecast overclocks no worse than a processor with a good forecast at close Vcore voltages for both. Therefore, one cannot fully rely on such a prediction technique, but one should not ignore it either.
Let’s start with the voltages of various processor nodes and their conditionally permissible limit levels. Experienced by enthusiasts over the years, it has been found that it is more or less safe to exceed the voltage during overclocking by 20-30% of the nominal level. However, the manufacturer itself does not give any guarantees, since overclocking is not a regular mode of operation. However, Intel offers to “insure” the CPU for a small fee.
| Permissible voltage levels Haswell | |||
| Voltage type (possible names) | Maximum for air and liquid cooling | Destination Description | Impact and purpose of the change |
| Vccin (iVR или VRIN) | 2.4 V | Voltage supplied from VRM mat. boards on iVR CPU | You should keep it approximately equal to Vcore + 0.5. In addition, voltages above 2 V can stabilize the CPU during strong overclocking, even with delta violation of 0.5 |
| Vcore | 1.45 V | Voltage supplied from iVR to CPU cores | Processor stabilization. You should not exceed the threshold of 1.45 V. For 24/7, it is advisable not to go beyond 1.4 V. High probability of CPU failure at values above 1.45 V |
| Vring (CPU Ring Cache или Uncore) | 1.35 V | Ring bus voltage inside the processor, from iVR | To overclock the ring bus and stabilize CPU overclocking |
| Vsa (System Agent) | Offset +0.200 | System agent voltage, from iVR | Should be increased when overclocking RAM. You can slightly increase to improve the overall stability of the system. Start with +0.025 V |
| Vioa (CPU I/O Analog) | Offset +0.200 | CPU analog I/O voltage, from iVR | Should be increased when overclocking RAM. You can slightly increase to improve the overall stability of the system. Start with +0.025 V |
| Viod (CPU I/O Digital) | Offset +0.200 | CPU digital I/O voltage, from iVR | Should be increased when overclocking RAM. You can slightly increase to improve the overall stability of the system. Start with +0.025 V |
| Vddq (DRAM Voltage) | 1.75 V | RAM voltage, from mat. fees | Should be increased when overclocking RAM. When using an XMP profile, you do not need to increase |
| PCH (PCH Core Voltage) | 1.15 V | Voltage for PCH | Usually it is not necessary to increase, except for cases of overclocking on the bus |
How to Adjust GPU Fan Speed in MSI Afterburner
After installing and running MSI Afterburner, you should see an interface similar to the screenshot below.
If your interface is different from what is shown in the screenshots, then you can change it. To do this, go to the settings, open the “Interface” tab and select the “Default MSI Afterburner v3 skin” option.

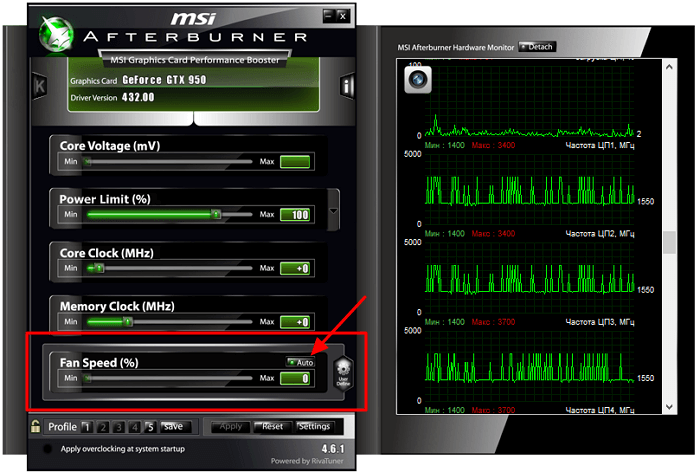
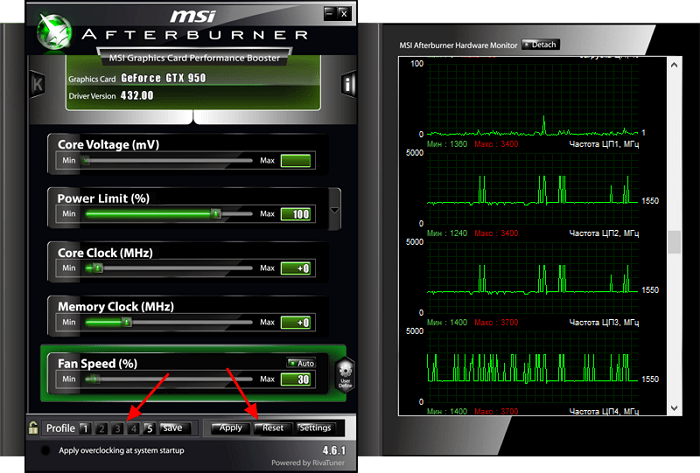
There is a “Fan Speed” option at the bottom of the MSI Afterburner interface. By default, this option works in “Auto” mode. This means that the video card itself controls the speed of its coolers. To switch to manual control mode, press the “Auto” button to turn off automatic mode.
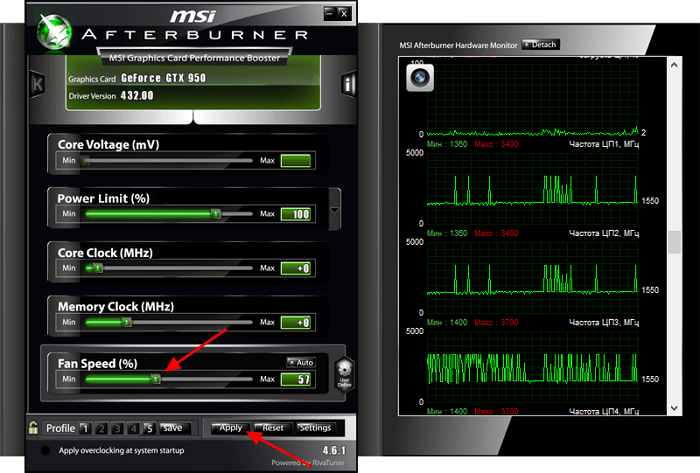
After that, you can manually set the speed of rotation of the cooler. To do this, move the “Fan Speed” slider and click on the “Apply” button.
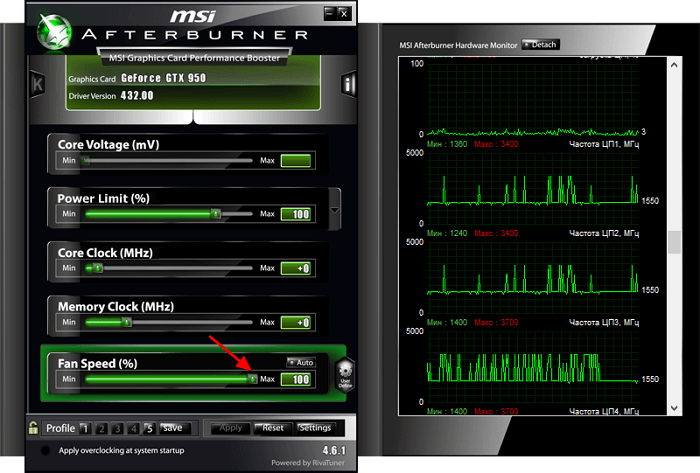
By specifying a value of 100%, you can check how the video card works at maximum cooler speeds, as well as estimate its maximum noise level.
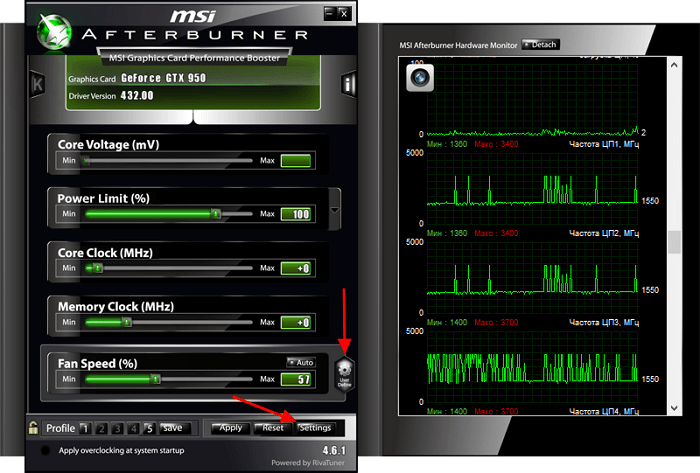
But the manual way to control coolers is not very convenient. Instead, it is better to set up a schedule that controls the cooler depending on the temperature of the graphics chip. To do this, click on the “User Define” button and go to the settings.
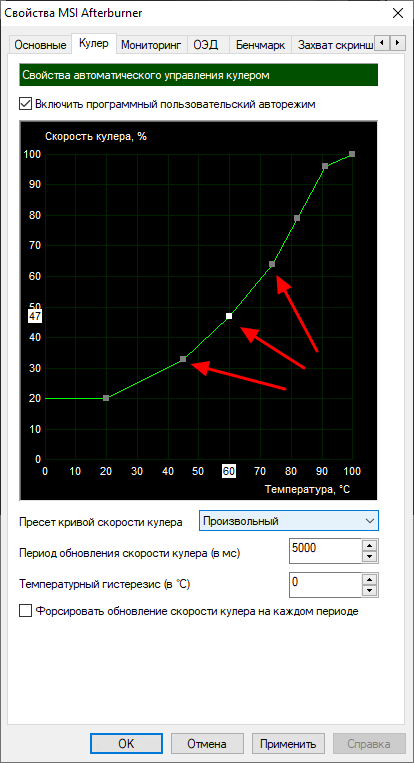
In the settings of the MSI Afterburner program, you need to open the “Cooler” tab. A graph will be available here for setting the speed of rotation of the video card coolers. The temperature of the graphics chip is shown horizontally, and the rotation speed is shown vertically as a percentage. Thus, the graph establishes at what speed the coolers will rotate at a certain temperature.
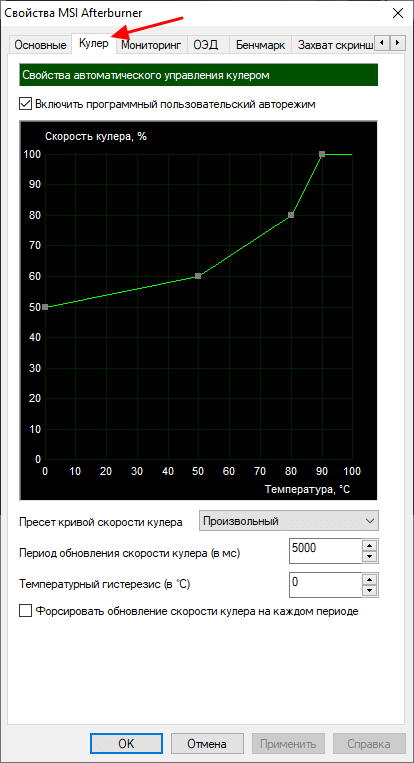
To adjust the speed of rotation of the video card coolers, you need to move the graph points to a suitable position and click on the “Apply” button.

If desired, you can click on the graph line and add a new point. This will make the graph smoother.
It will also not be superfluous to go to the “Basic” tab and enable MSI Afterburner to automatically start the next time you start the Windows operating system. Without this, the settings specified in MSI Afterburner will not work after a reboot.
If it seems to you that you have configured something wrong, then you can return to the default settings. To do this, MSI Afterburner has a “Reset” button.
You can also set up several different profiles and switch between them as needed.
[hide]
Related posts:
 Download Lexicon Alpha Driver Free Windows (10 &7) 64-bit bit
  Windows Drive is 100% charged in How to fix the problem
  GTX 1050 2GT VS RX 560 Hashrate: Overclocking | Settings (Shocking)
  How to prepare graphics card to calculating cryptocurrencies (whattomine)
  How to use the Favorites section in the TikTok app: Miracle Solution
  How to Increase HD 8570 2gb Mining: Overclock| Hashrate| PhoenixMiner 5.5C