Mining on Windows or on Hive OS, which is better?: Windows mining vs Hiveos/ Hiveos on Windows 10/ linux vs Windows Mining Hashrate/ Hiveos for windows – Are you not satisfied with Windows mining and want to upgrade to Linux OS, or have you already switched from Windows to Hive OS? If yes, then in this guide you will learn about the pros of switching to Linux and some mining tips for those who are already working with Hive OS.
What Will Be Discuss About – HiveOS vs Windows

- Is hiveos better than windows?
- Advantages and Disadvantages (Hiveos vs Windows mining)
- Should I Chose Windows or Hiveos?
- Hiveos vs Windows Hashrate
- Hiveos Windows or linux
- Hiveos on Windows 10
Everyone may share different experiences with Hiveos Vs Windows. The video below will explain why you may not like if you plan on signing up for Hiveos for windows.
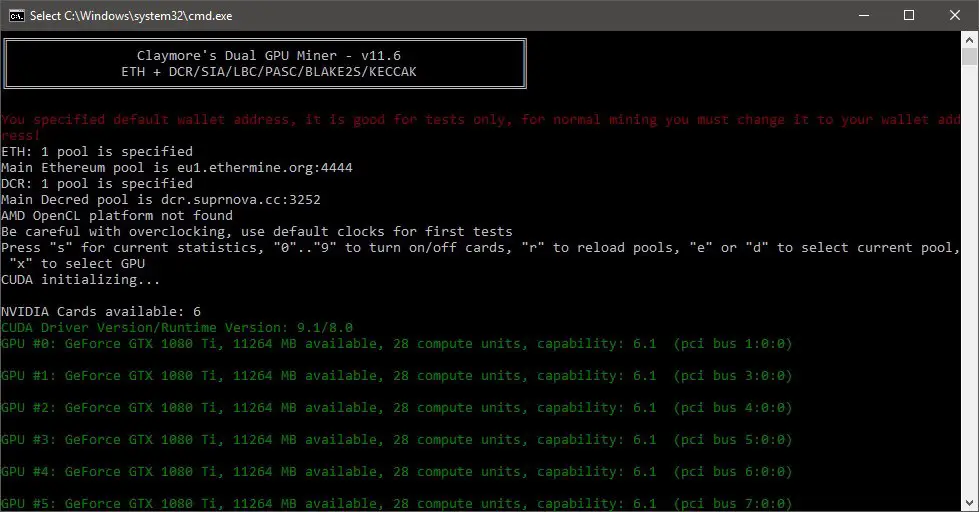
Why I use Windows for mining and not HiveOS
In this video I tell you all about my reasons for why I use Windows on all my crypto mining rigs instead of HiveOS. I think both operating systems have their pros and cons, but in my current situation Windows is just more preferable compared to HiveOS. Comparing Windows vs HiveOS for mining the main reasons I chose Windows is due to you guys.
Most of you use Windows for mining and so I want to be able to make good content that will help as many of you as possible. Plus in my opinion overclocking is a lost more visual in Windows which makes it easier for you guys to see in my videos. There are also a lot of great other mining YouTubers who use HiveOS, so I figure I’ll be the Windows guy 🙂
Dozens of Team Viewer windows, random reboots, blue BSOD screens, constantly downloading automatic Windows 10 updates, the lack of remote control is a thing of the past. Windows is undoubtedly the most popular operating system, but it is not convenient and not practical for mining cryptocurrencies. All of these disadvantages can be tolerated as long as you have one farm, but what if you have 100 or even 1000 installations?
As a solution to the problem, Hive OS was developed, which instead
gives this
Mining in Hive OS is much faster and more convenient than in Windows, since there is no need to download, update drivers for devices, various programs for mining cryptocurrencies, overclocking video cards and monitoring the system.
To burn the distribution, it is enough to use an 8 GB USB flash drive or an SSD disk. HDD, NVMe drives are also supported. You can download the system image, click on the “Install” link and select the desired distribution kit.
* We recommend installing the OS image to an SSD . SSDs are much more reliable and we recommend using them in a production environment.

So let’s see what you get by switching from Windows to Hive OS.
Comparison of Hive OS vs Windows OS
- To quickly change the miner or algorithm, you no longer need to go to each farm separately, to restart the miner with the necessary parameters, overload, wait for the drivers to be installed like in Windows;
- Thanks to the ability to work with a flash drive, you save on buying an SSD or hard drive;
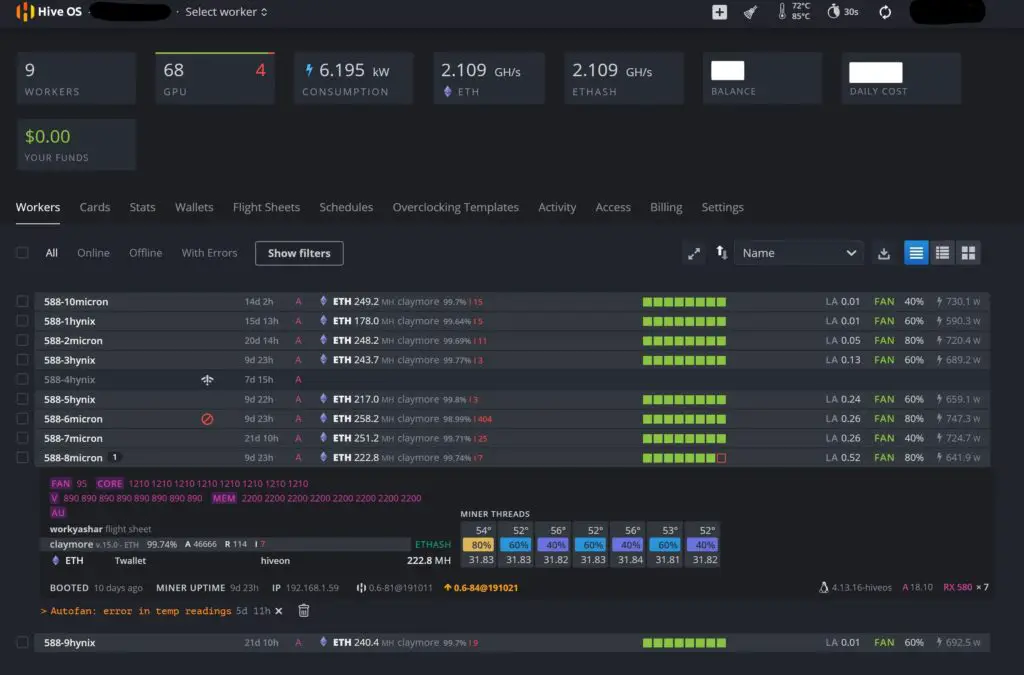
- You will be pleasantly surprised when you can easily and reliably run even 10+ GPUs in one system, control and manage your 1 or 1000+ GPUs and ASICs on one panel from anywhere via Hive;
- Hive OS provides robust stability and connectivity for an unlimited number of farms. Stability in Windows 10 is the weakest point in the entire comparison list due to the need for weekly (even daily) checks via TeamViewer or in person, otherwise your miner may be disabled and the number of downtime will increase week after week. Do you know that time is money, nowhere else than in the mining business;
- Another strong advantage of Hive OS is Flight Sheets . They allow you to create presets for operating parameters and switch between them on the fly with a few clicks. You can create multiple combinations of coins, wallets, pools and miners and switch between them on the fly and you can have more than 2 miners on one sheet;
- Each user account can have multiple farms in the Hive OS. Farms can be transferred to other users as a whole, so it is easy to set up a farm for a client and make it an owner or organize your own business;
- Hive is your Swiss knife for monitoring, controlling and managing all your farms from a single web interface, from anywhere in the world via the Internet.
If you’re already using Hive OS but have previously used Windows, we’ve put together a few tips to help you on your daily adventures.
What are the Advantages and Disadvantages: HiveOS vs Windows

PROS –
- Simple setup, install and you can start mining cryptocurrencies.
- It’s free if you connect between 1 and 3 rigs to mine.
- If you connect up to 3 rigs, you can mine Ethereum or Ethereum Cassic from the Hiveon Pool at no additional cost for pool usage.
- You can schedule alert notifications with the Hive OS Telegram bot and find out minute by minute the status of your machines.
- It allows you to mix AMD and Nvidia video cards on the same rig, something that other operating systems do not do.
- It allows to restart the miners remotely in an efficient way.
- Supports Windows, Mac and Linux.
CONS
- From 4 rigs you pay USD 3 per rig or USD 2 per ASIC, a little more than other operating systems of this type.
- It is difficult to find disadvantages to this operating system for mining cryptocurrencies.
Tips for miners Hive OS: Why Should I Mine on HiveOS?
- Reduce overclocking if something falls off.
- Check risers.
- Check out Hashpower.
- Do not use flash drives if possible, SSD / HDD only.
- Always turn on two-factor authentication. If you don’t, your chances of being hacked are increased.
- Check your motherboard BIOS settings for CSM support enabled, 4G Above Decoding, set PCI-E Link (PCI-E Gen) speed to Gen2, disable unused devices such as onboard sound card, etc.
Other Hive OS features worth looking out for:
- Hashrate Watchdog, which overloads the miner or the entire farm when the hash drops;
- Supports hardware watchdog timers such as OpenDev, WatchdogInUA, many Chinese models from AliExpress;
- A large number of miners are supported for AMD, NVIDIA video cards and even for the processor;
- Dual Miners;
- Scheduler;
- RX Boost;
- Real-time monitoring data;
- Statistics;
- Many interface things such as tags, filters, data export;
- Fast pool and miner switching;
- Individual configs for each type of miner;
- Telegram or Discord notifications;
- Hive OS is constantly being improved and updated.
In conclusion, in addition to all these features, Hive has a reward system that offers a 10% bonus as part of the referral reward system by exchanging referral links online through various social networks, online forums and blogs.
If you are interested in becoming apart of HIVEOS you can sign up by clicking the button below
Running and mining in HiveOS on Windows operating system
Many miners use the Windows operating system or HiveOS for mining. Both operating systems have their advantages and disadvantages, the discussion of which requires a separate article.
Most users are unaware that it is possible to use HiveOS directly under Windows. This is convenient for those who want to get familiar with this system. For those who want to take advantage of the Rocm drivers for AMD video cards and take full advantage of the computing capabilities of video cards, especially older types, you need to use a full-fledged HiveOS, and preferably Ubuntu. This driver still makes it possible to get 29-30 mh / s when mining Ethereum on R9 290 series video cards.
Unfortunately, this is not possible under Windows due to the significantly increased size of the DAG. Using HiveOS under Windows does not provide any benefit when using old maps.
How can I start mining on a HiveOS virtual machine under Windows 10?
To use the HiveOS OS from under Windows 10, you need to install the Hive OS client for Windows – a distribution kit that works as a virtual machine from under Windows. For this, the Cygwin application is used – a UNIX environment and command line interface for Windows.
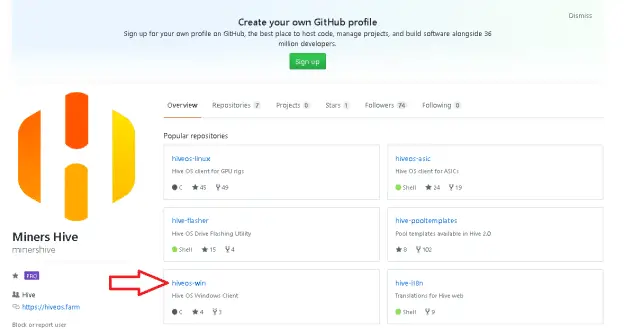
The finished application can be downloaded on Github and you can choose the version for Windows:
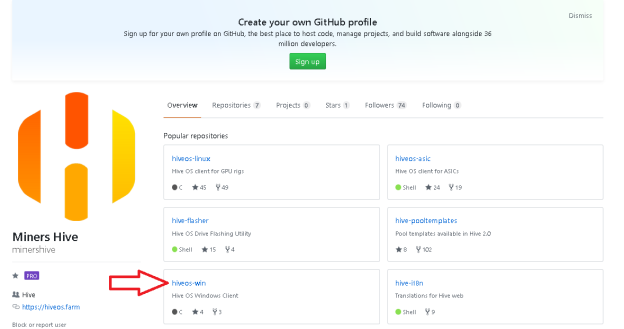
Here you need to select the Beta Image version and download the distribution kit as an archive:

There is currently beta version 0.1-01 on Github.
The newest beta distribution kit version 0.1-0.2 in exe format can be downloaded from the official HiveOS website at the link:
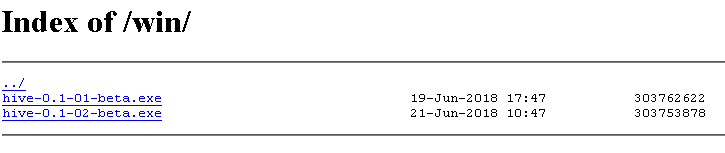
The archive weighs about 300 megabytes:

The exe file also weighs about 300 MB:

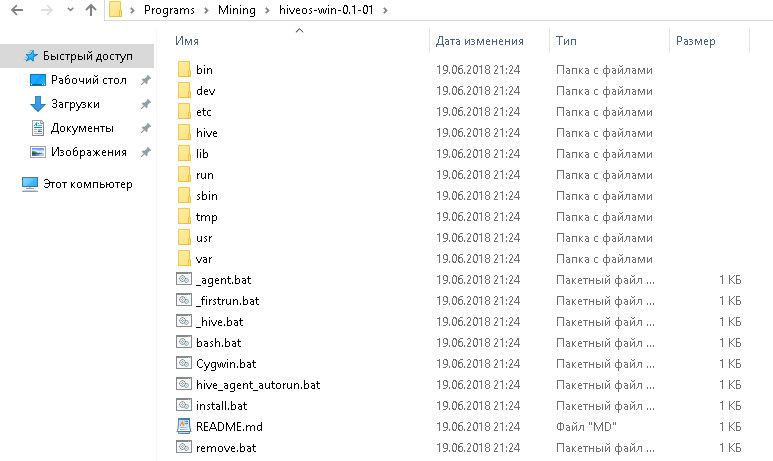
After downloading the HiveOS zip archive, you need to unzip the image and run the installation. The unzipped distribution weighs more than 500 megabytes, so you need to have enough space on the media.
If necessary, you can download versions of miners for Nvidia video cards at this address, or “dance with tambourines” and install the latest versions of miners manually.
While the archive is downloading, you can register on the hiveos website.
Register in HiveOS
Registration in HiveOS is done by filling in the required fields in the web interface:

After online registration, the HiveOS interface window will appear:
In it, you will subsequently need to create a RigID, set up flight sheets and configure the miners.
Installing the HiveOS image on the Windows 10 operating system
After unzipping the downloaded HiveOS distribution, it is installed on the Windows 10 operating system by running the install.bat file:
Some antiviruses may swear at the miners installed in the distribution, so you need to add the folder where HiveOS is installed to the exceptions.
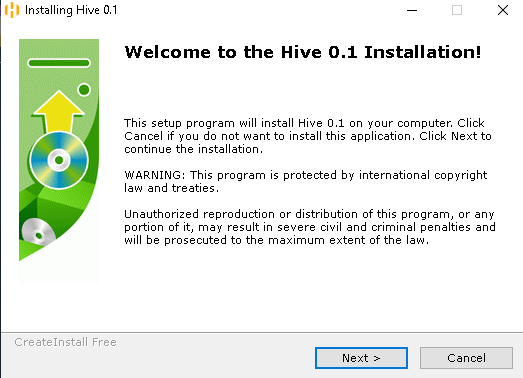
To install the newest version from the hive-0.1-02-beta.exe executable file (downloaded from the main site), run it and sequentially perform the steps prompted by the installer:
In beta versions of HiveOS under Windows, it is not possible to select a custom folder, you must use the path C:cygwin64 provided in the installer:
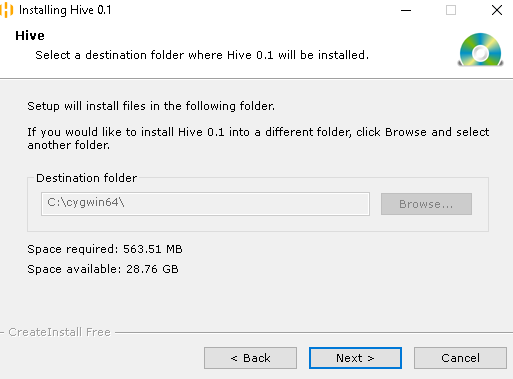
Before installation, you need to add this folder to the antivirus exclusion list, since most miners are defined by them as malicious.
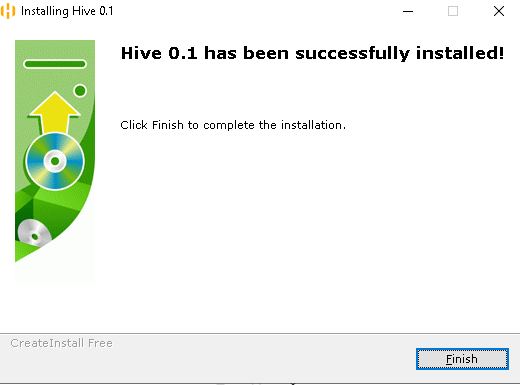
The installation process itself takes several minutes, after which you need to click the Finish button:
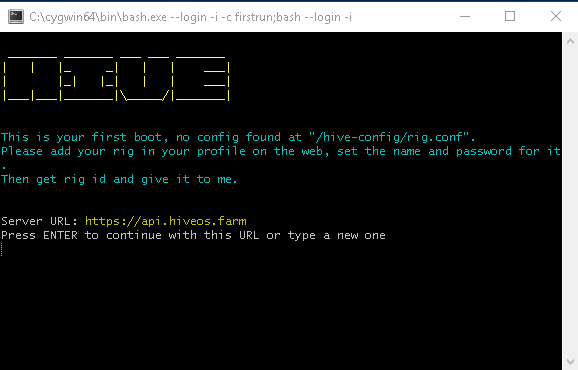
After that, the operating system console for mining HiveOS will appear, which runs under Windows:
At the same time, the GPU-Z program, which is used by the system to collect statistical information about the state of the system, will start.
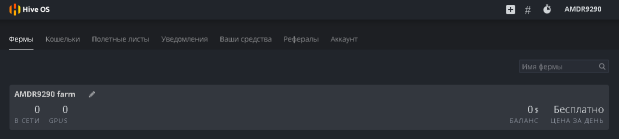
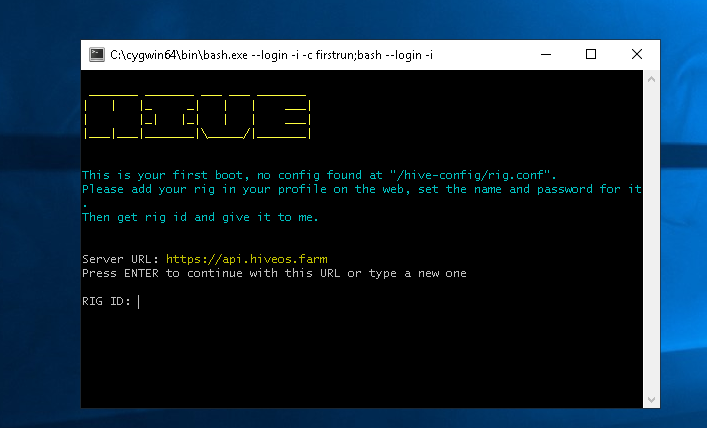
In the HiveOS console window, you need to press enter and configure the rig. First, enter the rig ID, which you need to create in the farms web interface:
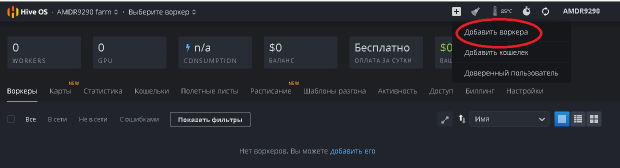
To create a RIG ID in the Internet window of your farm (in this case, AMDR9290), you need to add a worker by opening the list of commands in the square plus sign in the upper right corner of the HiveOS web interface:
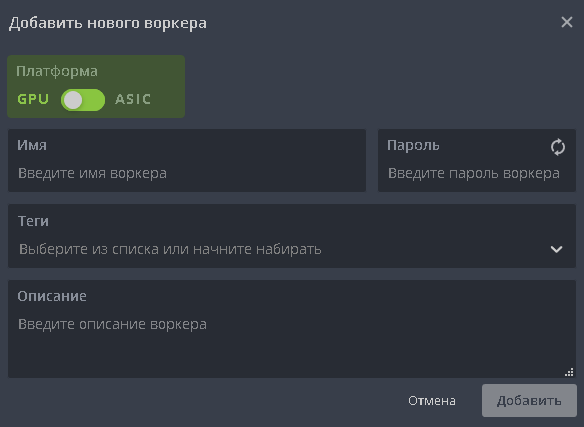
After that, a window will appear in which you need to set the name and password of the desired rig:
After entering information about the rig name and password, a window will appear with information about the RigID, which must be entered into the console of the HiveOS virtual machine.
If any miners are running on the computer at this time, they must be turned off to prevent the system from freezing.
You also need to check and disable unnecessary video cards in the web interface of the desired RigID:
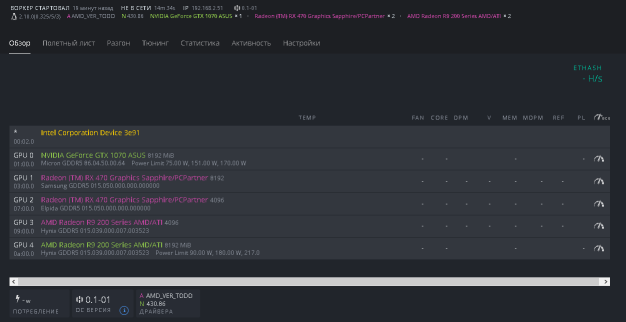
Since this is a beta version, sometimes phantom cards are detected, in this case it is an 8 GB R9 290 card that is absent in reality. To disable the cards, you need to enter the miner settings menu and add an additional parameter to the command line corresponding to the desired cards, for example, in the Claymore configuration parameters to select the desired card, you can add the -di 123 command (the numbers indicate the number of the selected GPUs, starting from the zero card), to select only AMD cards, add the –platform 1 command.
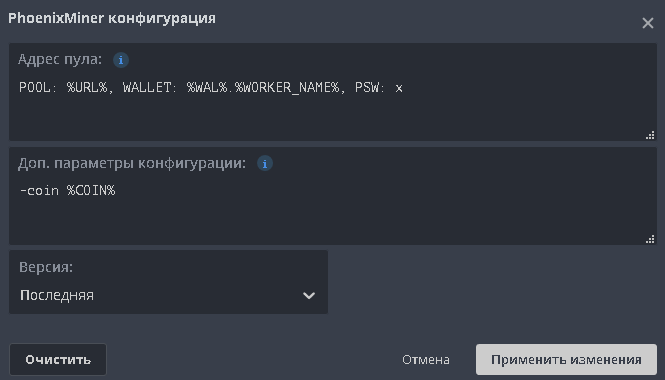
Screenshot of the miner configuration window, commands are entered in the additional parameters field:
After configuring the miners and properly distributing video cards between Windows and HiveOS applications, you can start mining.
The HiveOS virtual machine will be automatically launched every time the system is started. If you want to disable HiveOS autorun, you need to turn off the HiveOS items in the following ways (it is convenient to do this with the Autoruns utility from Microsoft):

Setting up a miner for mining Ethereum on R9 290 in the HiveOS virtual OS under Windows consists in creating a flight sheet and miner configuration.
After configuring it, the correct operation can be tracked in the HiveOS console by entering the miner command:
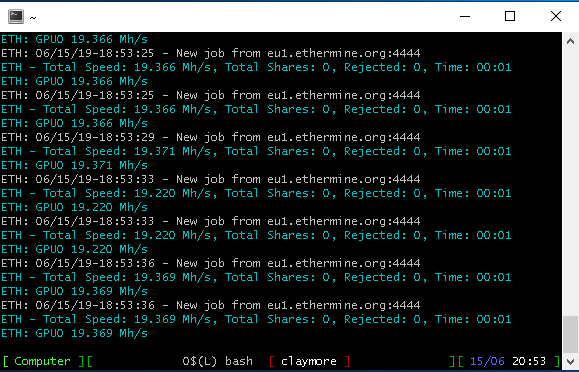
The information in the console will be similar to what is displayed under Windows. Unfortunately, you won’t be able to get the benefits of Rocm drivers in a virtual machine. The full potential of the r9 290s is possible on Linux-like systems. You can read about using Ubuntu for this in the article.
To get all the benefits from the HiveOS OS, you need to download its latest distribution, burn it to a USB flash drive or SSD and run the rig, managing its configuration through the web interface. When you first start the rig, you will need to connect a monitor to it and enter the Rig ID in the system console.
Related posts:
 How to connect to hive using OpenDev Watchdog: Lets Take a Peak
  Dual Mining ETH + TON on Hive OS: Overclocking | 2022 Profitability | TONCOIN
  How to set up your Hive OS wallet 2022: ETH+DCR| Config EWBF Zec.mine + Ccminer
  Hiveon ASIC firmware: Cryptojacking | Hashrate Theft | Mining on Hive OS (Safe?)
  Dual mining ETH + TON Ethereum: I TON Coin lolMiner (HiveOS) | Max Loss 2022 Guide
  Dual mining ETH + ALPH: Ethereum I Alephium | T-Rex miner 0.25.0: ETH + ALPH (No LHR)