How to set up your Hive OS wallet 2022: ETH+DCR wallet Hive OS Configuring/ EWBF Zec.miner in Hive OS lux mining/ Configuring Ccminer in Hive OS. If you want to know to do all this and more, read the enjoy the article below.
In Hive OS, a wallet (Wallet) is something more than just a coin wallet address, it is a whole config file containing many settings for connecting miner programs to pools. Setting up and managing wallets is carried out using a web interface that we met during the installation and configuration of the system.
How to set up your Hive OS wallet – 2022
Such a wallet is easily managed from any gadget that is at your disposal and connected to the Internet. Its owner does not need to copy a huge database of all blocks of the blockchain chain. Transactions are carried out at high speed, it is simple and easy to handle. This kind of purse is stored on the user’s PC, which determines the level of protection and controls their savings.
- Binance takes security very seriously, and upon signing up, users are asked to set up two-factor authentication, further reaffirming the exchange’s commitment to secure storage.
- It is believed that EternalBlue was created by the US National Security Agency.
- The devices caused more than 1 million rubles in damage to the energy supply company, and a criminal case was initiated against two suspects.
- But most often they succeed, because wallet owners do not install additional protection on their accounts, but limit themselves to only a standard password.
4 Easy Steps to create your HiveOS Wallet
How to set up your Hive OS wallet – These are these outlined on HIVEOS – ( Use the Promo Code -BMhashrate)
- Step 1) Decide on the coin and the mining pool. If you decided to mine in a pool, you will have to register within that pool directly from their website.
- Step 2) Click on your worker & navigate to wallet.
- Step 3) Click on Flight Sheets.
- Step 4) Click on the Rocketship.
New Wallet creation – How to set Up?
First of all, we choose which coin we will mine and on which pool. Next, in the Hive OS web interface , open the Wallets menu tab . Here are all the wallets we previously created, as well as standard system templates.
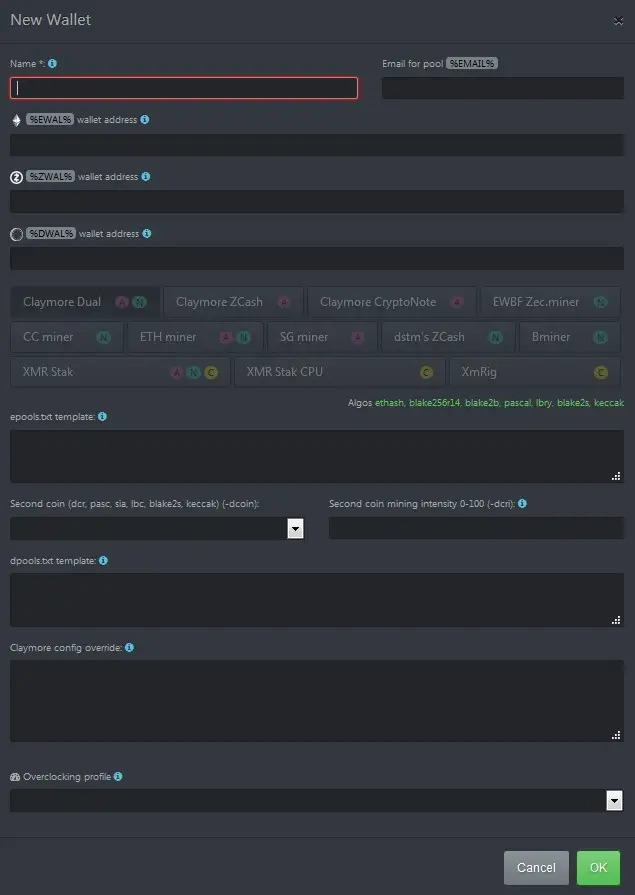
Click on the green + button on the right, a pop-up form for setting up a new wallet will open.
The form contains several fields:
” Name ” – The name. I recommend calling each wallet in the format “Coin Name + Pool”.
” Email for pool %EMAIL% ” – enter your email address here. On some pools, you need to specify your email to connect. It all depends on the registration format on the pool.
” %EWALL% ” – a field for entering addresses on the Ethash algorithm. Those. if you are going to mine “Ether” or coins using the same algorithm, then enter your address here.
” %ZWALL% ” – here we enter the addresses of coins on the Equihash algorithm. If you “dig” ZEC, ZCL and so on, then enter the wallet address in this field.
” %DWALL% ” – in this field we enter the addresses of coins on other algorithms: NeoScrypt, Lyra2REv2 and others. You should also enter the address of the second coin here in Dual mode.
Next to each field is a blue button with an exclamation point, clicking on which will open help with explanations.
After we have decided on which coin you will mine, we select the necessary program for mining. You must click on one of the twelve inactive tabs with programs.
For cryptocurrency mining on Nvidia cards, programs with a green mark N are available, for AMD with a red mark A, for a mixed rig AMD + Nvidia mark A + N, for mining on a processor mark C.
You can also open any standard wallet template for clarity. All the fields will be filled in there, you just need to replace the address of the coin with your own to start mining.
For each miner, the settings are different, so let’s look at examples on the three most popular miners: Claymore Dual, EWBF Zec.miner and Ccminer.
Configure Claymore Dual in Hive OS – New Wallet HiveOS
Let’s say we decide to mine ETH on the cointron pool. com. Go to the pool and register.
If you need to register on the pool, then, as a rule, you need to use username instead of the wallet address.
We find information on the pool for connecting via Claymore dual: EthDcrMiner64.exe -epool coinotron.com:3344 -ewal username.workername -esm 2 -epsw workerpassword -allpools 1 .
As you can see, we need to make the following settings in the wallet: pool address and port, username.worker name, password and -esm 2 parameter.
Fill in the fields in the wallet:
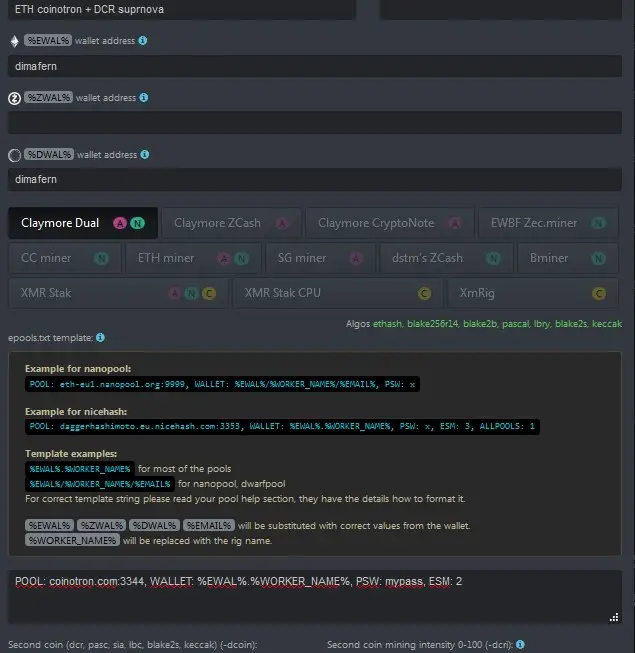
Since the pool is with registration, instead of the wallet address, we use the username for identification. Enter a name in the %EWAL% field.
On pools with registration, the wallet address is entered in the account settings on the pool itself.
Choose the Claymore miner. At the first field ” epools.txt ” we open a hint and see what format for recording the settings should be. We enter the settings by substituting our values according to those indicated on the pool: POOL: coinotron.com:3344, WALLET: %EWAL%.%WORKER_NAME%, PSW: mypass, ESM: 2 .
On this, in theory, you can finish, apply the settings and start mining “crypto” with this wallet. But we will complicate the task and add a second DCR coin for Dual mining.
We will mine the decree on the suprnova.cc pool. Go to it and register. Note that the pool has a registration, which means that instead of the address of the second coin in the ” %DWAL% ” field, you need to enter a username.
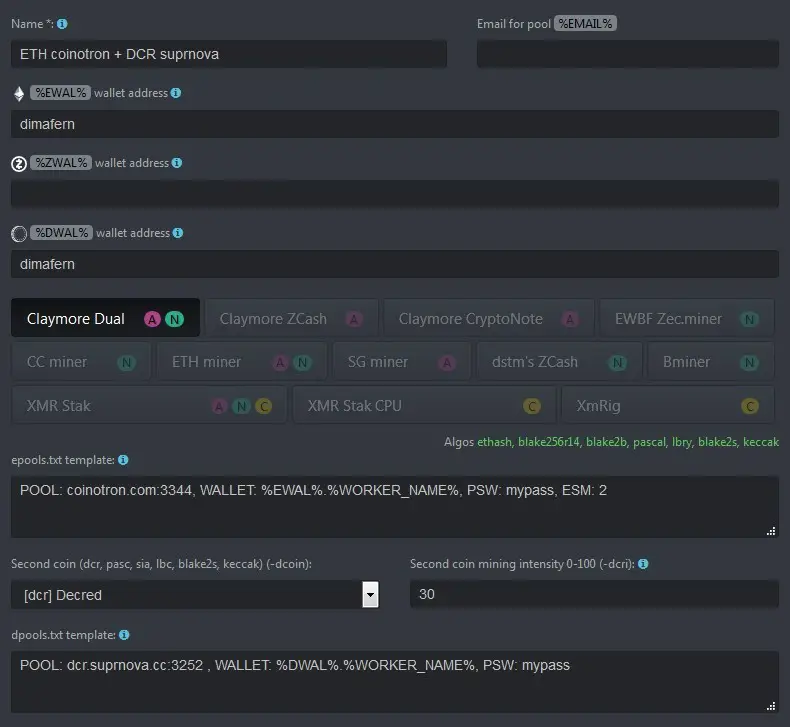
We go back to editing the wallet and in the ” second coin ” field, select DCR.
in ” %DWAL% ” we enter our username from suprnova.cc.
In the ” Second coin mining intensity 0-100 ” field, set the value to 30 according to the prompt.
In ” dpools.txt template ” enter the values POOL: dcr.suprnova.cc:3252 , WALLET: %DWAL%.%WORKER_NAME%, PSW: mypass .
Everything, the wallet is ready for Dual mining and you can save it.
For those who want to experiment with the settings of the miner itself, there is the Claymore config override field, where you can enter additional parameters.
Configuring EWBF Zec.miner in Hive OS
If you notice, the ” %ZWAL% ” field is left free, so you can set the parameters for mining coins on the Equihash algorithm in the same wallet.
Let it be ZEC on the 2miners.com pool. We go to the pool and see that registration is not needed there, which means that identification will occur at your coin address.
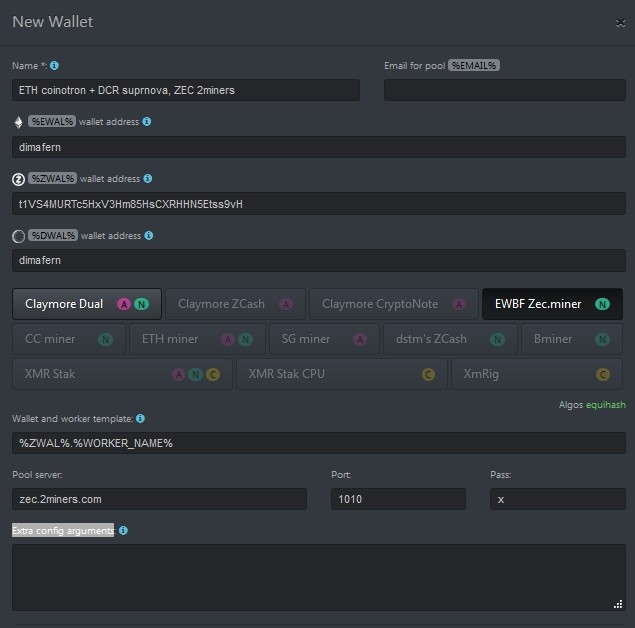
We look at the settings for connecting to the pool: miner –server zec.2miners.com –port 1010 –user WALLET_ADDRESS.FARM_NAME –pass x –eexit 3 –pec –fee 0 .
Enter our coin address in the ” %ZWAL% ” field.
We select the desired miner in the open wallet and enter the parameters according to the prompts.
“Wallet and worker template” – %ZWAL%.%WORKER_NAME%.
“Pool server” – zec.2miners.com.
“Port” – 1010.
“Pass” – x.
To change additional miner settings, you can enter the necessary values in the ” Extra config arguments ” field. I leave it empty.
Click OK and our wallet will now be available for two mining modes: ETH+DCR and ZEC.
Configuring Ccminer in Hive OS
For Ccminer, everything is the same. We look at what the pool requires from us, then enter the necessary data according to the template
Consider creating a wallet using the example of the LUX coin and the Yiimp.eu pool.
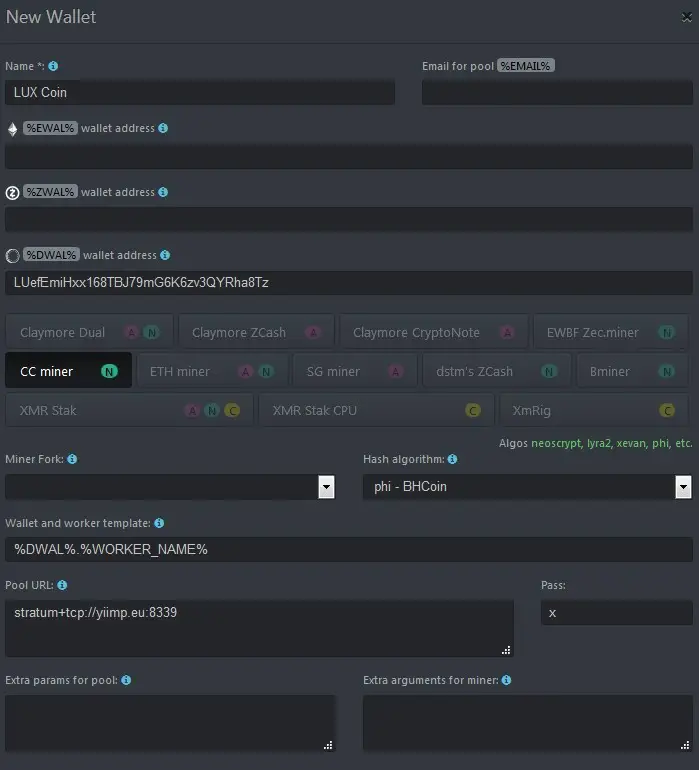
Since there is no registration on the pool, enter the wallet address in the ” %DWAL% ” field.
Choose the miner CCminer.
Do not forget that it is for Nvidia cards! You will find information about which miner for which cards to use on the pool.
In the “Miner Fork” field, you can select the desired version of Ccminer. I left blank to use the default version.
” Hash Algorithm ” – select the algorithm of our coin Phi from a large list.
“Wallet and worker template” – вставляем %DWAL%.%WORKER_NAME%.
” %WORKER_NAME% ” is the name of our rig. On pools with registration, create workers identical in name to the name of the rig!
“Pool URL” – stratum+tcp://yiimp.eu:8339, “Pass” – x.
” Extra params for pool ” and ” Extra arguments for miner ” are used to enter additional settings. Leave blank for default settings.
We save the wallet and start mining cryptocurrency.
The settings for other miners are prescribed identically according to the settings specified on the pool. To start mining on a new wallet, Click on the name of the desired rig, Select the miner program in the left drop-down list, the required wallet in the right list and Rocket to start.
We connect via SSH or Shellinabox and check if everything is in order. If something is wrong, and the miner does not work correctly, we request the Config rig on the administration panel and check whether everything is in order there. If you made a mistake or a typo somewhere, open the desired wallet and make changes.
If you have any questions, ask in the comments. Happy Mining!
Related posts:
 How to connect to HiveOS using SSH Teleconsole: It’s So Easy It’s That Easy
  Hive OS Ethereum Mining Farms: Best Software for Bitcoin (ETHminer)
 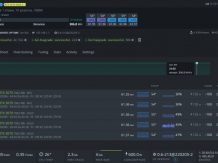 Dual Mining ETH + TON on Hive OS: Overclocking | 2022 Profitability | TONCOIN
  Hiveon ASIC firmware: Cryptojacking | Hashrate Theft | Mining on Hive OS (Safe?)
  Dual mining ETH + TON Ethereum: I TON Coin lolMiner (HiveOS) | Max Loss 2022 Guide
  Dual mining ETH + ALPH: Ethereum I Alephium | T-Rex miner 0.25.0: ETH + ALPH (No LHR)