


DISM host maintenance process High CPU usage in Windows 11/10
Deployment Image Servicing and Management (DISM) is a command line utility on Windows system. It is generally used to prepare an environment for the installation of the Windows image on a system. Mostly this process runs in the background and creates a lot of temporary files. These temporary files can accumulate over a period of time and can damage your system. You may see the following error messages:
dismhost.exe high disk usage
dismhost.exe failed
dismhost.exe is not responding
If you see these errors on your system, don’t panic, we’ve compiled a list of fixes that can help solve the problem.
Solution 1: disable background intelligence transfer services and Super Fetch
Step 1: Open the Run dialog by holding the Win key and R at the same time.
Step 2: Write services.msc and hit Pay in.
Step 3: find the service named Superfetch and double click on it.
Step 4: In the Properties window that opens, in the Startup type drop-down menu, select Disabled.
Step 5: In the service status section, click the stop button.
Step 6: click Request and then click It’s okay.
Step 7: Reboot the system and check if this helps to solve the problem.
Step 8: If not, in the services window, locate the service called Background intelligence transfer and double click on it.

Step 9: disable the service at startup and stop the service (see steps 4-6)
Step 10: reboot the system.
Solution 2: check if DISM files are infected with malware
Below are the symptoms you may notice if your dismhost.exe has been infected.
1. When there are multiple dismhost.exe files in the Temp folder
Step 1: Open Windows Explorer with the keys Windows + E.
Step 2: In the address bar at the top, copy paste the location below and hit Enter
C:WindowsTemp
Step 3: If you see more than one dismhost.exe file, the files are infected.

2. CPU usage is 100%
Step 1: Right-click on the empty area of the taskbar
Step 2: choose Task Manager from the context menu.
Step 3: In the task manager window, observe the CPU usage.
Step 4: If the CPU usage is 100%, this could mean that the DISM host is infected.

3. Many unknown files in local temp folder
Step 1: Open Windows Explorer with the keys Windows + E.
Step 2: In the address bar at the top, copy paste the location below and hit Enter
Users<username>appdatalocaltemp
Step 3: If you have hundreds and thousands of unknown files here, it means that DISM Host is infected.
To remove malware from the system, run a full scan with Windows Defender Firewall.
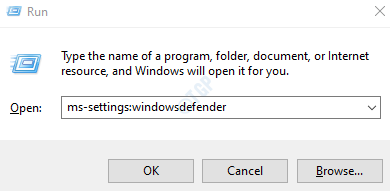
Step 1: Open the Run dialog box on your PC by holding down the Windows logo key and the R key simultaneously from the keyboard
Step 2: In the text area of the Run dialog box, type ms-settings: windowsdefender, and Press OK.
Step 3: In Settings -> Update & Security -> Security window that opens, click Protection against viruses and threats

Step 4: From the window that appears, click Scan options
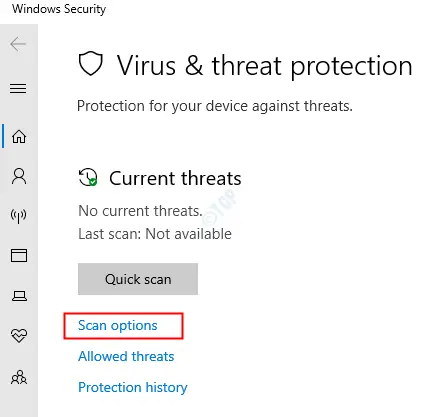
Step 5: In the window that appears, click Complete analisis and then click the Scan now button

Step 6: After the scan is done, check for threats and remove them from the system.
Step 7: reboot your system.
Solution 3: Uninstall dismhost.exe
Step 1: Open the Run window using Windows + R.
Step 2: Write appwiz.cpl and hit Pay in.

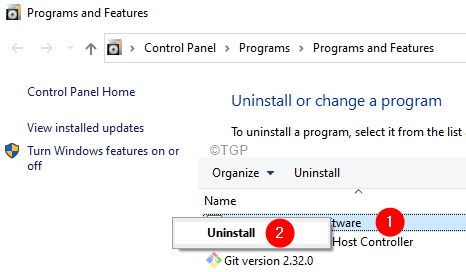
Step 3: In the Program and Features window that opens, locate all unwanted and unknown software and remove them.
Step 4: Right click on the software and choose Uninstall As shown below.
Step 5: Open Windows Explorer windows with Windows + E.
Step 6: In the address bar at the top, write the location below,
C:Program Files
Step 7: Find the file named dismhost.exe. If you can find the file, continue with the next steps.
Step 8: Open the Run dialog box.
Step 9: type regedit and press Pay in
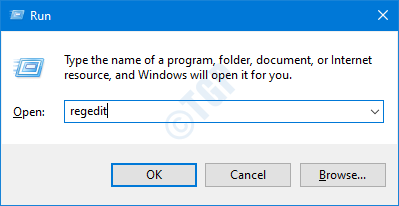
Step 10: If you see a UAC popping up, just click Yes
Step 11: In the Editor window, copy and paste or browse or write to the following location,
HKEY_CURRENT_USER Software
Step 12: On the left side, locate the DISM Host Service Process. Once you find it, right-click on that folder and choose Delete.

Solution 4: update your Windows
Step 1: Open the Run dialog using Windows + R.
Step 2: Write ms-settings: windowsupdate and press Pay in.
Step 2: In the Settings> Update & Security> Windows Update window, click Check for updates.
Step 3: Windows will now check for new updates. If new updates are found, they will be downloaded and installed.
Step 4: Click the Restart now button to see the changes.
Check if this helps.
That is all
We hope this article has been informative. Please comment and let us know if this has helped you.
Also, mention the solution that helped you.
Related posts:
 How to access Steam games without an internet connection
  How to view FPS with Xbox Game Bar in Windows 10: Steps Made Easy
  Hacked account? How to check and remedy
  How to make video calls from WhatsApp Web
  How to increase the RAM memory of a desktop or laptop + Tips and Tricks
  How to organize your YouTube subscriptions into categories
+ Tips and Tricks
How to organize your YouTube subscriptions into categories
+ Tips and Tricks


