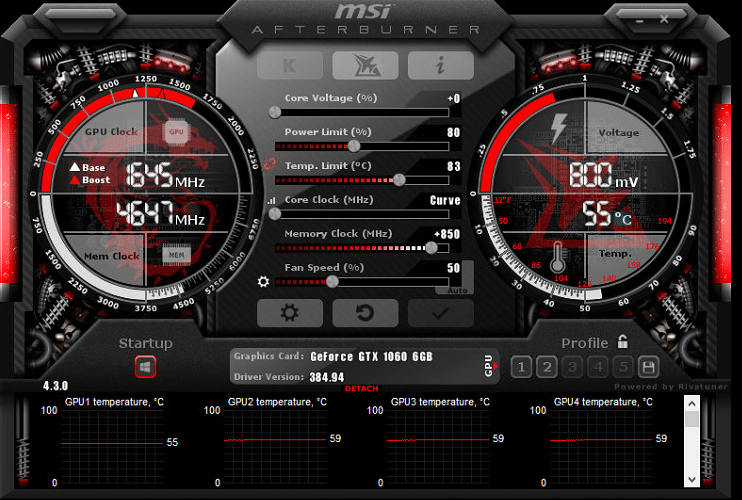
Example: Overclocking an Nvidia GTX 1060
Here is an example of an overclocking profile for an Nvidia GTX 1060 GPU.
Please note that these values are approximate. Use at your own risk.
Examples of Nvidia OC settings
- Algo – we set it to the default configuration as we want it to be applicable to all algorithms
- + Core Clock (Mhz) — 130
- Memory (Mhz) – 2000
- Fan (%) – empty for default values
- Power limit (W) – 120
- Leds – Our GPU has no LEDs, so we skipped this setting
- OhGodAnETHlargementPill – This is only available for 1080 series GPUs, so we skipped this setting
Click “Save” and you’re done.

Overclocking AMD GPU
Before changing any settings, you can run the command amd-infoto find out the current GPU settings. To do this remotely from your dashboard, go to your worker and click the Run Command button in the toolbar at the top of the screen.
You can specify one value for all cards, or a space-separated list of values for each card. For example:
150 is one value for all GPUs.
0 100 0 0 0 140 – means GPU0 = no, GPU1 = 100, etc.
AMD OC Window
The Algo field is used to specify overclocking settings for a specific algorithm. You can create a separate set of overclocking parameters for each algorithm separately, or choose a default setting that will apply to all algorithms, but can be overwritten by the algorithm settings themselves.
- Core Clock (Mhz) – sets the core frequency.
A good value would be around 1100. If the core state is disabled, the default state will be used to set the frequency to 5. All values must be absolute.
- Core State (Index) – This is necessary if you are trying to power down your graphics card. You must use this parameter in conjunction with the Core Clock and Core Voltage settings. This is called DPM (Dynamic Power Management) or “Power Level” of the GPU core. For RX GPUs, this is a value between 1 and 7. The default is 5. Reduce the value to downstream. If you choose to set one of the default states, you do not need to set any values for Core Clock and Core Voltage.
- Core Voltage (mV) – Required if you try to lower the core voltage of a graphics card. And you have to set the kernel state or the default state 5 will be used to set the voltage. You can set values like 900, mV value or values like 65284 from VBIOS table.
- Memory Clock (Mhz) – sets the memory clock frequency. All values are absolute.
- Mem State (Index) is a very advanced setting. Change this if there are problems with undervolting. If everything works within the specification, do not change this value. It is known that RX cards have 1 or 2 memory states (3 including 0 – idle state). The highest state will be selected by default. But some rare cards are known to defy restoration in their highest state and must choose the lowest one. For example, the highest value is 2, and for undervolting you need to set the state to 1. You must use this parameter with the Memory Clock setting.
- Fan (%) – to set the fan speed. Keep in mind that miners like claymore will still control the fan speed. You must turn off fan control in miner config for this to work.
We advise you to leave this field blank if you have enabled AutoFan. We will write more about AutoFan in our future articles.
- Aggressive undervolting – Selects a given overclocked parameter for each DPM state.
Click “Save” and you’re done.
Example: Overclocking AMD RX 580
Here is an example of an overclocking profile for an AMD RX 580 GPU.
Please note that these values are approximate. Use at your own risk.
Examples of AMD OC settings
Algo – we set it to the default configuration as we want it to be applicable to all algorithms
- Core Clock (Mhz) — 1150
- Core State (Index) — 3
- Core Voltage (mV) — 875
- Memory frequency (Mhz) – 2200
- Mem State (Index) – left blank as our GPU had no problem with undervolting
- Fan (%) – empty for default values
- Aggressive undervolting – set to active
Click “Save” and you’re done.
Applying an overclocking profile
You can now apply the overclocking profile you created by going to the Workers tab and then clicking the check boxes on the left side of the rigs to which you want to apply the overclocking profile. You should see a speedometer icon in the menu bar in the upper right corner.
Applying the OC profile
Click on it and you will see a window with the number of workers you have selected and a list of all your flight sheets.
List of OC profiles to apply to workers
Select the overclocking profile you want to apply and click the Apply button. You should see a message that a runaway command has been sent to a worker. In a few seconds, your workers should apply the changes.