


How to change the ISP router
– Take a look at these tips, tricks, and solution you can use to make your life much easier with your devices whenever problems arrive and complications which you may find difficult to deal with.
One of the reasons why the Internet becomes slow, especially when the whole family connects, is usually the “router” that our Internet provider or “ISP” installs for us. Generally, the technical specifications of such equipment are unable to handle more than a handful of connected devices simultaneously. To think that those kinds of low-end equipment can handle around eight devices at the same time it could even be optimistic for some. The seller Flash Routers claims that the Netgear R6700, a team of dual core, is designed to two to five devices. Based on that statement, I would not be able to understand what would be the number of computers that my Huawei HG8546M can handle, whose single core CPU does not exceed 700MHz.
Additionally, we must bear in mind that the equipment that our ISP leaves us, and which we call “router”, in many cases is really a “combo” of modem + router, that is, it performs a double function (without considering its work as Switch and Access Point). If we are talking about fiber optics, it converts electricity or digital signals into light and vice versa (modulation and demodulation), and it is also responsible for “routing” information from the Internet to each of our computers and vice versa.
The ideal would be to replace that modem + router with a more powerful equipment, but since this combo of functions cannot be found easily, one of the most common solutions is to delegate the router function, which is the one that requires the most work, to a more powerful independent equipment, which can cope well with several equipment, in addition to ensuring that the WiFi signal can reach the entire house.
How
To transfer network management to a new router you will need to enter the software of your ISP’s modem router and also that of the new router. Therefore, you must know in advance the access data to both computers, that is, IP address, user and access password, and how to enter their settings. You should also be familiar with some basic concepts of networks or networking.
As you will have to configure both computers separately, it will be better if you have a network or internet cable to connect to the router through a PC. Remember that you must configure the IP of that PC so that it is within the range of the router’s IP. That is, if the router’s IP is 192.168.100.1, you must configure the PC with the IP 192.168.100.2, for example.
You will also need to call your provider to get a couple of information and possibly a little help.
For this tutorial I will use my Huawei HG8546M equipment (ONT modem + router) and a TP-Link WR941ND router with DD-WRT firmware. Even if you don’t have the same equipment, the idea, parameter names and the procedure should be similar.
On the Modem + Router
First, you enter the modem – router configuration from the web browser of a device connected to the computer, using its IP address, which in my case is 192.168.100.1. Then enter the username and password for access.
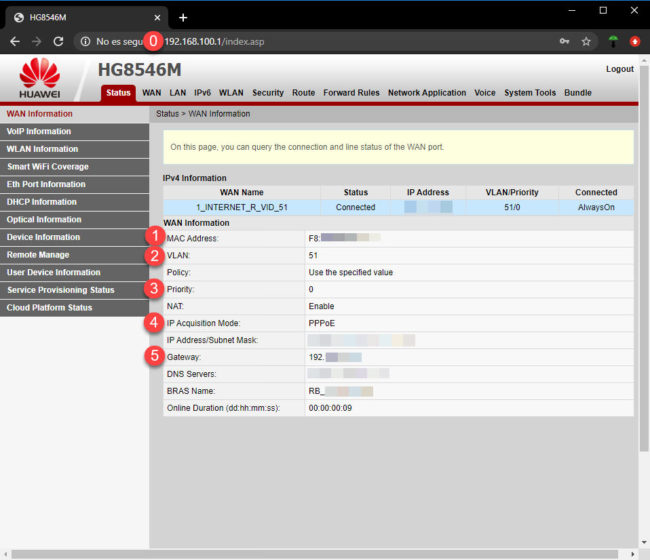
Once inside, you should go to the “WAN” or “Internet” information, which is usually under the “Status” tab. As we are going to transfer the Internet connection from the modem-router to our new router, we will need to copy the following data: MAC Address, VLAN and its priority, IP acquisition mode and Gateway. I have indicated them with numbers, to identify where this data should be configured in the new router.
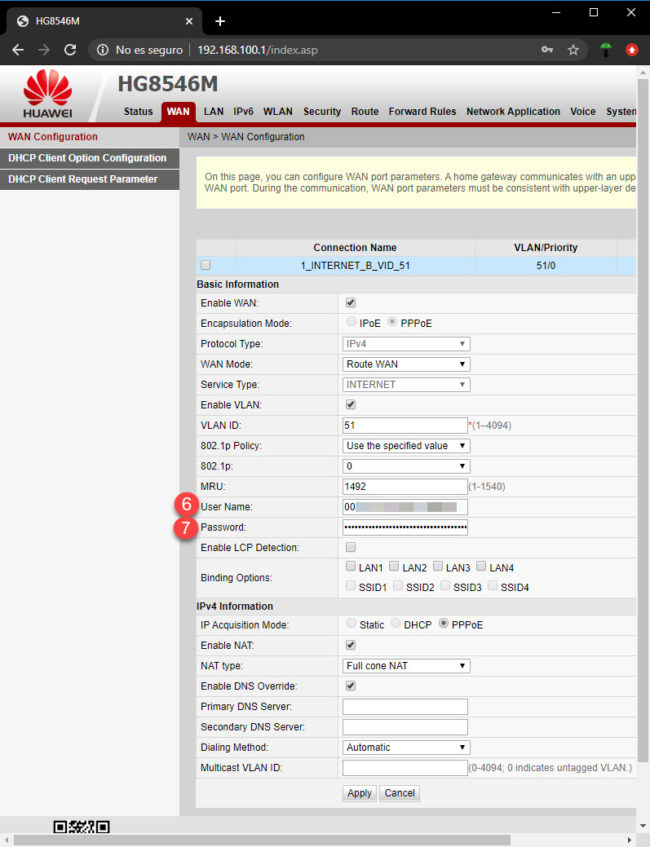
We must also go to the WAN tab, and within WAN Configuration, write down the username and password. In my case the user is visible, but the password is not. Although it is perfectly possible to see the key behind these points (in Chrome, by right clicking on the points, “Inspect element”, and in the html code viewer, in the fragment input (…) type=»password», change “password” to “text”), I have found around 50 characters: it was the encrypted password. Therefore, I had to contact my ISP to find out what the unencrypted password was, which is what is needed.
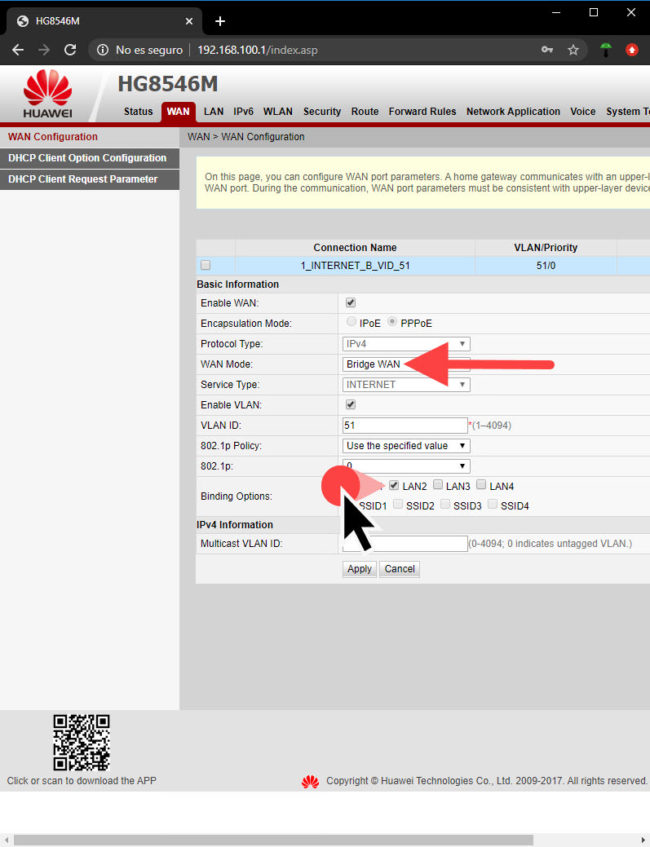
So far we had only read the data from our modem-router. But at this point we will have to make the changes that we see in the image, that is, in the WAN configuration, in the WAN Mode line change the Route WAN option to Bridge WAN. Below we must activate the LAN port that will be used to transfer the connection to our new router, in my case from the Binding options option. I have chosen the LAN2 port, but you can choose the one you want.
In my case, I have not had any problems activating Bridge WAN and applying the changes, but in case the error or warning is generated «The current service type is not supported in bridge WAN mode«, There is a simple solution that is explained in this video.
Before clicking “Apply” to save the changes, I warn that the Internet connection will be lost and you will be without service until you make the configuration in the other router, so do this procedure when no one in your house is going to use the Internet . In any case, you can always revert the previous configuration to have the service again.
Important: It is possible that when you enable Bridge mode and activate the new router, some modem-router settings are lost, such as port forwarding or opening. Make sure to copy this information elsewhere to configure it later on the new router.
On the new router
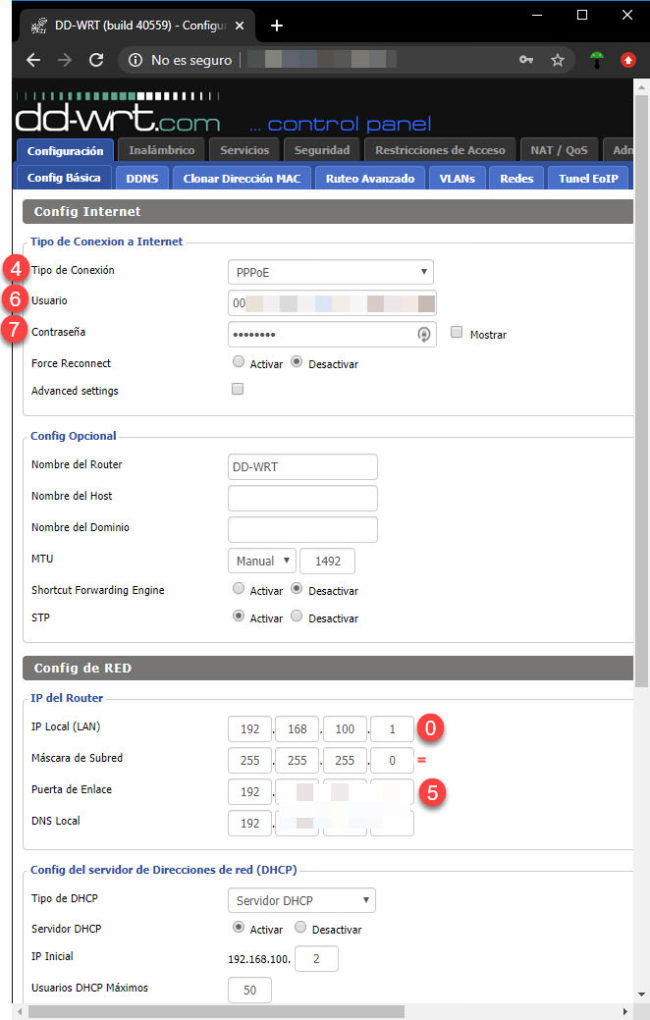
Once the work on the modem-router is finished, we have to do the configuration on the new router. Once you have entered its configuration page using your IP, username and respective password, you will have to look for the Internet settings or WAN. There we will have to fill in some information that we obtained from the modem router, in my case the type of connection, username and password. You must also put the same local IP address of the modem router, subnet mask and gateway. In my case, these last settings appear on the same screen but it is likely that in your router you will find them under the «LAN» section.
You will also want to enable DHCP based on what has been configured on your modem router. As for the rest of the fields, they should not be changed, unless your Internet provider indicates otherwise.
When finished save the changes. Remember that from this point on you must save the changes on each screen where you make modifications.
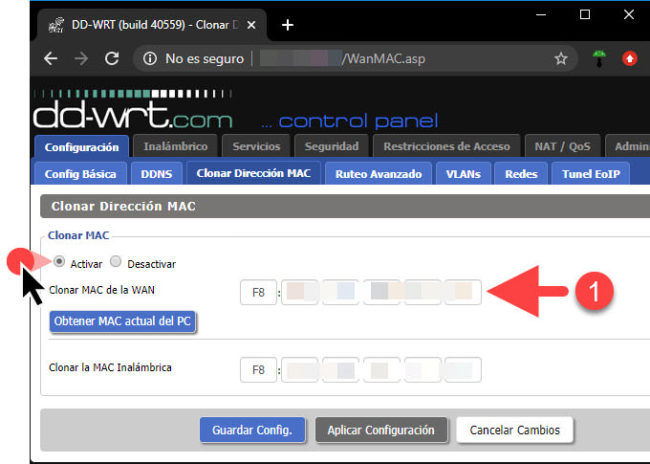
The next step is to give the new router the same MAC address as the modem-router. This is necessary because Internet providers generally do not allow the connection of computers whose MACs they have not previously registered.
This option is called Clone MAC Address and it is usually on the same Network Configuration tab. You simply have to enter the same MAC that we obtained from our modem router and save the configuration.
Assuming that your router does not have the option to Clone MAC, you must call your ISP to request the registration of the MAC of the router that you want to associate with the service.
![]()
Some ISPs make use of VLANs, as in my case and fortunately the DD-WRT firmware in my TP-Link offers support for this configuration in the “Networks” or “Networking” tab. In the VLAN Tagging section we can add a new VLAN, configure its ID (Tag Number) and priority with the same values as our modem router.
We must make sure that this VLAN is assigned to the WAN port of the router, which in my TP-Link corresponds to the interface eth1. In other brands of routers with DD-WRT the WAN may correspond to another interface, or that’s how I understand it (2). This must be configured both in the VLAN and in the port configuration, as we see in the lower part of the image. A little further down I have also added the MAC of the modem router in the eth1 configuration, although I am not sure if this is necessary.
Your router may not support VLAN, and if your ISP uses this technology, you will not be able to configure your router as a replacement. That is a major absence that I have noticed on two of my older TP-Link WRXXX series routers. Apparently more modern versions already integrate VLAN supportBut if you can’t invest in another router, you can install the DD-WRT firmware to get this feature.
Finally, check that all the changes we made in all the previous tabs or tabs have been kept. That being the case, apply the configuration.
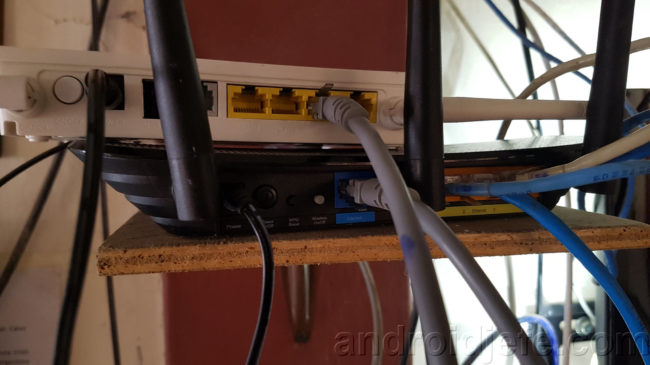
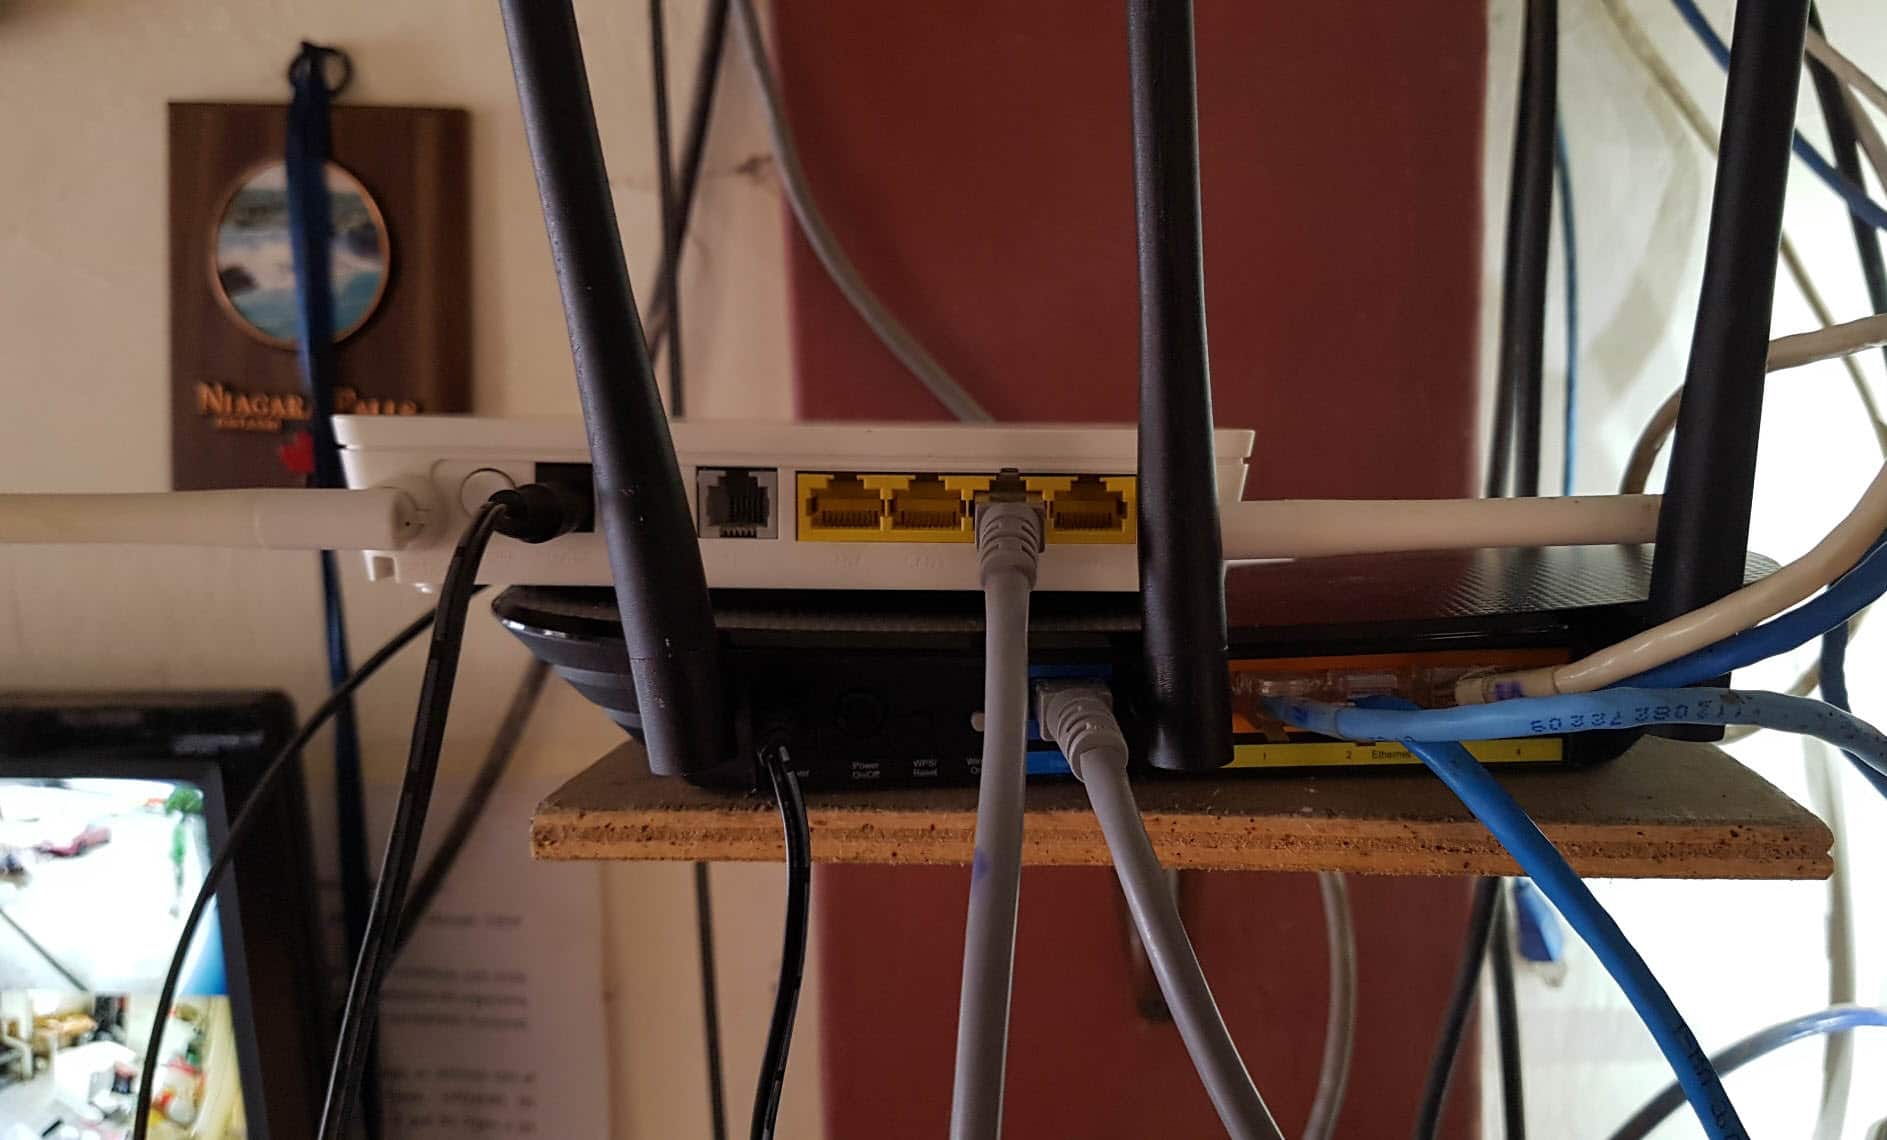
Once both devices have been configured, it only remains to connect them with an ethernet cable (preferably category 6 for optimal communication), from the port configured in the modem router (in my case LAN2) to the WAN or Internet port of the new router, as shown you can see in the picture above.
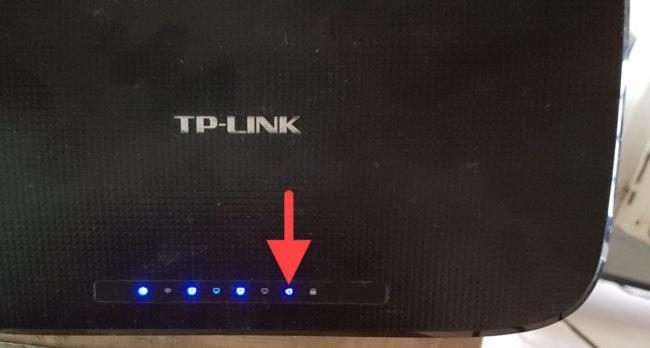
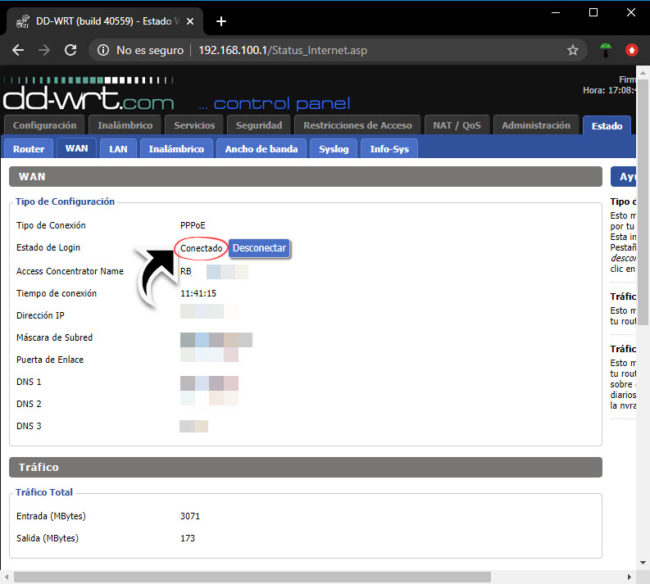
If everything has gone well and your router has managed to “hook up” to your ISP, you should see the Internet LED light up in the same color as the other LEDs, in the case of my TP-Link in blue. In the “Status” tab of the new router configuration, WAN option, you should see that the Login Status is “Connected”, your IP address and the rest of the data obtained from your ISP.
Conclution
This task may require doing some research on your modem-router, the replacement router you are going to use, and even, as we saw, a little help from your Internet provider. However, the effort is worth it because it can solve one of the biggest problems with a home internet service: saturation of the modem router, slowness due to many connected devices and the need to constantly reboot.
In my case, even using an alternative router similar in specifications to my provider’s modem-router, by dividing the workload between both computers I have seen a notable improvement in my Internet, less time loading (buffering), elimination of intermittencies when opening YouTube, Netflix or streaming services and no lag when loading web pages, even though the new router hits 100% CPU usage at peak hours. I assume it should be even better with a higher hardware router.
In the event that it is finally not possible to replace your provider’s router in the indicated way, another alternative is usually to connect the second router as an access point to handle the wireless network. In this case, a network cable is bridged from a LAN port of the modem-router to a LAN port of the second router. In the latter you can assign any IP address, activate the wireless network, ignore the WAN and deactivate the DHCP service. Once working, the modem-router’s WiFi network can be disabled. Unfortunately, with this solution the modem router can still be overloaded at peak times and slow down Internet service.
References: NCConsumer (RAM, CPU router), ADSLAyuda, YouTube, Google
Increase the WiFi signal by installing other firmware on the router
How to extend the WiFi signal and achieve “roaming” between two routers
How to open ports on your router so that you can access or “see” you from the Internet
Related posts:
 How to access Steam games without an internet connection
  How to view FPS with Xbox Game Bar in Windows 10: Steps Made Easy
  Hacked account? How to check and remedy
  How to make video calls from WhatsApp Web
  How to increase the RAM memory of a desktop or laptop + Tips and Tricks
  How to organize your YouTube subscriptions into categories
+ Tips and Tricks
How to organize your YouTube subscriptions into categories
+ Tips and Tricks


