


How to disable Google Chrome Notifications on your PC or Cellphone?
–
We all know the Google Chrome notification ads makes us reach our computers or mobile devicesIn general, they are usually software updates, advertising for games, videos, articles, antivirus, emails, among others.
These notifications appear automatically because one of your browsers (in this case we are talking about Google Chrome) requested your permission through a platform or web page to send you all kinds of messages through notifications on your phone or pc, and you accepted it. and in that way it is being allowed, it allows certain pages to notify on your Windows 10 and also on the phone.
Be it WhatsApp, Facebook, YouTube, or any other page, notifications are also usually due to a virus and these notifications are usually activate automatically as well as pop-ups or Google popups that contain advertising elements.
What should you know before looking for the option to disable Chrome notifications?
It is necessary to know that it is not the same to remove and block. If you remove the site when you return to it, it may be that it will send you notifications again, but If you block it, no matter how many times that site is visited, it will never have access to send you Google notifications or ads, that’s why it is recommended block those sites who are more insistent with their excessive notifications.
So, to know what they are, since it identifies from which page or application all those notifications come to you, you can look for that site in the notification blocking settings and then it is the one you are going to block. Remember also that when you block a site, you don’t is immediately added in the option of “blocked”, it takes a while.
Devices that have Chrome notifications disabled by default
It is true that there are applications that we must always keep in mind and it is not necessary to deactivate their notifications, as is the case with Gmail (among many other notifications) we will always need to know that an email arrives since they are of great importance, it may be due to notification of a bank, work or studies.
We can make the exception since it has blocked them by default and then instead of blocking them, what we do is activate them.
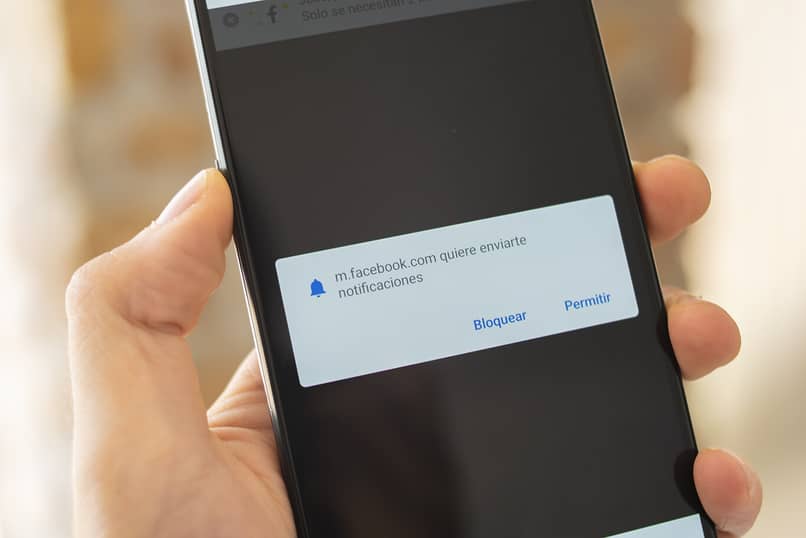
Chrome alerts you when a site wants to send you notifications
In the case of a phone, every time we have a new application, a message always appears asking us if we want to allow them to send us notification messages and they give us options as options. “block” and “allow”.
If we give it to allow then we are accepting that these notifications always appear to us, instead if you give it to block, Chrome will not send you notification of any type on this platform or web page, although sometimes they are activated without our consent.
What is the way to disable notifications within Google Chrome?
It is important to know that disabling these notifications is usually very simple, since all these will be removed from your phone advertising notifications How often appear on our cell phone and also on our pc, regardless of whether it is Android or iPhone or whether the pc works with Apple’s Windows or Mac operating system.
Undoubtedly, most users do not support interruption by Google through ads, while we are using our equipment to perform a specific task, creating content, playing, among other activities, for that reason, we will leave you the steps so they can achieve their goal, disable annoying and uncomfortable notifications that Google Chrome and Ads show us.
If you have an Android device
In this case, I will show you how you can disable this option on your Android phone or device, to do this, follow the following steps:
- We are going to go to our Chrome search engine.
- We go to the upper right part of the screen where the 3 points are vertically and we take them off.
- We seek the option of setting.
- Once in configuration we deploy enough so that the option of “Advanced settings”.
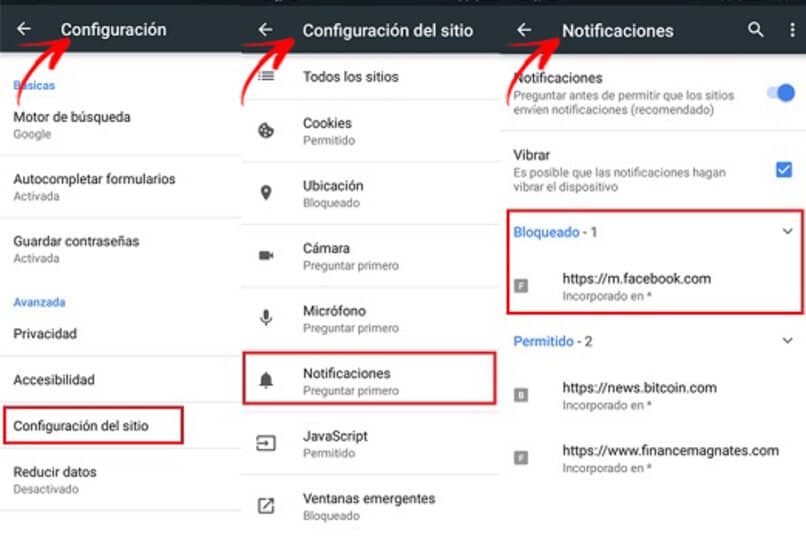
- Within advanced settings we will enter the option “site settings”
- We will look for notifications and click. In that tab we will find all the sites we visit frequently.
- We deactivate the notification option.
After doing these steps, you can rest easy and enjoy using your cell phone without adsWell, they will not appear again. Another simple way to do it is by entering the settings of your mobile phone, you go to “notifications and applications”, press “Chrome” press the “notifications” option and deactivate the notifications option.
On your Windows or MacOS PC
This time we are going to learn how to remove or eliminate the notifications that appear automatically on our PC screen, which is usually located in the lower right part.
- The first thing we should do is open our Chrome browser and we are going to go to the upper right part of the screen and we will give it click on the three vertical points, right next to the address bar.
- We are going to look for the configuration option and we click.
- We will get several options and we will look down at the end, the one that says “advanced” we click.
- We will look for the option of “content settings” we click there and we go to “notifications” and we click there.
- They will already be in the tab where they will have all the information and they will be able to allow, block or eliminate certain pages that are notifying in your Windows.
- You can choose for any of the options that come out and click on the three points that are next to them and you can choose between lock, edit or delete so that notifications will not appear again.
Related posts:
 How to access Steam games without an internet connection
  How to view FPS with Xbox Game Bar in Windows 10: Steps Made Easy
  Hacked account? How to check and remedy
  How to make video calls from WhatsApp Web
  How to increase the RAM memory of a desktop or laptop + Tips and Tricks
  How to organize your YouTube subscriptions into categories
+ Tips and Tricks
How to organize your YouTube subscriptions into categories
+ Tips and Tricks


