


To update: Stop getting error messages and slow down your system with our optimization tool. Get it now at this link
Microsoft makes it increasingly difficult for users to decide whether to check for Windows updates and install them, as long as the average user is not smart enough to make that decision on their own.
Windows Update Medic Service is a new Windows service introduced in Windows 10. This service was introduced to protect Windows Update components from damage so that the computer can continue to receive updates.
Windows Update Medic Service (WaaaSMedicSVC) allows you to repair and protect Windows Update components. This means that even if you disable Windows Update-related services, this service will reactivate them at some point.
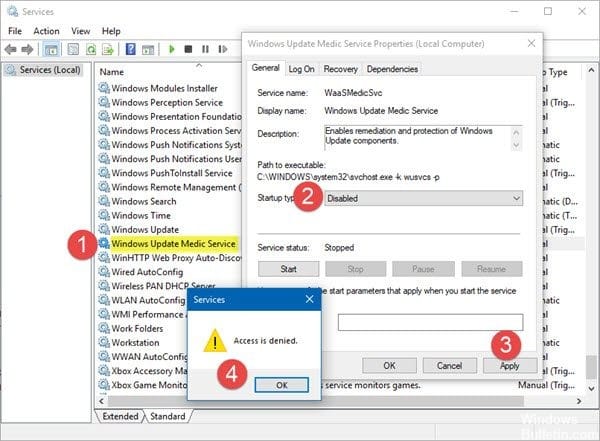
WaasMedic is one of the programs that tries to repair Windows Update if it gets corrupted. Since it is a built-in component of Windows Update, you can’t really remove it from your system, but it can be disabled or replaced. You can disable most Windows services using the Services, although some services use the Access Denied dialog to ask you to disable them.
What are the causes of WaasMedic errors?
Well, these errors are usually caused by:
- Unnecessary files. If you have unnecessary files in your system files, they can interfere with the process and cause a crash.
- Virus or malware. If your system is infected with viruses or malware, the service files can become corrupted, which can lead to a crash.
How to completely disable WaasMedic:
Although Microsoft does not recommend this if you regularly update your Windows, there is not much to lose. To disable the WaasMedic service, you cannot use the generic method and disable it in Windows Service Manager because it displays an “Access Denied” dialog box. However, you can disable it with third-party software.
October 2021 update:
Now you can avoid PC problems using this tool, such as protecting against file loss and malware. Plus, it’s a great way to optimize your computer for maximum performance. The program fixes common errors that can occur on Windows systems with ease, without the need for hours of troubleshooting when you have the perfect solution at your fingertips:
- Paso 1: Descargar PC Repair & Optimizer Tool (Windows 10, 8, 7, XP, Vista – Microsoft Gold Certified).
- Step 2: Click “Start scanTo find Windows registry problems that could be causing problems on the PC.
- Step 3: Click “Repair everything”To solve all the problems.

Disable or remove REMPL task
- At the same time, press Win + R keys to open the RUN dialog box, then type taskchd.msc in the RUN field and hit Enter.
- Open the Task Scheduler program. Now click on “Task Scheduler Library” on the left sidebar and go to the “Microsoft -> Windows -> Fill” folder.
- Find the Shell task in the right pane.
- Select this task and press the Delete button to remove it from the list. Click the Yes button to confirm the action.
Disable automatic group policy updates
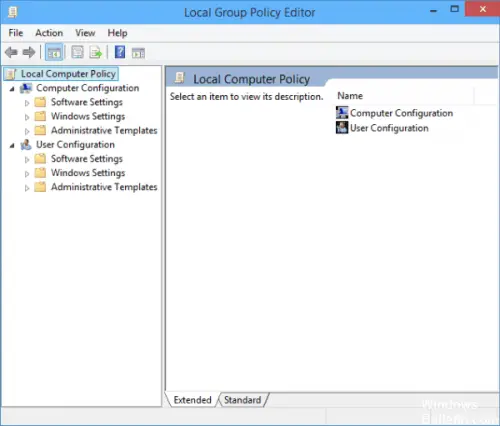
Step 1: Search for group policies in the Start menu and open the policy editor.
Step 2: Go to: Computer Configuration -> Administrative Templates -> Windows Components -> Windows Update
Step 3: In the Windows Update Strategies folder, double-click the Configure Automatic Updates strategy.
Step 4: In the upper left part of the window that opens, check the Disabled box.
Step 5: press OK to close the window.
Using hard drive cleanup
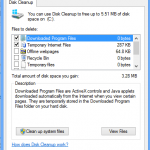
To start removing the unnecessary or temporary files stored on your system that could block the service, you should use the disk cleaning utility that is integrated with Windows. This will allow you to scan your drives for junk files and delete them. To clean the disc, proceed as follows:
- Go to the Start menu, type Clean Disk, and then open it.
- Select your system volume.
- Click on ‘Clean System Files’.
- Make sure to check the Temporary files box in the list.
RECOMMENDED: Click here to troubleshoot Windows errors and optimize system performance

CCNA, web developer, PC troubleshooter
I am a computer enthusiast and a practicing IT professional. I have years of experience behind me in computer programming, hardware troubleshooting, and repair. I specialize in web development and database design. I also have a CCNA certification for network design and troubleshooting.
Related posts:
 How to access Steam games without an internet connection
  How to view FPS with Xbox Game Bar in Windows 10: Steps Made Easy
  Hacked account? How to check and remedy
  How to make video calls from WhatsApp Web
  How to increase the RAM memory of a desktop or laptop + Tips and Tricks
  How to organize your YouTube subscriptions into categories
+ Tips and Tricks
How to organize your YouTube subscriptions into categories
+ Tips and Tricks


