


How to fix Registry Editor not opening issue in Windows 11, 10
Registry Editor is the tool that we use to fix the error in the Windows system. It is the hub of the registry keys that, when set correctly, fixes most problems. But in very rare cases, the Registry editor can also crash.
Many users have reported seeing the error when trying to search for a key that does not exist on the system. If you try to cancel the search, the app crashes and even if you don’t cancel the search, the app freezes with the following message.
Registry Editor has stopped working.
The root cause of the problem is the length of the subkey. If the length of the subkey is more than 255 bytes, this error is seen. However, sometimes this can also be caused by viruses or malware.
If you notice this issue on your system, don’t panic. In this article, let’s discuss the solutions to overcome this problem.
Solution 1 – Rename regedit.exe and try to open
1. Open the Windows Explorer window holding keys Windows + E.
2. Copy and paste the location below and press Enter.
C:WindowsSystem32
3. In the window that opens, scroll down to locate the regedit32.exe icon.
4. Once you find the icon, right click on it and select Copy.
Alternatively, you can click on the regedit32.exe file and hold down Ctrl+C to copy the file.
5. Go to Desktop and paste this file.
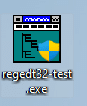
6. Now, click on the file and press the F2 key to rename the file
7. Rename the file to something else. Say, regedit32-test.exe
8. Simply double click the file to open it.
You should see the Registry editor open.
Check if this helps you solve the problem.
Solution 2: Run an SFC and DISM scan
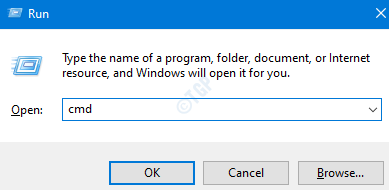
1. Open the Run dialog using keys Windows + R at the same time.
2. Type cmd and hold the keys Ctrl+Mayús+Intro to open Command Prompt in Administrator mode.
3. In the user access control prompt that opens, click the Yes button.
4. In the Command Prompt window that opens, enter the following command and press Enter.
DISM.exe /Online /Cleanup-image /restorehealth
5. Please note that the scan will take a few minutes to complete. Please wait patiently.
6. Once the scan is finished, reboot the system.
7. Open Command Prompt again and enter the following command:
6. In the terminal, type the following command and press Enter.
sfc /scannow
7. Wait patiently until the scan is complete.
8. Once done, reboot the system.
Check if the problem has been resolved.
If this doesn’t help, you can perform a system restore to restore your system to an earlier point. Note that this only works if the restore point has been previously set.
That’s it.
We hope this article has been informative. Thank you for reading.
Do comment and let us know the solution that helped you solve the problem. Also, please let us know if you have any problems, we will be happy to help you.
Related posts:
 How to access Steam games without an internet connection
  How to view FPS with Xbox Game Bar in Windows 10: Steps Made Easy
  Hacked account? How to check and remedy
  How to make video calls from WhatsApp Web
  How to increase the RAM memory of a desktop or laptop + Tips and Tricks
  How to organize your YouTube subscriptions into categories
+ Tips and Tricks
How to organize your YouTube subscriptions into categories
+ Tips and Tricks


