


How to fix the problem of Accountsd using too much CPU on macOS?
Question
Problem: How to fix the problem of Accountsd using too much CPU on MacOS?
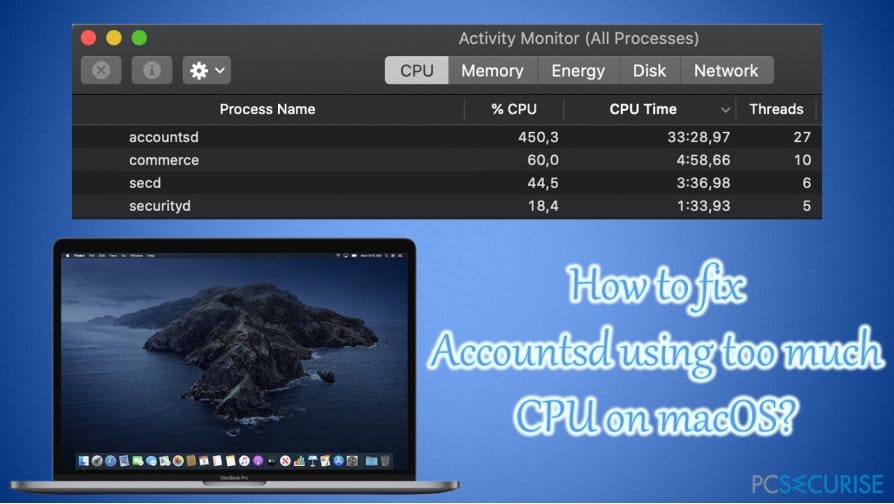
Hello. I recently noticed that my Mac was running slower than usual. When I checked my Activity Monitor, I found that the “Accountsd” process uses up to 300% CPU! Restarting my computer helped me awhile, but then the same thing happened again. Is there any way to fix Accountsd high CPU usage issue on Mac?
Answer provided
Just like Windows, macOS uses hundreds of different processes and files to keep the system running smoothly. The Accountsd process is just one of many such processes that can be found on the Activity Monitor – this process is linked to the accounts registered on the system and designed to handle all your logins as well as words. password for many of your accounts.
Thanks to this database, applications can use certain information to improve the user experience, without directly accessing sensitive data. For example, when you connect multiple email accounts on a single macOS device, you’ll be able to access all of your contacts and previously sent emails.
Therefore, Accountsd is a legitimate process built into a macOS in order to preserve the relevant information required for several different accounts. First, the daemon process must be running in the background all the time in order to function properly.
In principle, most users wouldn’t even notice its existence (unless they’ve encountered the password management system before), but as soon as it starts to act, it gets a close look. Many people have reported that Accountsd uses too much CPU, so much so that their Macs become almost impossible to use.
No matter how old your Mac is, built-in background processes shouldn’t require so many hardware resources. As the behavior is unusual, there are several ways to fix Accountsd high CPU usage on Mac, and below we present all the relevant solutions.
How to solve the problem of Accountsd consuming too much CPU on MacOS?
Reports of the high CPU usage by Accountsd started flooding all IT support forums as early as 2015, although most of the issues started after the release of macOS Catalina (version 10.15) on October 7, 2019. If the resource use is a common feature of the problem, users experienced it in different ways. However, the problem is persistent and users keep complaining about it on Apple’s official forums and other forums.
According to some people, the problem is exclusively related to Mail.app, Gmail, Exchange and other email accounts. Also, they claimed that the high CPU and memory usage was only seen after the WiFi connection was cut off, and there was no problem when the internet connection was restored normally. .
So in many ways changing the settings of Mail.app can help correct the high CPU and memory usage of Accountsd. On the other hand, other users claimed that they absolutely do not use the app and still have the same problem.
Below, you will find various methods which are likely to help you to resolve Accountsd using too much CPU issue. Additionally, a scan with Reimage should automatically resolve various computer issues, which is why we recommended trying it first.
Solution 1. Re-add your Mail.app, Gmail, iCloud or other linked accounts
Apple has yet to officially announce the issue, but much speculation is circulating as to what causes the high resource usage of the Accountsd process. At the moment, it is estimated that iCloud and all other accounts linked to it run an infinite sync loop, which puts a lot of strain on the CP. If you are using multiple email and iCloud accounts, you should do the following with each of them.
- Click on the menu Apple and select System Preferences
- Choose Internet Accounts
- Select Gmail, iCloud or another email account on the left by clicking it once
- Click on the minus button ” -— »At the bottom left of the window

- As soon as the confirmation request appears, click on OK
- Restart your Mac
- Re-add the deleted account and check if the problem persists.
Solution 2. Disable automatic account settings on Mail.app
- Open your application Mail
- Click on Mail> Preferences at the top of the screen
- Go to Accounts
- Select Advanced and uncheck the box Automatically detect and preserve account settings

- Close app preferences.
Solution 3. Download the latest MacOS Catalina 10.15.7 Combo update
If you are not using the latest update on your macOS, you need to go to the official website and download it. Users claimed that running the latest version of the operating system helped them overcome the high CPU usage by Accountsd.
You can download the latest update from the App Store or by visiting the apple official website.

Solution 4. Reconnect your Apple ID again
According to some users, signing out of their Apple ID and signing in again fixed the issue.
- Click the button of the menu Apple and select System Preferences
- At the top you should see your name and your account details
- Click on Apple ID
- Make sure that the section Overview is selected on the left, then click the button Logout at the bottom of the page.
- Then log back into your Apple ID
Solution 5. Close Mail.app when you are offline
Although this option is not a permanent solution, some users have claimed that closing the Mail app when the device is not connected to WiFi has resolved the issue of high CPU usage by Accountsd. .
Another alternative solution would be to deactivate the problematic account as per the steps given in Solution 1.
Solution 6. Move the Accounts4.sqlite file to another location
Accounts4.sqlite is one of the files believed to cause the high CPU usage by the Accountsd process. In order to try to fix it, you need to move the file to another location and then copy it over the original. Note: after moving the file, you will no longer be able to connect to your iCloud. This should return to normal as soon as you place the file in the right location.
- Go to the following location:
/Users/[username]/Library/Accounts/
- You will certainly find there the Accounts4.sqlite file
- Just click on it and drag it to a backup location (which could be the office for example).

- At this point, Mac should create a new file with the same name
- Restart the computer
- Now copy the Accounts4.sqlite file to the original location and log back into your iCloud account.
Get rid of programs with just one click
You can uninstall this program using our step-by-step guide which has been brought to you by the experts at pcsecurise.com. To save you time, we have chosen the tools that will help you perform this task automatically. If you are in a rush or feel that you are not experienced enough to uninstall this program yourself, please use these solutions:
Related posts:
 How to access Steam games without an internet connection
  How to view FPS with Xbox Game Bar in Windows 10: Steps Made Easy
  Hacked account? How to check and remedy
  How to make video calls from WhatsApp Web
  How to increase the RAM memory of a desktop or laptop + Tips and Tricks
  How to organize your YouTube subscriptions into categories
+ Tips and Tricks
How to organize your YouTube subscriptions into categories
+ Tips and Tricks


