


How to fix Windows Update stopped working troubleshooter in Windows 11, 10
Updating Windows is the first and most important step in keeping your machine in tip-top shape. If you don’t keep your Windows system up to date, you will have a lot of problems. Many of the Windows users recently reported that when they were unable to update their operating systems, they tried to fix the problem with the Windows Update troubleshooter, but it abruptly stopped working.
They rebooted their system to see if the Windows Update Troubleshooter would work again, but it didn’t. We did some research and found that it could be caused by corrupted system files, registry file changes or maybe anti-virus software installed on the system etc.
Therefore, we have found some solutions that could solve this problem with Windows Update troubleshooter in Windows 11 system and users will be able to update their Windows system again.
Solution 1 – Enable Windows Update service using Command Prompt
The Windows Update service provides a seamless update of Windows on the system, as well as ensuring that Windows is automatically updated and checks for available updates.
When there is any problem with this service then this creates problems also with Windows update and its troubleshooter. We need to make sure that the Windows Update service is enabled on the system, along with some other services as well.
We recommend our users to enable these services with the help of Command Prompt by following the steps below.
Step 1: Press Windows + R keys together on the keyboard to open the Run command box
Step 2: Write cmd at Run box and press CTRL + SHIFT + ENTER keys together to open the Elevated Command Prompt request.
Step 3: Accept any UAC prompts by clicking Yes continue.
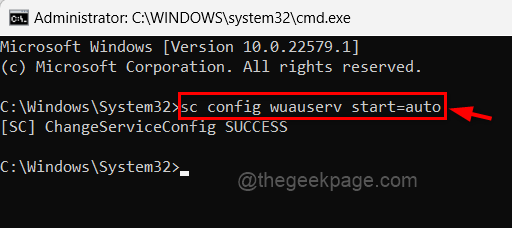
Step 4 – In the command prompt window, type the following command and press the button Get into key to start windows update Service.
sc config wuauserv start=auto
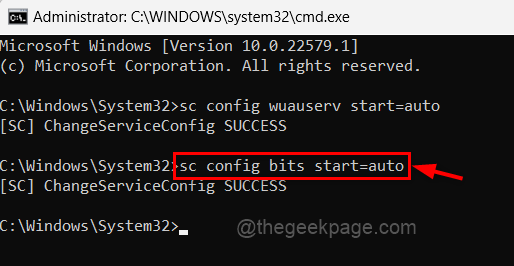
Step 5: Then run the following command to start the POINTS (Background Intelligent Transfer Service) as shown below.
sc config bits start=auto
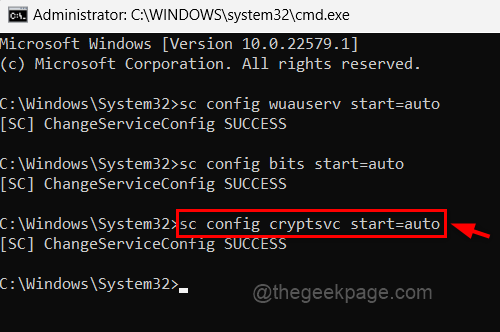
Step 6: Copy and paste the following command and press Get into key to start cryptographic Service.
sc config cryptsvc start=auto
Step 7: Run the following command to start the Windows Modules Installer service as shown.
sc config trustedinstaller start=auto
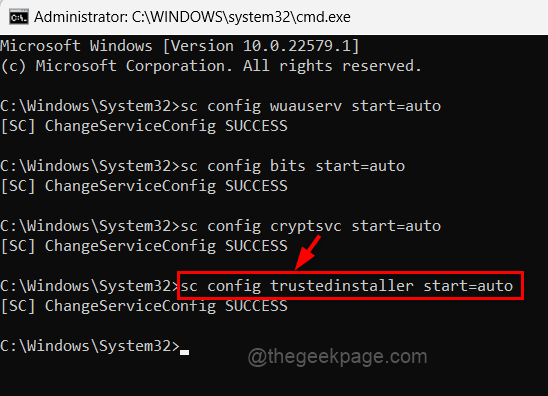
Step 8: Once done, close Command Prompt and reboot your system.
Step 9 – Once the system boots up, check if the issue is resolved.
Solution 2 – Make group policy changes using the local group policy editor
Local Group Policy allows you to create policy modifications that affect all user accounts when they are configured. Therefore, we have explained in simple steps how you can make Group Policy changes that could solve this problem.
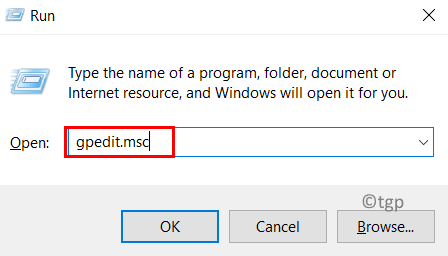
Step 1: open the Run command box pressing Windows + R keys together.
Step 2: Write gpedit.msc in the run box and press the Get into key to open Local Group Policy Editor in the system
Step 3: Once it opens, navigate to the path as mentioned below.
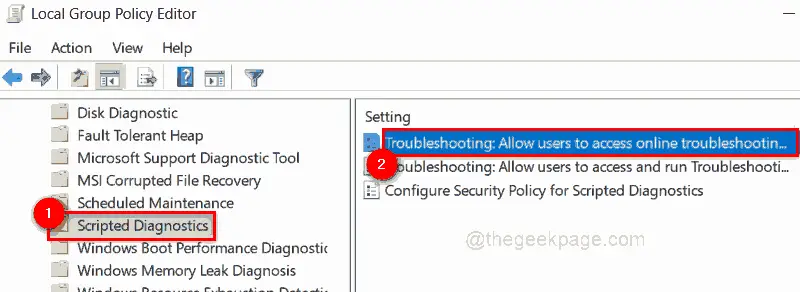
Computer Configuration > Administrative Templates > System > Troubleshooting and Diagnostics > Scripted Diagnostics
Step 4: Make Sure Scripted Diagnostics is selected in the left pane.
Step 5: Then on the right side of the window there are three settings which are mentioned below.
- Troubleshooting – Allow users to access online troubleshooting content on Mcirosoft servers.
- Troubleshooting – Allow users to access and run troubleshooting wizards
- Configure Security Policy for Scripted Diagnostics
Paso 6: double click on Troubleshooting – Allow users to access online troubleshooting content on Mcirosoft servers setting to open your window.
Step 7: Select not configured radio button in the window and click Apply and OK to make changes and close the window.
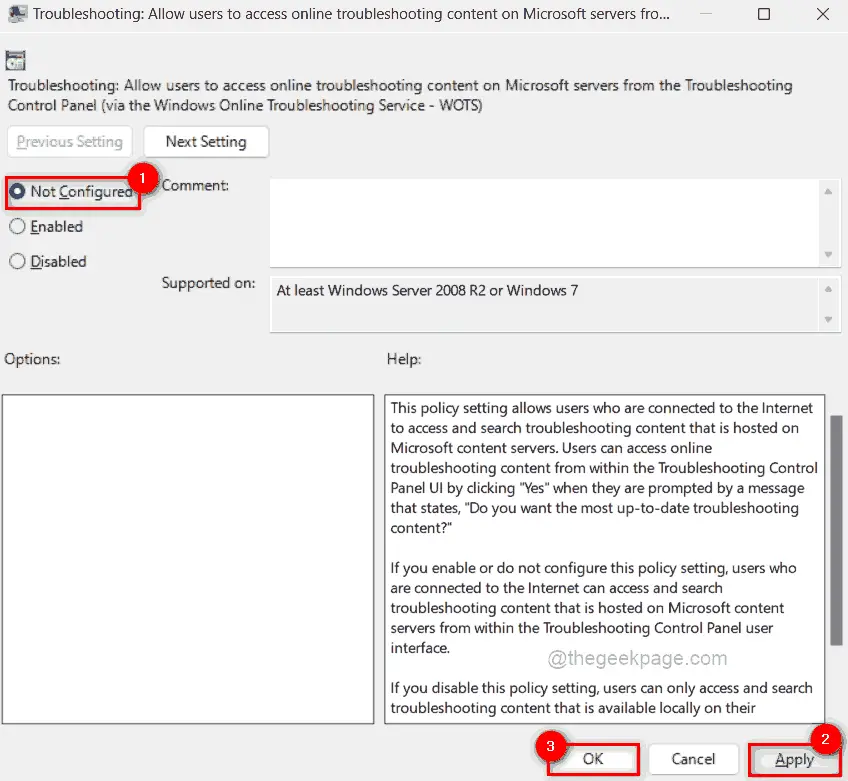
Step 8: Repeat the same for the other two settings as well.
Step 9: Lastly, close the Group Policy editor window.
Solution 3 – Change the software publishing status value in the registry file using Registry Editor
NOTE: Before proceeding with this method, please export the registry file by referring to this post so that the user can restore the file at any time if something goes wrong during editing, which may damage the system.
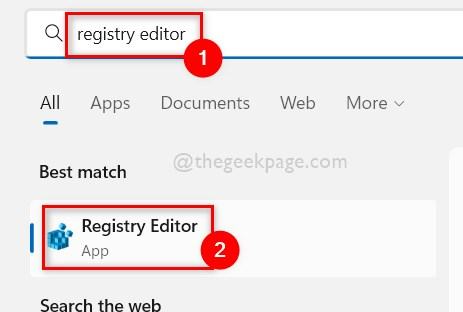
Step 1: Press Windows key on the keyboard and type registry editor.
Step 2: Click registry editor app from the search results as shown in the screenshot below.
Step 3: Click Yes at the user access control prompt to continue.
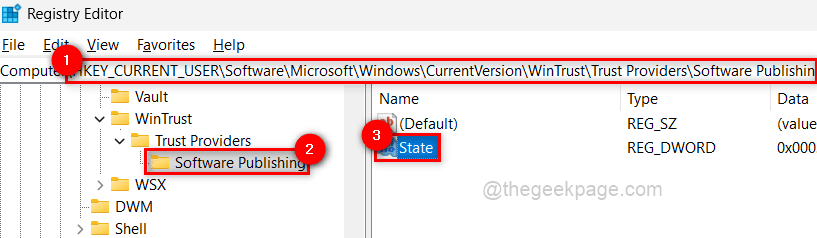
Step 4 – Clear the address bar first and then copy and paste the below path into the address bar and press Get into wrench.
HKEY_CURRENT_USERSoftwareMicrosoftWindowsCurrentVersionWinTrustTrust ProvidersSoftware Publishing
Step 5: After you arrive software publishing registry key, double click Condition DWORD value on the right side of the editor window to open it.
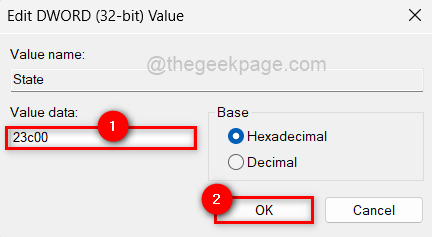
Step 6: Then Enter 23c00 in the Value Data field and click OK to save the changes and close the window.
Step 7: Once done, close the registry editor window and restart the system.
Step 8 – After the system boots, check if the issue is resolved.
Solution 4 – Perform an SFC scan and restore DISM status
System file checker is the scan where it tries to detect the corrupted system files in the Windows system. After the scan, if there are any corrupted system files, the user should replace them as soon as possible to fix any issues on the system.
Let us see how this can be done using Command Prompt with the steps below.
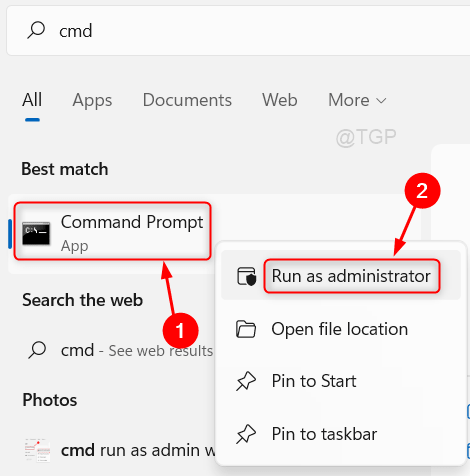
Step 1: open the Symbol of the system in the system by pressing Windows key and click cmd.
Paso 2: The right button of the mouse about him symbol of the system from the search results and select Execute as an administrator from the context menu as shown below.
Step 3: Accept the uac request to continue clicking And.
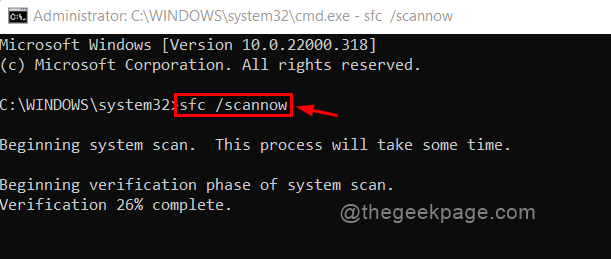
Step 4 – Type the following command and press Get into key to start performing the SFC scan.
sfc /scannow
NOTE: If any damaged files are found, replace them as soon as possible.
Step 5: Once done, to restore system health, run the following command.
Dism /Online /Cleanup-Image /RestoreHealth
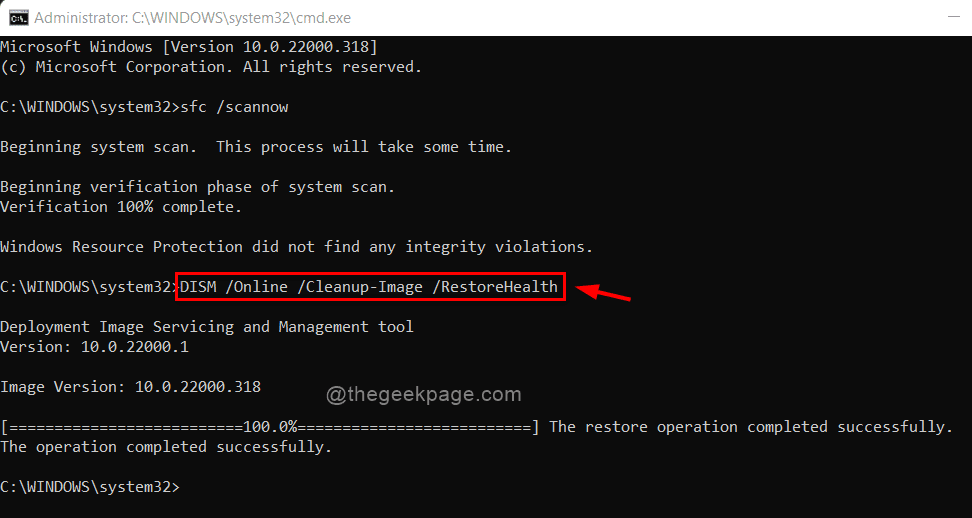
Step 6: Once done, close Command Prompt.
I hope the problem has been solved.
Thanks.
Related posts:
 How to access Steam games without an internet connection
  How to view FPS with Xbox Game Bar in Windows 10: Steps Made Easy
  Hacked account? How to check and remedy
  How to make video calls from WhatsApp Web
  How to increase the RAM memory of a desktop or laptop + Tips and Tricks
  How to organize your YouTube subscriptions into categories
+ Tips and Tricks
How to organize your YouTube subscriptions into categories
+ Tips and Tricks


