


How to Record Video on Mac (4 Methods)
When it’s time to shoot a video, the first thing you think of is pulling out your phone or grabbing a digital camera, but you can also shoot video right on your Mac. All MacBook and iMac models come with a dedicated webcam. It won’t be the best quality, but it can do the job very well.
Recording video on a Mac with your webcam is pretty simple, and there are plenty of apps you can use to do this.
Note: This is a guide on how to record video using your Mac’s webcam. If you’re looking to record your screen, check out our guide on how to make a Mac screen recording.
Preparing to record a video
Before you start recording your video, you need to make sure your system is fully prepared to do so. The most important component, in this case, is a webcam. All MacBook and iMac models released since 2006 have built-in webcams, so as long as yours works, there should be no problem.
However, if you’re using a Mac mini, Mac Pro, or Mac Studio, you’ll need to purchase an external webcam as an add-on. Additionally, you can also use an external camera, such as a DSLR or mirrorless camera, to record your video (which may require a bit of extra experience).
It should have plenty of light in front of you, not be backlit (for example, with a window behind you), and not have excessive background noise.
Once everything is set up, you can start recording video on your Mac. There are a few options you can use to record this, we cover them below.
1. Record video using Photo Booth
The first application that you can use to record video on your Mac uses photo boothAll Macs come with Photo Booth preinstalled, allowing you to take photos and videos using your webcam.
The main advantage of using Photo Booth is that it doesn’t flip your video horizontally like QuickTime Player does. Another advantage is that it allows you to apply various effects to your video recording. While these are pretty fun, they probably won’t. be of any use in a professional video. Still, it’s nice to know you have a choice.
Here’s how to use Photo Booth to record videos:
1. Open photo boothon your Mac. You can do it from stand outthe carpet applications of Discoverer.
2. Once Photo Booth is open, you will see a preview of what your webcam is seeing. Make sure everything looks good and that you are fully framed.
3. Switch to video mode by clicking thevideo iconin the lower left corner.
When you’re ready, click the red record button to start the video. When you are done, stop the recording by pressing the red stop button.
5. Click on the video thumbnail in the Camera Roll to preview your video once it has been saved. If you’re happy, Control-click the thumbnail, choose Exportand save it anywhere on your Mac.
That is all! You can also monitor the recording time at the bottom left corner of your screen while recording. Also note that your recording time is limited by the amount of storage available on your Mac.
2. Record video on Mac using QuickTime Player
You can also record videos on your Mac using QuickTime Player. QuickTime is Apple’s native application for playing videos. However, it also offers many additional options. features, including the ability to record video using your webcam.
To record video on Mac using QuickTime Player:
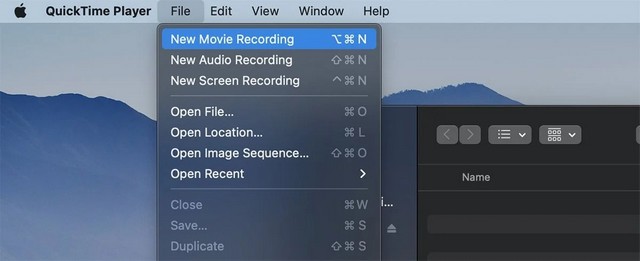
1. Open Quicktime Playerin you Mac.
2. From the menu, choose File > New Video Recording press him cmd+ Option+ NOfor a new video recording. QuickTime should open a preview from your webcam, allowing you to set up the scene and make sure everything goes smoothly. (Note that the video is reversed, unlike Photo Booth.)
3. If you have multiple webcams or audio microphones connected, you can switch audio and video sources by clicking the button little arrow to the right of the record button. You can also choose the recording quality here.
4. Once you are satisfied, click the red record button to start recording. Once you are done recording, just click again to end the recording.
5. QuickTime Player will show you the final recording, which you can view to make sure you’re happy with it. You can also make some minor modifications to the video from the menu. edition.
6. Once you are done, save the video by pressing cmd+ Sor selecting to registeron the menu Office hour.
3. Grabar video con iMovie
Our third option for recording video on your Mac is to use iMovie. Since iMovie is a bit more complicated than the other two we’ve mentioned, we only recommend it if you want to do a lot of editing of your video after you’ve finished recording it. iMovie is also a good option if you’re importing your video into a larger project.
iMovie is not installed on Mac by default, but can be downloaded for free from the Mac App Store. Once done, you can record from your Mac’s webcam directly into iMovie by following the steps below:
1. Launch iMovieon your Mac. Then go to File > New Movie. You can also select Create new on the iMovie Projects screen.
2. Click on the Import button (down arrow) at the top of the iMovie screen.
3. Select cameras in the left pane, then select HD FaceTime camera(or the webcam of your choice). You may need to allow the app to access the webcam’s microphone and camera.
4. Select the project to import the video into at the top of the screen.
5. Once you are satisfied, click the save button at the bottom of the screen to start recording.  Click again to stop recording. When you’re done, click fence at the bottom of the screen to close the recording window.
6. Click Projects in the upper-left corner of the iMovie window to save the recording and import it into a project.
That is all! As you can see, the process is a bit more complex with iMovie, but it’s really useful if you’re creating a larger video (like a documentary) and don’t want to save just a small clip for it.
4. Record using third-party apps
Fortunately, Apple apps do such a good job of recording video that you shouldn’t need to use a third-party app. But if you are looking for a more powerful recording software, we recommend you check out OBS Studio to record your screen and webcam. This can be very useful if you are looking to create a video guide or live stream.
conclusion
Recording videos with a Mac webcam is fine for short videos, but if you’re looking for professional recordings or creating videos for a series of content, it might be worth investing in a better webcam or an external camera to record your videos. Not only will it improve the quality of your recording, but it should give you more flexibility over the different camera settings, including exposure, audio control, etc.
Related posts:
 How to access Steam games without an internet connection
  How to view FPS with Xbox Game Bar in Windows 10: Steps Made Easy
  Hacked account? How to check and remedy
  How to make video calls from WhatsApp Web
  How to increase the RAM memory of a desktop or laptop + Tips and Tricks
  How to organize your YouTube subscriptions into categories
+ Tips and Tricks
How to organize your YouTube subscriptions into categories
+ Tips and Tricks


