


How to take screenshots on Mac: all working methods
– Learn these tips and tricks on how to use your devices in a much easier way as well as solved some of your common problems that are difficult.
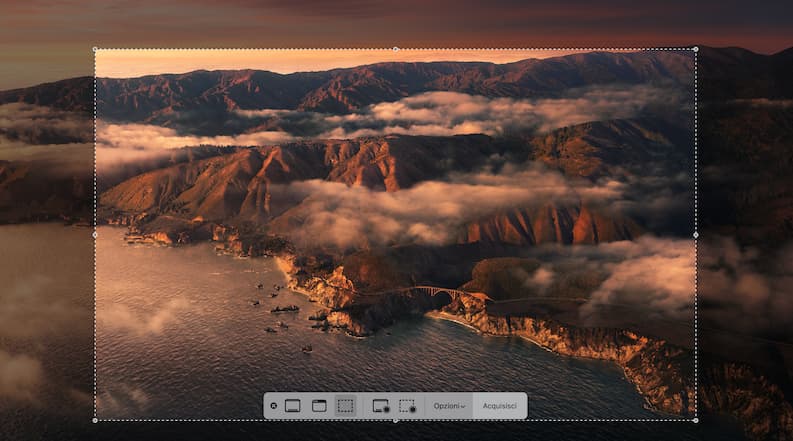
Macs offer many different ways to take a screenshot, that is, to capture the computer screen. For example, you can take a snapshot of the screen with a keyboard shortcut, setting a timer, or using the Touch Bar.
Each screenshot is saved by default on the Desktop, ie on the desktop, although the save location can be changed at any time (more on that later). Each snapshot is stored in PNG format and has the word Screen in the title, followed by the date (year, month, day) and time (hour, minute, second) of the “capture”.
Below we show you all the ways that exist for take a screenshot on Mac.
How to take a screenshot on Mac using the keyboard
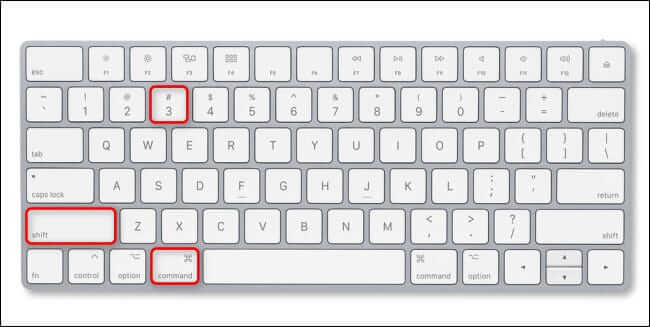
The easiest way to take a screenshot on Mac is by using a keyboard shortcut.
There are multiple key combinations, each of which allows you to get a different result:
- Shift (⇧) + Command (⌘) + 3: Captures a full screen.
- Shift (⇧) + Command (⌘) + 4: captures a portion of the screen.
- Shift (⇧) + Command (⌘) + 4 then Space: captures a window or menu.
- Shift (⇧) + Command (⌘) + 5: Opens the Screenshot app.
- Shift (⇧) + Command (⌘) + 6: Take a snapshot of the Touch Bar.
Read also: Keyboard shortcuts, key combinations on Windows
How to take a screenshot on Mac without using the keyboard
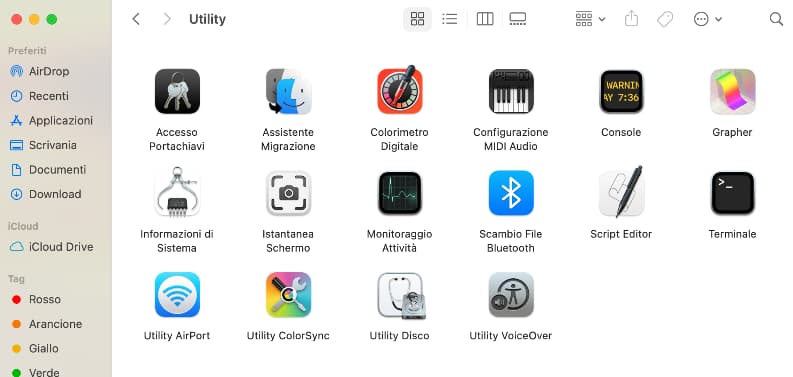
The Mac allows you to take a snapshot of the screen without using a keyboard shortcut, but more simply via theintegrated app Snapshot Screen.
To start it, simply follow these simple steps:
- Open Finder.
- Select “Go” and, from the drop-down menu that opens, click on “Applications”.
- Scroll down and click on the Utilities folder.
- Click on Screenshot to launch the app.
If you want to launch the Snapshot application faster, click on the icon located in the bottom bar of your computer with the right button, then select “Options” and “Keep in Dock”. From now on, just select the app icon from the Dock to launch it.
How to take a screenshot on Mac via the Touch Bar
If you have a MacBook Pro with the Touch Bar, you can take a screenshot by going to customize Control Strip by adding the Snapshot app icon. To do this, open System Preferences and select Keyboard, then click on “Customize Control Strip” and from the menu that opens, drag Screen Snapshot (a camera icon) to the Touch Bar.
At this point, to launch the Snapshot app from the Touch Bar, all you have to do is click on the camera icon, the equivalent therefore of the keyboard combination Shift (⇧) + Command (⌘) + 5 seen before.
Read also: How to take screenshots of an entire web page
How to take a screenshot by setting a timer
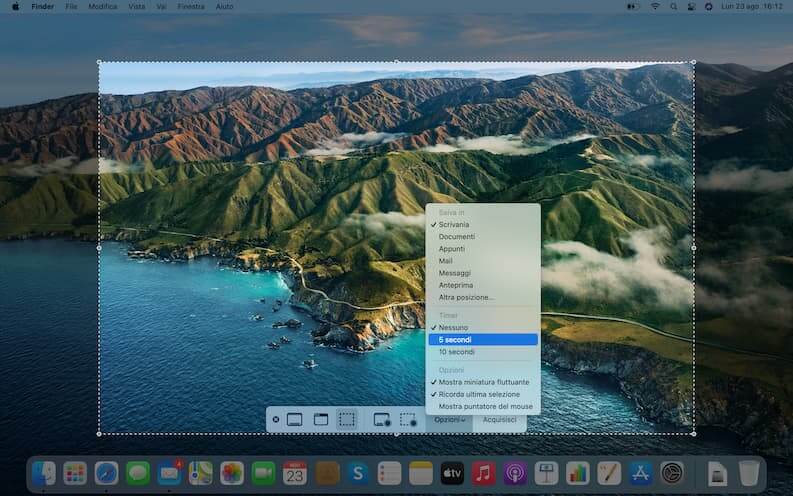
You can also take a snapshot of your computer screen with a 5 or 10 second delay. How? By setting a timer, an option integrated in the Snapshot app.
Here are the steps to follow:
- Launch the Snapshot app.
- Click “Options”, then under “Timer” select “5 seconds” or “10 seconds”.
- Select “Capture within x seconds” to launch the timer.
Note: The captured snapshot is not saved automatically. To save the screenshot captured with the timer, open the image showing the snapshot of the screen and click on the “Finish” button.
How to record Mac screen as a video

Using the default Screenshot application you can record the Mac screen as if it were a video. This is a widely used technique especially to create a tutorial, to be published later on YouTube or on a website.
Here is the procedure:
- Launch the Snapshot app.
- Click on the “Record full screen” or “Record selection” icon (you can easily recognize them by the presence of the black dot at the bottom right).
- Click “Record” to start screen recording.
- Use the Shift + Command + 5 shortcut to display the Screen Snapshot app tools and click on the “Stop Screen Recording” icon to end the video recording.
How to edit a screenshot on Mac
Once you’ve captured a screenshot of your Mac, you can edit it via the options provided by the default screenshot app.
To see the editing tools you just have to click on the screenshot thumbnail just made that you find in the right corner of the display.
The available options are:
- Sketch
- Draw
- Form
- Text
- Highlight selection
- Company
- Shape style
- Border color
- Fill color
- Text style
- Wheel
- Cut out
Then, to save the changes made and save the file, click on the “Finish” button.
On the same topic: Best sites to edit photos online
How to change screenshot saving location on Mac
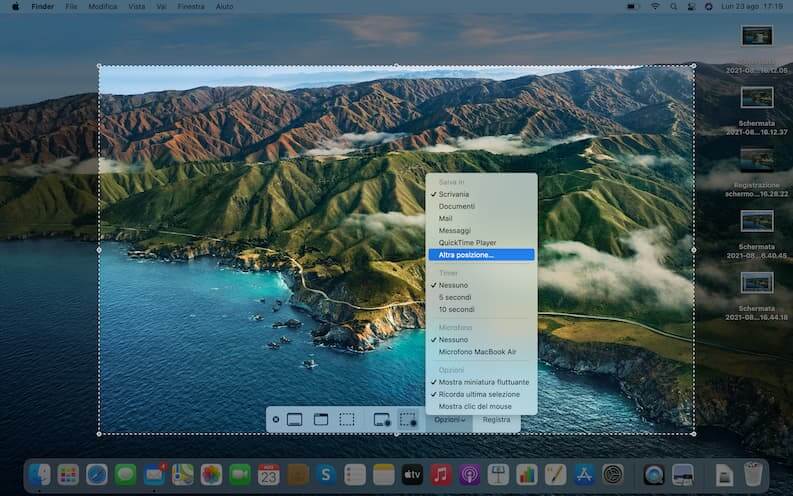
By default, screenshots are saved on the desktop. If you want, however, you can choose another saving destination, directly from the Snapshot app before saving the captured image.
These are the steps to take:
- Launch the “Screenshot” app.
- Click on “Options”, and from the menu that opens select “Documents”, “Mail”, “Messages”, “QuickTime Player” or “Other location”.
- If you choose “Other Location”, select the location you prefer within the Mac, then click on “Choose” to confirm the new save location …
How to capture mouse cursor in screenshot on Mac
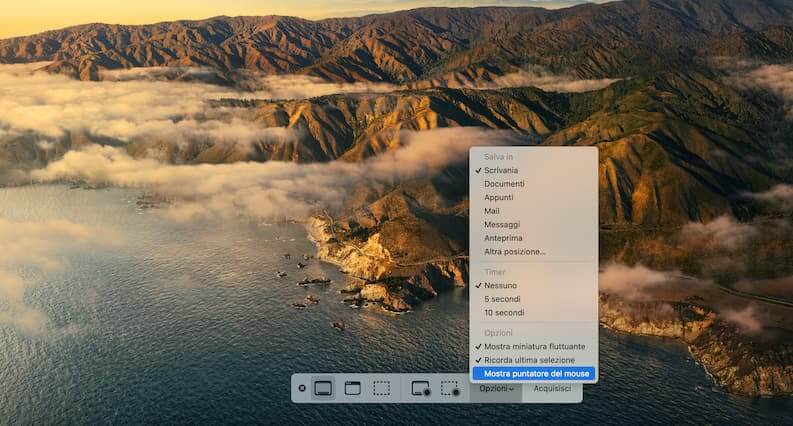
By default, the mouse cursor never appears in the Mac screen screenshot. Even in this case, however, it is possible to solve the “problem” by making a simple one change the Snapshot app options.
First of all start the application using the shortcut Shift (⇧) + Command (⌘) + 5, then click on “Options” and, from the menu that opens, select the last item “Show mouse clicks”.
How to turn off screenshot sound on Mac
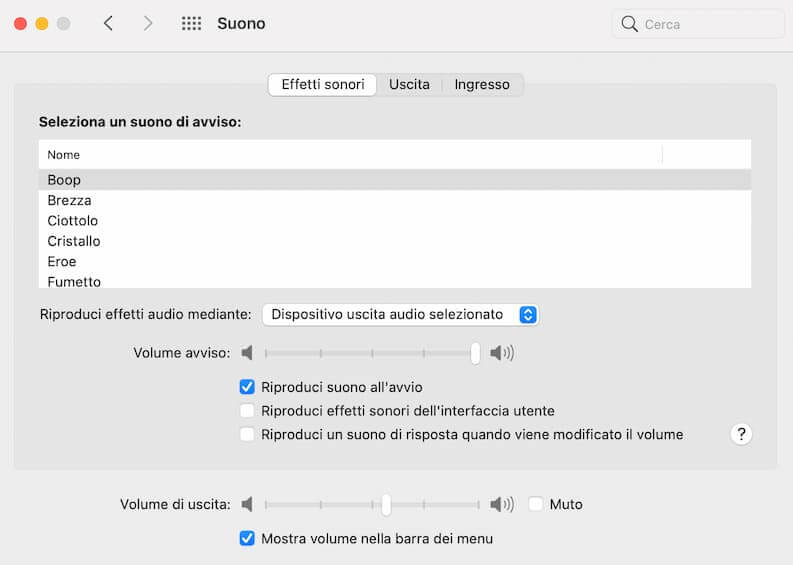
Some users may not find the sound automatically emitted by the computer when the screen is captured pleasantly. If you’re on this list too, we’ll show you how easy it is disable audio notification of screenshot on your Mac:
- Open System Preferences.
- Select “Sound”.
- Under the “Sound Effects” tab, remove the check mark next to “Play User Interface Sound Effects”.
Note: by doing this you will not only delete the sound of the screenshot, but also all the other audio notifications, such as the one that the Mac emits as soon as you empty the Trash.
Third party app to take a screenshot on Mac
If you’d rather try a different experience than the one provided by the default Screen Snapshot app of the macOS operating system, you can rely on other third-party apps, which allow you to take a screenshot on Mac by offering additional tools:
- Skitch: Part of the popular Evernote app and one of the most used alternatives to replace Snapshot.
- Lightshot Screenshot: Another great alternative to the default screenshot app on the Mac. Among other things, it allows you to easily share images on Facebook and Twitter. Free download from the Mac App Store.
- Monosnap: an advanced app to take screenshots, edit them and upload them to the most popular cloud services. In this regard, it offers support for Dropbox, Evernote, Box.com and CloudApp.
Conclusions
Our guide on how to take a screenshot on Mac ends here. Do you know of any other shortcuts or apps that were not mentioned in the article? If you like, tell us your experience by leaving a comment below.
On the same topic, read also: How to take screenshots on Windows 10 PCs

Related posts:
 How to access Steam games without an internet connection
  How to view FPS with Xbox Game Bar in Windows 10: Steps Made Easy
  Hacked account? How to check and remedy
  How to make video calls from WhatsApp Web
  How to increase the RAM memory of a desktop or laptop + Tips and Tricks
  How to organize your YouTube subscriptions into categories
+ Tips and Tricks
How to organize your YouTube subscriptions into categories
+ Tips and Tricks


