


We can’t open this file in Photos in Windows 11
Microsoft Photos was first introduced to the operating system in 2012. Since then, Microsoft has overhauled the user interface, revamping the visual aesthetics to the point that it transcends Windows 11 images. But, there are some issues that are still there. Some users have recently complained about an issue where they can’t open image files with Photos, instead of an annoying “We can’t open this file in Photos” error message. There are some quick fixes for this problem.
Alternative solutions –
1. The file will not open if it is broken or damaged. Try opening the file with another image processor (like Paint) and check.
2. If the image file is on a shared network drive, you may not have the necessary permissions to access the file. Just move it to your own computer and access it again.
Solution 1: check if the image is in an unsupported format
There are some advanced image formats that Photos doesn’t support yet. We have provided a list of these unsupported formats:
WebP
HEIC
JPEG XR
You can convert these images to .JPEG or .JPG file format and then you can access them with the Photos application.
Otherwise, you can use other third-party applications to access the file.
Fix 2 – Reset or Repair Photos
The quickest solution to this problem is to reset the Photos app to default settings.
1. At first, press the Tecla de Windows + I keys together.
2. Then tap on the «Applications” On the left side.
3. On the right side, click «Apps and Features“.
4. Now find the «Microsoft Photos”In the application list.
5. Then click on the three-dot menu and click on the «Advanced Options“To access it.
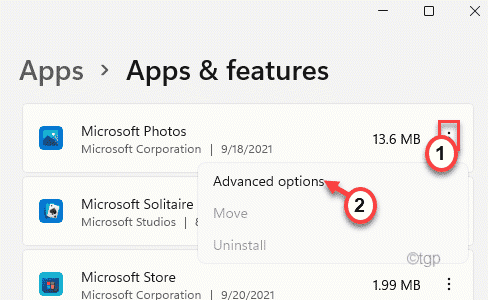
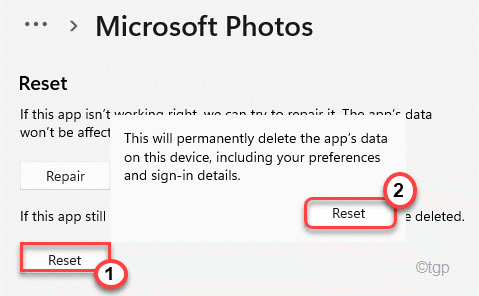
6. Now, here you will see two options under ‘Reset’.
Repair
Restart
7. Now, touch «Repair“To repair the application.
After the repair process is complete, try opening the image file again.

8. If Photos still shows the error message, click «Restart“.
9. Then confirm the action with a tap on «Restart“.
After restoring photos, just open the image file you were having trouble with.
Fix 3 – Reinstall Photos app
You can reinstall the Photos application on your computer.
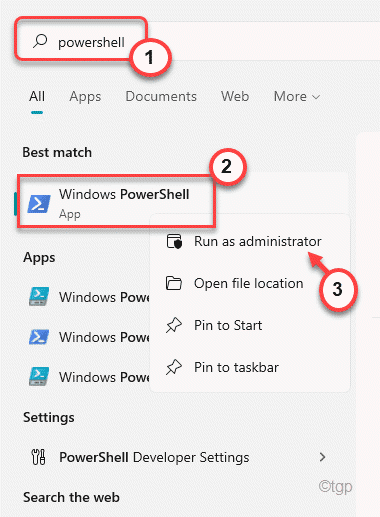
1. At first, click the Windows toand writes “potencia Shell”In the search box.
2. Then, right-click on the «Windows PowerShell“And click”Execute as an administrator“.
3. copy get this command in terminal and press Pay in to uninstall the Photos application from your computer.
Get-AppxPackage *photo* | Remove-AppxPackage

This will uninstall the Photos application from your computer. Close the PowerShell window once you are done.
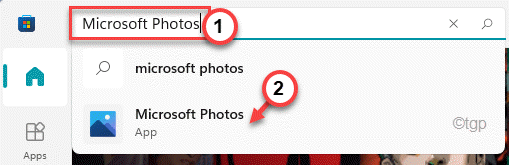
4. Now open the Microsoft Store on your computer.
5. Here, search for «Microsoft Photos”In the search box.
6. Tap on «Microsoft Photos” again.
7. Also, touch «Get”To install the Microsoft Photos application on your computer.

After installing the app, close the Settings and try opening the image files again.
Solution 4: use Windows photo viewer
If any of these solutions don’t work, you can use the older Windows Photo Viewer application on your computer.
1. First, download the Restore Windows Photo Viewer.
2. Then, double click about him “Restore Windows Photo Viewer“To run on your computer.

3. Now, tap «next“To continue.

4. Then click on «Install on pc”To install it on your computer.

After the installation process is complete, close the installer. Restore Windows Photo Viewer should open automatically.
5. Here, simply click on «Restore Windows Photo Viewer“To restore it.

Now, you can use the Windows photo viewer. Try to reopen the conflicting image files with this Windows photo viewer. Check whether it is working or not.
Solution 5: choose the default apps by file type
You can choose the ‘Photos’ app by default for the file types you choose.
1. First, open the Settings window.
2. Then tap «Applications“.
3. Then, on the right side, click «Default apps“.

4. Now, in the same part of the screen, scroll down and tap «Default apps by file type“.

5. Now, look for the image file types (like .jpeg, .jpg, etc.).
6. Touch the first one to change the default setting.

7. Then select the «Photos”Application of the list.
8. In addition, click on «OK”To set the default settings.

9. Now repeat the same for other extensions associated with image files and set them in Photos.

Once you’re done, close Settings.
The photos will start working and all those conflicting images will open without any more errors.
Related posts:
 How to access Steam games without an internet connection
  How to view FPS with Xbox Game Bar in Windows 10: Steps Made Easy
  Hacked account? How to check and remedy
  How to make video calls from WhatsApp Web
  How to increase the RAM memory of a desktop or laptop + Tips and Tricks
  How to organize your YouTube subscriptions into categories
+ Tips and Tricks
How to organize your YouTube subscriptions into categories
+ Tips and Tricks


