


Fix error 0x80070426 for Microsoft Store and Windows Update in Windows 11, 10
Some of the Windows users have reported that they encounter a Windows update error while installing some updates on their system. This particular error with error code 0x80070426 is seen both when updating Windows and in the Microsoft Store when purchasing some applications.
Error message in Windows Update –
There were problems installing some updates, but we will try again later. If you keep seeing this and want to search the web or contact support for information, this may help: (0x80070426)
Error message in Microsoft Store –
Your purchase could not be completed. Something happened and your purchase cannot be completed. Error code: 0x80070426
NOTE: There is an error related to Microsoft Essentials with the same error code. Therefore, check the error message before proceeding with the corrections.
In this article, we have selected some fixes that can help you solve this problem.
Solution 1: reset the Windows Store
Step 1: Open Terminal Run using keys Windows and R.
Step 2: Write cmd and keep the keys Ctrl + Shift + Enter to open the command prompt in administrator mode.
Step 3: If a confirmation dialog appears asking for permission, just click And.
Step 4: In the command prompt window that appears, type the following commands.
wsreset.exe
Step 5: reboot your system.
Check if this helps. If not, try the next solution.
Solution 2: run the Windows Update troubleshooter
Step 1: Open the Run dialog box.
Step 2: In the window that appears, type the command ms-settings: troubleshoot and click it’s okay.

In Windows 10
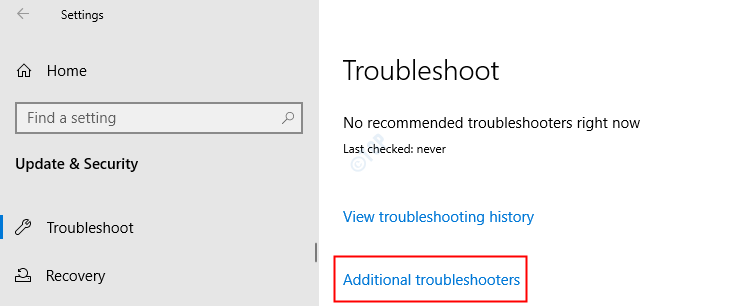
Step 3: In the Settings -> Update & Security -> Troubleshoot window that appears, choose the Additional troubleshooters option
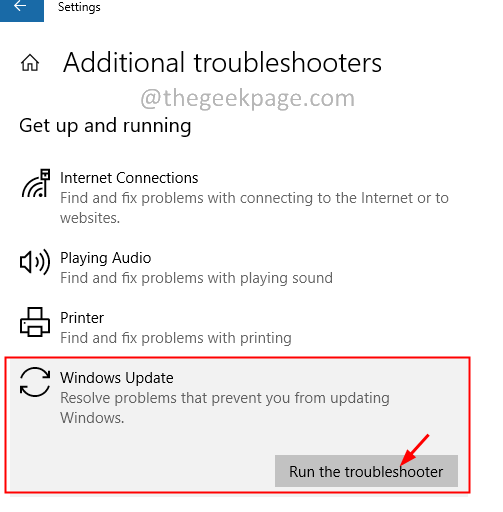
Step 4: In the Additional Troubleshooters window that opens, choose the windows update option
Step 5: click next Run the troubleshooter button
Step 6: Now, the system will start looking for problems. You will be notified once the problem is found, follow the on-screen instructions to fix the problem.
Step 7: reboot the system.
In Windows 11:
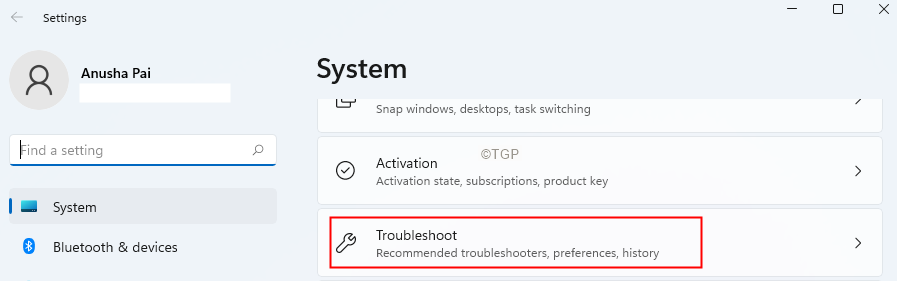
Step 3: In the window that appears, click Solve problems.
Step 4: Now, click Other troubleshooters.
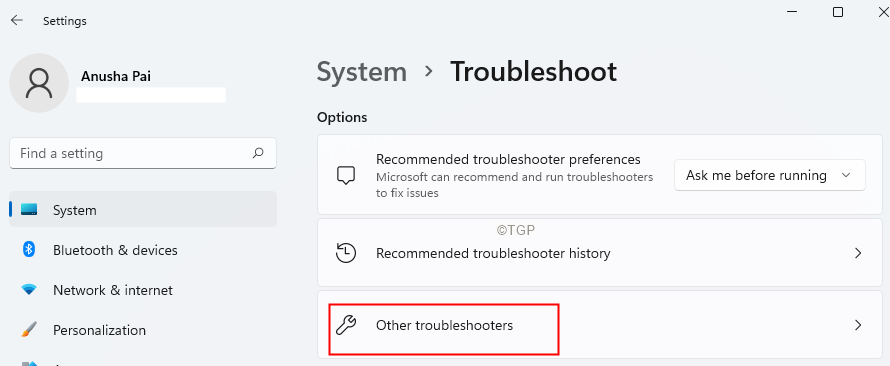
Step 5: Click the To run button next to Windows update.
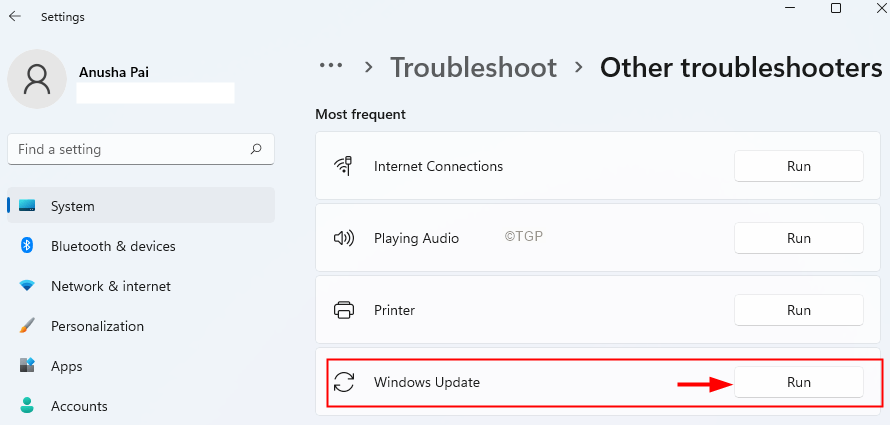
Step 6: Now, the system will start looking for problems. You will be notified once the problem is found, follow the on-screen instructions to fix the problem.
Step 7: reboot the system.
Check if this helps. If not, try the next solution.
Solution 3: reset Windows Update components
Step 1: Open Run Terminal using Windows and R.
Step 2: Write cmd and keep the keys Ctrl + Shift + Enter to open the command prompt in administrator mode.
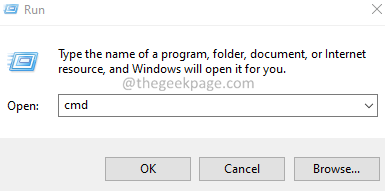
Step 3: If a confirmation dialog appears asking for permission, just click And.
Step 4: In the command prompt window that appears, type the following commands. Make sure to hit enter after each command.
net stop wuauserv
net stop cryptSvc
net stop bits
net stop msiserver
ren C:WindowsSoftwareDistrubution SoftwareDistribution.old
ren C:WindowsSystem32catroot2 Catroot2.old
net start wuauserv
net start cryptSvc
net start bits
net start msiserver
exit
Step 5: Open the Run dialog box again.
Step 6: Write potencia Shell and press Get into.
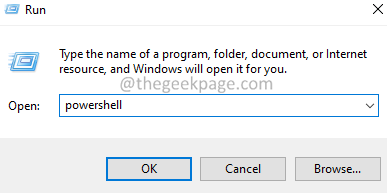
Step 7: If you see a pop-up confirmation dialog, click And.
Step 8: In the window that opens, copy and paste the following commands. Make sure to press Enter after each command.
wuauclt.exe /updatenow
exit
Step 5: reboot the system.
Solution 4: run a DISM and SFC scan
Step 1: Open the Run dialog box. Use the shortcut Window and R.
Step 2: In the dialog box, type cmd and press Ctrl + Shift + Enter. This opens the command prompt in administrator mode.
Step 3: In the Command Prompt window that opens, enter the following commands. Don’t forget to press Enter after each command.
Dism /Online /Cleanup-Image /CheckHealth
Dism /Online /Cleanup-Image /ScanHealth
Dism /Online /Cleanup-Image /RestoreHealth
sfc /scannow
Step 4: reboot your system.
Check if this helps, if not try the next solution.
Solution 5: enable the Microsoft account sign-in wizard
Step 1: Open the Run dialog with Windows + R.
Step 2: type the command potencia Shell and hold Ctrl + Shift + Enter keys to open PowerShell with administrator rights.
Step 3: If you see a UAC message, click And.
Step 4: In the PowerShell window that opens, enter the following command to check the status of Microsoft account sign-in wizard service.
Get-Service -DisplayName "Microsoft Account Sign-in Assistant"

Step 5: If you see the status as stopped, enter the following command to start the service.
Start-service -DisplayName "Microsoft Account Sign-in Assistant"
Step 6: You can check the status to confirm that it has started.

Solution 6: disable the third-party firewall temporarily
If you have any third-party antivirus installed on your system, temporarily disabling it or uninstalling the AV can help. Note that the problem is not known to be caused by Windows Defender Firewall. Usually seen with AV like Mcafee, Avast, Combo, etc.
Step 1: First of all, try to disable your antivirus program. Check the AV website to see how to disable your antivirus as the instructions are different for each vendor.
Step 2: If the deactivation did not work, try uninstalling the AV program completely.
Step 3: Open the Run window using Windows + R
Step 4: Write appwiz.cpl and hit Get into.
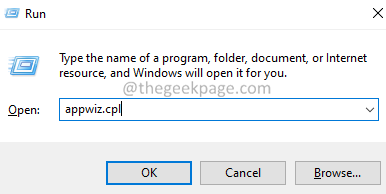
Step 5: In the Program and Features window that opens, locate your antivirus software.
Step 6: Right click on the software and choose Uninstall As shown below.
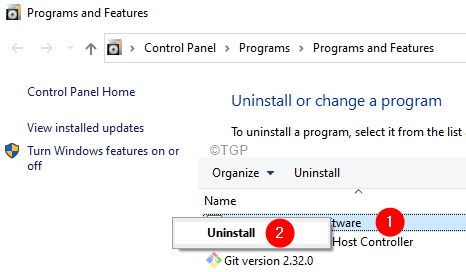
Step 7: Follow the instructions on the screen and complete the uninstall process.
Step 8: restart the computer.
Step 9: Try to backup again.
Step 10: If you don’t find any error messages, this means that the third-party antivirus caused the problem.
Step 11: Try installing the third-party antivirus software again with the latest version and check if you see the problems.
Step 12: If you keep seeing the problem, you may need to wait until the next version is released.
Solution 7: download the update manually
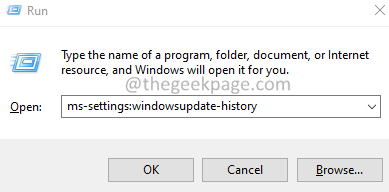
Step 1: Open the Run dialog with the keys Windows and R
Step 2: Type the following command and hit Enter.
ms-settings:windowsupdate-history
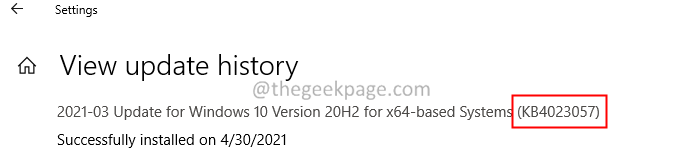
Step 3: In the window that appears, locate the failed update and identify its KB number. Please refer to the screenshot below.
NOTE: The image below is for demonstration only.
Step 4: open the Microsoft Update Catalog

Step 5: Choose the update based on your build and click the Download button as shown below.

Step 6: Try to install the update now.
That is all.
We hope this article has been informative. Thank you for reading.
Please comment and let us know the solution that has helped you solve the problem.
Related posts:
 How to access Steam games without an internet connection
  How to view FPS with Xbox Game Bar in Windows 10: Steps Made Easy
  Hacked account? How to check and remedy
  How to make video calls from WhatsApp Web
  How to increase the RAM memory of a desktop or laptop + Tips and Tricks
  How to organize your YouTube subscriptions into categories
+ Tips and Tricks
How to organize your YouTube subscriptions into categories
+ Tips and Tricks


