


How to add or remove folders from Controlled Folder Access in Windows 11, 10
Microsoft has introduced an antivirus software that helps protect folders from any other app attack called Defender Antivirus. In a ransomware attack where all the folders and files inside of them are attacked and you will not be able to use them because you will be locked by another process which is a virus. Therefore, when you add folders to Controlled Folder Access, you provide additional security and prevent these ransomware attacks. By default, Windows adds the Documents, Pictures, Videos, etc. folder. from your Users directory to Controlled Access to the folder. You must log in as a Administrator on your system to add or remove folders from controlled folder access. We have explained some methods by which you can do it in this post.
How to add or remove folders to Controlled Folder Access in Windows 11 using Settings
Step 1: Press windows +R keys together on your keyboard to open Run dialog box.
Step 2: Write windows defender: at run dialog box and press the button Get into key on your keyboard to open windows security.
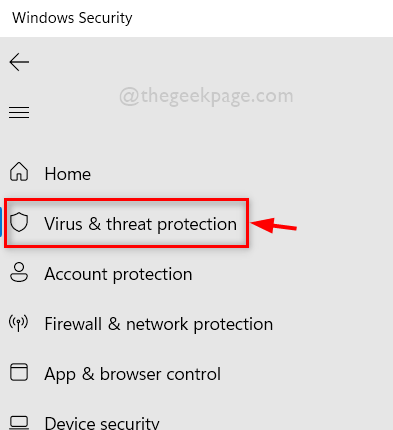
Step 3 – Select Virus & Threat Protection on the Security left side of the window.
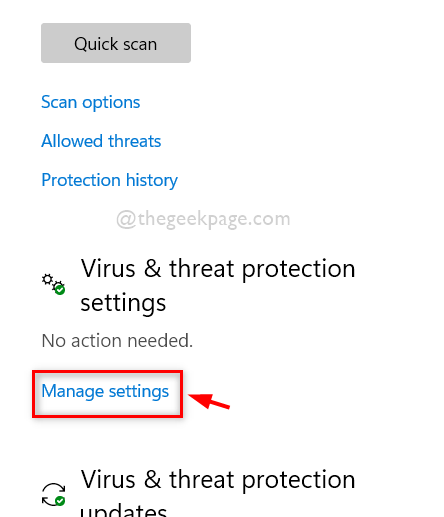
Step 4 – On the right side of the window, scroll down and click Manage settings in the Virus & threat protection settings option, as shown below.
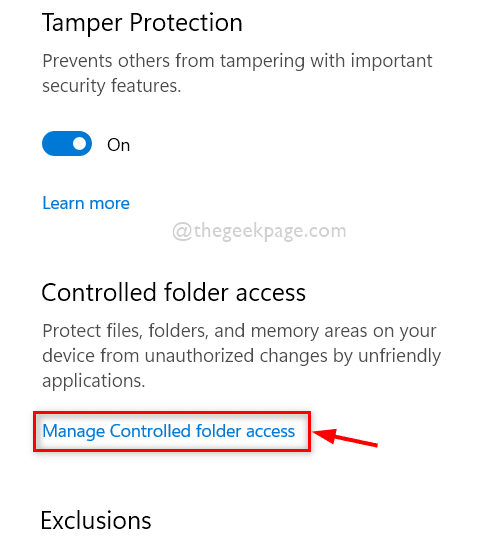
Step 5 – Then, at the bottom of the Virus & threat protection settings page, click Manage access to controlled folders option as shown below.
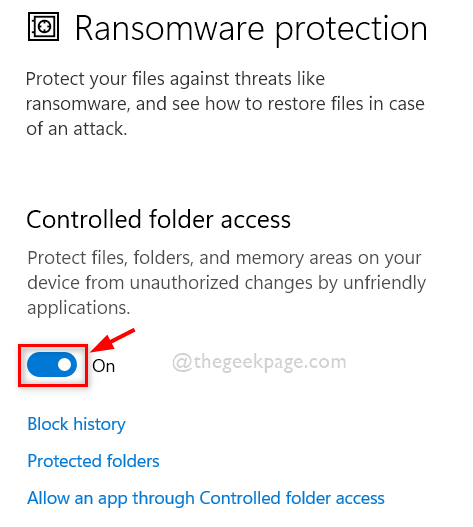
Step 6: Click Controlled access to folders toggle button to turn it on.
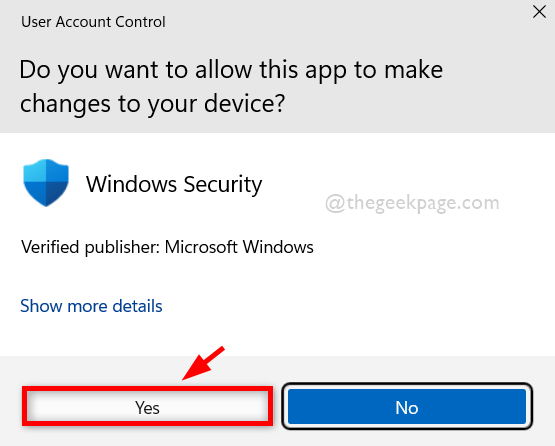
Step 7: Accept the UAC prompt to enable controlled folder access by clicking Yes as shown.
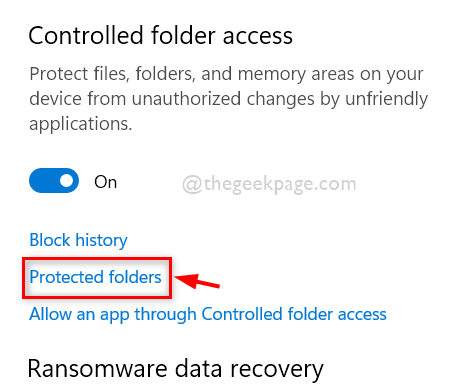
Step 8 – After enabling controlled folder access, click protected folders to see the list of folders as shown below.
Step 9: Again, click Yes to accept the UAC prompt to continue.
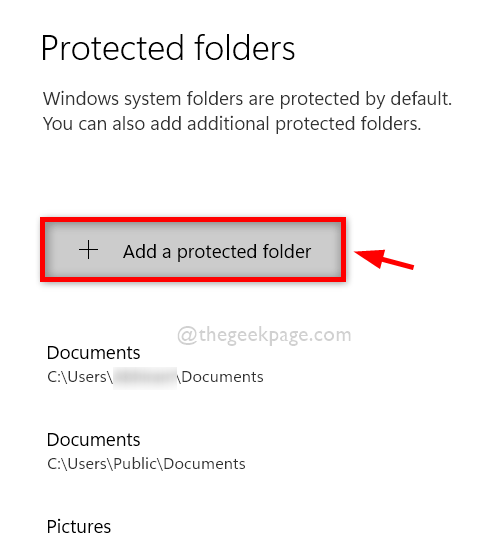
Step 10 – Then click Add a protected folder button to add the folder you want.
Step 11 – Find the folder you want to add and select the folder.
Step 12: Then click Select the folder button as shown in the image below.

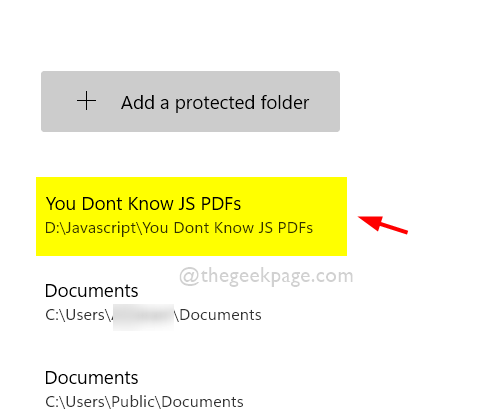
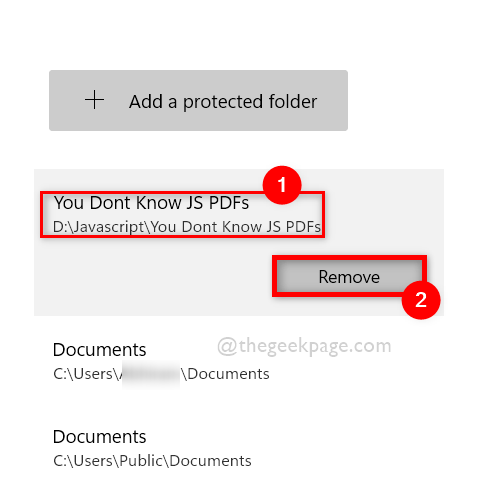
Step 13 – Now you can see that the folder you had selected has been added to the list of protected folders.
Step 14 – If you want to remove the Protected folder from the list, simply select the folder by clicking on it.
Step 15: Then you will see Get rid of button below the protected folder. Click on it and the protected folder will be immediately deleted.
Step 16 – Once done, close the Windows Security window.
That’s it.
How to add or remove folders for Controlled Folder Access in Windows 11 using Local Group Policy Editor
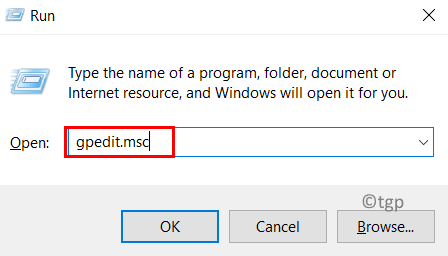
Step 1: Press windows +R keys together on your keyboard to open Run dialog box.
Step 2: Write gpedit.msc in the run dialog and press the button Get into key to open Local Group Policy Editor.
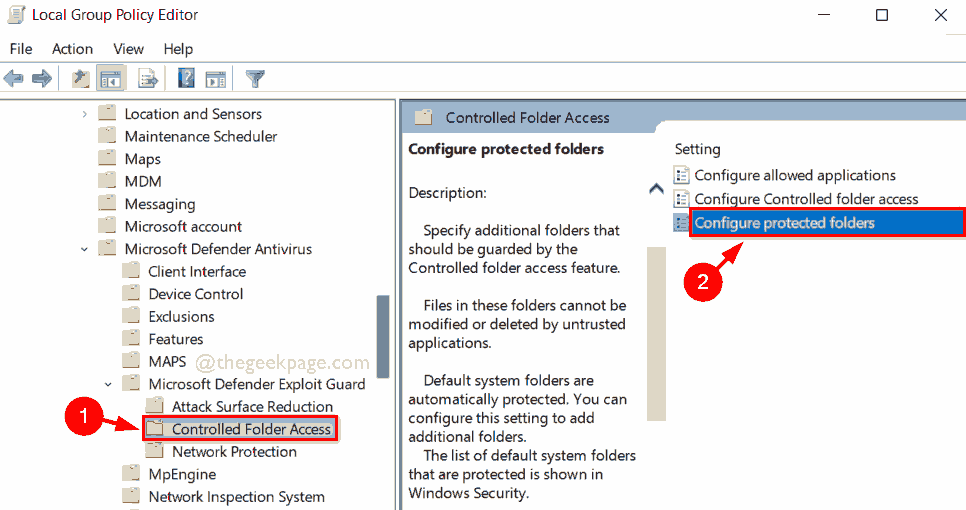
Step 3 – Navigate through the below given path to reach Controlled access to folders option.
Computer Configuration> Administrative Templates> Windows Components> Microsoft Defender Antivirus> Microsoft Defender Exploit Guard> Controlled Folder Access
Step 4: Select the Controlled access to folders in the left side panel of the local group policy editor.
Step 5: Then on the right side of the window, double-click Set up protected folders option as shown in the following image.
Step 6 – In the Configure Protected Folders window, select Activated radio button and then click Show button as shown in the image below.
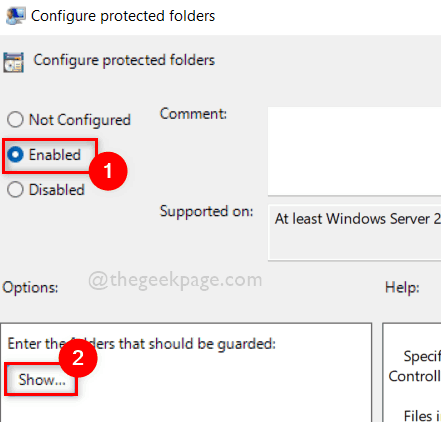
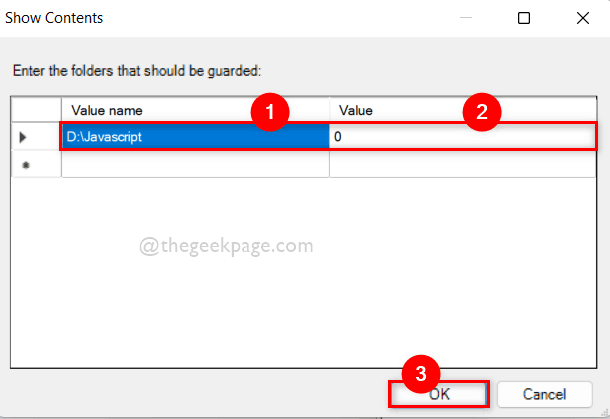
Step 7 – In the Show Contents window, enter the path of the folder you want to add to Controlled Folder Access in the Value name countryside.
Step 8: Then Enter 0 at Value countryside.
Step 9: For many other folders, enter the folder path one after another as explained in Step 8.
Step 10: Click OK continue.
Step 11 – To remove the folders from Controlled Folder Access, click Activated and then play Show button as explained above.
Step 12: So, Delete the folder path from the Show Contents window.
Step 13 – Close the Local Group Policy Editor window once you are done.
That’s it.
How to add or remove folders for Controlled Folder Access in Windows 11 using PowerShell
Step 1: Press Windows + R keys on your keyboard to open Run dialog box.
Step 2: Then type potencia Shell in the run box and press CONTROL + CHANGE + GET INTO key to open Potencia Shell application as administrator.
Step 3: To add the folder to Controlled Folder Access, copy and paste the following command and press the button Get into key to run it.
NOTE : please replace D:Javascript with the path of the folder you want to add to controlled folder access.
PowerShell Add-MpPreference -ControlledFolderAccessProtectedFolders "D:Javascript"

Step 4: Run the following command if you want to remove any folder from controlled folder access.
NOTE : please replace D:Javascript with the path of the folder you want to remove from controlled folder access.
PowerShell Remove-MpPreference -ControlledFolderAccessProtectedFolders "D:Javascript"

Step 5 – Once done, close the PowerShell app.
That’s it.
How to add or remove folders for Controlled Folder Access in Windows 11 using Registry Editor
NOTE: Keep a backup copy of the registry file before continuing with this method. Because you can roll it back at any time if something goes wrong with the registry file that may harm your system.
Step 1: Press Windows + R keys together on your keyboard to open Run dialog box.
Step 2: Then type cmd in the run box and press CTRL + SHIFT + ENTER keys together to open Symbol of the system What management.
Step 3 Run the following commands one by one.
set key="HKEY_LOCAL_MACHINESOFTWAREPoliciesMicrosoftWindows DefenderWindows Defender Exploit GuardControlled Folder AccessProtectedFolders"
reg add %key%

Step 4 – Close Command Prompt.
Step 5: Press Windows + R keys together on your keyboard to open Run command box
Step 6: Write regeditar in the run box and press the button Get into key to open registry editor.
Step 7: Accept the UAC prompt by clicking Yes continue.
Step 8: Copy and paste the path given below into the empty and clear address bar.
HKEY_LOCAL_MACHINESOFTWAREPoliciesMicrosoftWindows DefenderWindows Defender Exploit GuardControlled Folder AccessStep 9: Then right click on Controlled access to folders and select Nuevo > Valor DWORD (32 bits).
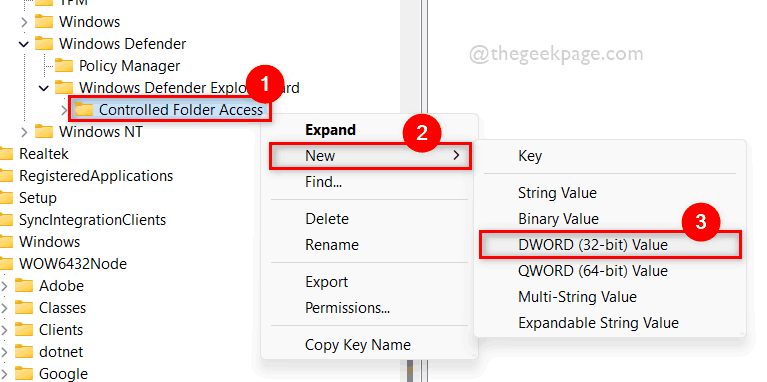
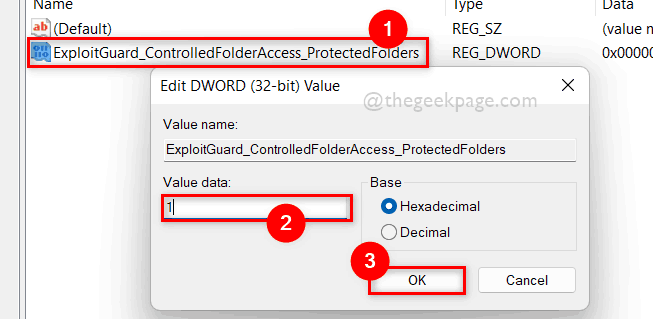
Step 10: Rename the newly created DWORD value to ExploitGuard_ControlledFolderAccess_ProtectedFolders and double click on it to open it.
Step 11: After that, enter 1 in the Value Data field and click OK.
Step 12 – Copy and paste the path below into the empty address bar again and hit the button Get into wrench.
HKEY_LOCAL_MACHINESOFTWAREPoliciesMicrosoftWindows DefenderWindows Defender Exploit GuardControlled Folder AccessProtectedFolders
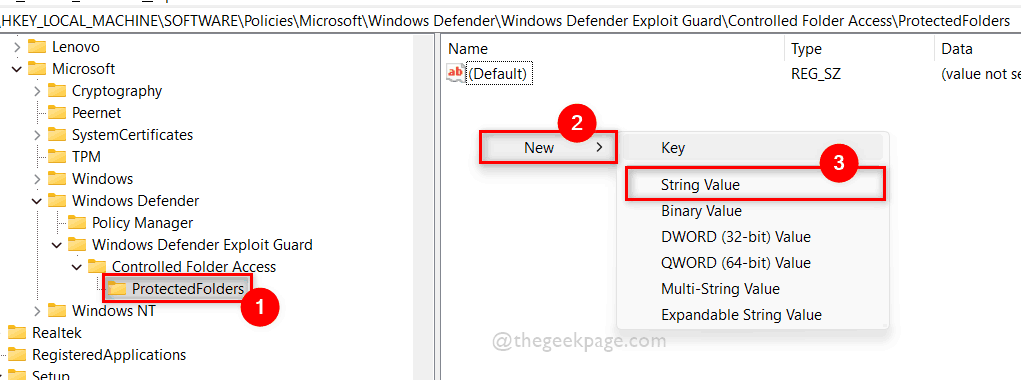
Step 13: Then Make Sure Protected folders the registry key is selected on the left side.
Step 14: On the right side, right click on the empty space and select New > String Value.
Step 15 – Rename the string value to the folder path you want to add to controlled folder access.
Step 16: Double click on it to open it and Enter 0 to the Value Data field and click it’s fine.

Step 17 – If you want to remove the folder from controlled folder access, right-click the string value folder path and select Erase context menu option as shown below.
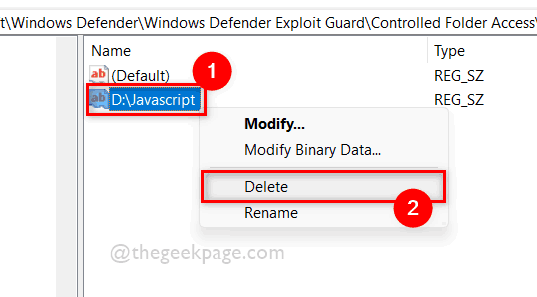
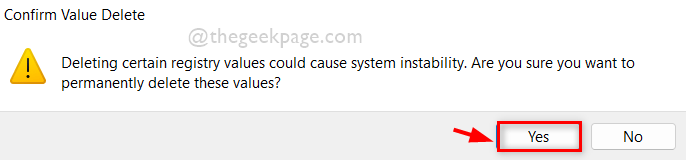
Step 18: Click Yes to confirm the deletion of the value as shown below.
Step 19 – Once done, close Registry Editor.
That’s it.
I hope this article has been helpful.
Please leave comments below.
Thanks!
Related posts:
 How to access Steam games without an internet connection
  How to view FPS with Xbox Game Bar in Windows 10: Steps Made Easy
  Hacked account? How to check and remedy
  How to make video calls from WhatsApp Web
  How to increase the RAM memory of a desktop or laptop + Tips and Tricks
  How to organize your YouTube subscriptions into categories
+ Tips and Tricks
How to organize your YouTube subscriptions into categories
+ Tips and Tricks


