


How to autofill data based on patterns using Flash Fill in Excel
Would you believe me if I told you that Microsoft Excel is smart enough? Well, some would agree with me right away. The other group of people who disagree with me would agree with me once they finish reading this article. Microsoft Excel has this amazing feature called instant fill which can spot patterns in your data and fill in the rest of the worksheet for you! Well, does that sound like something to come in the future? Well, you’re in luck!
instant fill it can be used to combine data, extract data, remove characters, and much, much more. And all is well here, this is not something that will come in the future! In this article, we explain in detail how you can make the best use of instant fill with the simplest possible examples. I hope you enjoy reading!
How to split data using Flash Fill
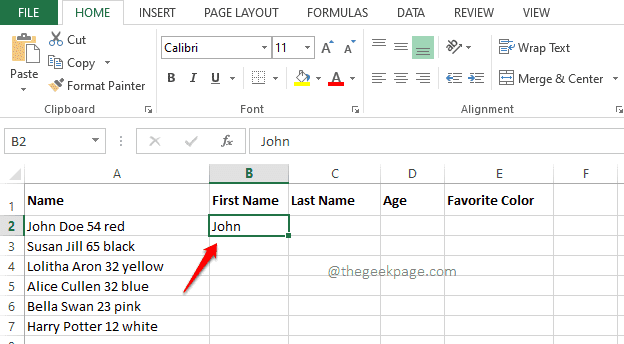
Suppose you have a source column where you have data that needs to be split into multiple columns. For example, I have to split the data in the source column into Name, Surname, Age, and Favorite color columns respectively.
Paso 1: First, make sure your source the data is present And it is consistent As shown below.
Paso 2: Now, go to the First name column and writes at first name whatever you want. The only thing is that it must match the spelling in the source string.
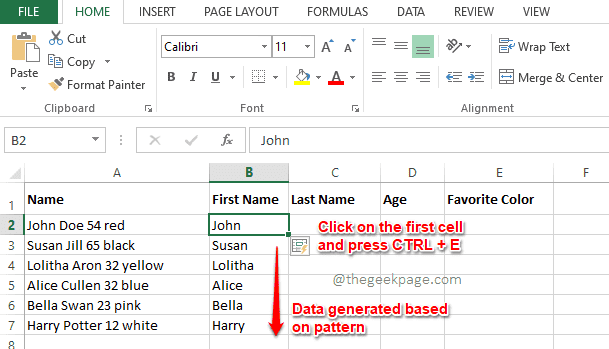
Paso 3: Now click about him cell where you have entered the data and then press the keys CTRL + E. This will automatically fill in all cells in the same column, extracting the first name from the source string.
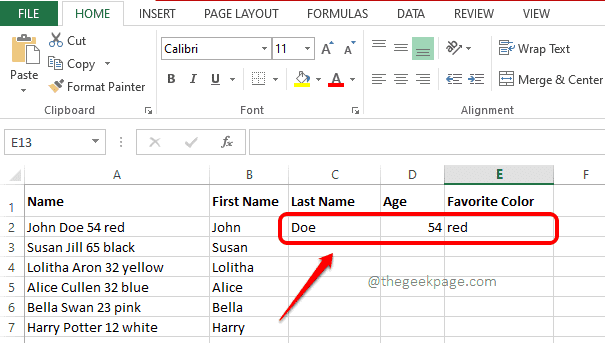
Stage 4: As in the previous steps, you can write the Last name, age and favorite color in the first cells of their respective columns.
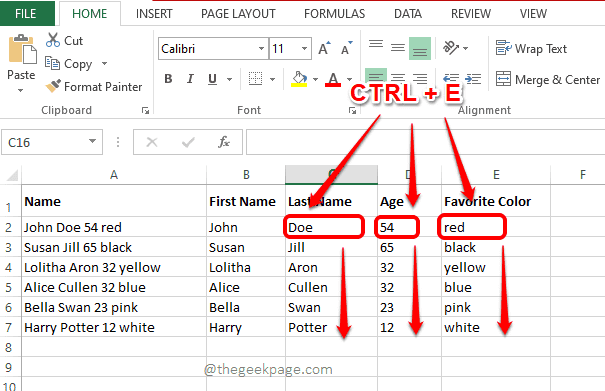
Paso 5: Once you have typed in the first row, simply press each of the first cells in each of the columns and then press CTRL y E Keys to automatically generate the series using Flash Fill.
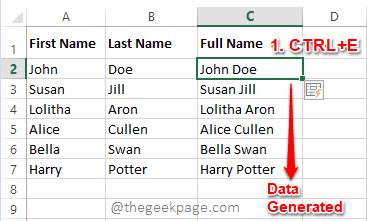
How to combine data using Flash Fill
Let’s say you have a worksheet and column 1 and column 2 have data. You need to form column 3 by combining the data from column 1 and column 2. Here too, Flash Fill comes to the rescue.
Paso 1: In the third column, writes on how you want your columns to be combined.
For example, in the example below, I want the First name and the Last name combine to form the Full name.
Therefore, I have clicked on the first cell of the Full name and typed in the combined full name, which is, John Doe.

Paso 2: Now click about him First cell of the Full name column and just press CTRL + E together.
hey! Your series is now generated as simple as using Flash Fill.
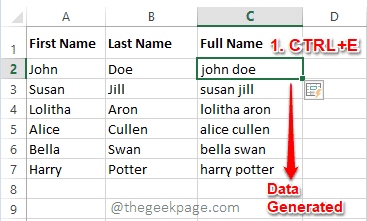
How to Change Case Using Flash Fill
Let’s say you need to combine data from 2 columns and form a third column like in the above scenario. But in this one, you want the case of your third column to be different from your source data. In that case, follow the steps below:
Paso 1: if you want the First name and Last name combine, but you want the first letters of both the first and last name to be lowercase, then type that way in the first cell of the Full name column.

Paso 2: Now Select the cell where you have entered the data and then press the button CTRL + E keys simultaneously. That’s it. Now you have the series generated. depending on the case of your preference.
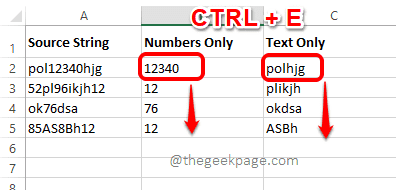
How to extract only numbers or text using Flash Fill
This is a very interesting trick using Flash Fill. Suppose you have a source string that has numbers and letters. You want the numbers in the string to be output to one column and the text to another column.
Paso 1: Simply writes in all the numbers present in the source string in the first row, in the same order, in the Only numbers column.
Equally, writes in all the letters present in the source string column, in the same order, in the Text only countryside.
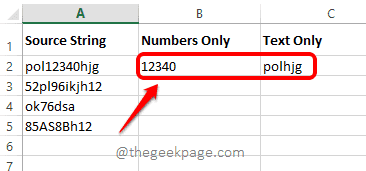
Paso 2: Now click the cells, where you entered the data in the previous step, one by one, and then press the keys CTRL + E to see the magical extraction taking place.
How to remove space characters from source string using Flash Fill
Suppose you have a source string and you want all space characters removed from the source string. Oh yeah, you can even do that with Flash Fill!
Paso 1: Firstly, please enter the string without space characters as shown in the screenshot below, into the destination column.
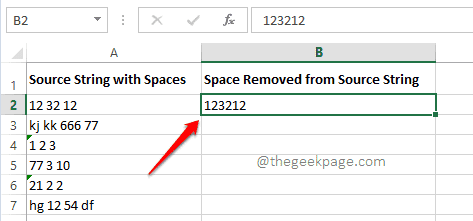
Paso 2: Now press CTRL + E to autocomplete the second column, with strings that do not have space characters, as shown below.
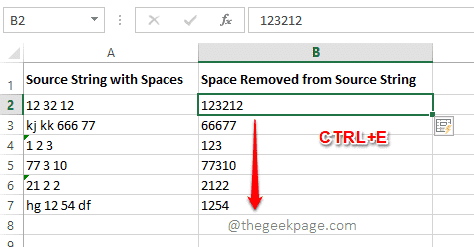
Paso 3: But if you look at the screenshot above, you can see that the letters in strings were also removed along with space characters. Now we need to tell Flash Fill not to remove the letters along with the space characters.
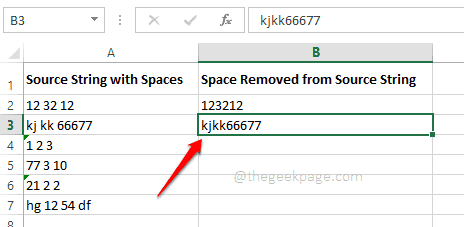
For that, just type one more value in the second column as shown in the screenshot below. The string shown below has letters and space characters and is therefore a perfect example to teach Excel the pattern to create.
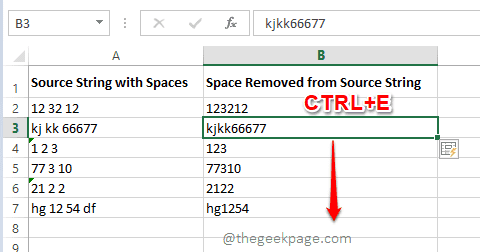
Stage 4: Once you are done, simply click on the cell where you just entered the data and then press the keys CTRL + E. This would give you the refined results. Enjoy!
There are many more possible scenarios where you can use instant fillHowever, we have tried to cover some of the most important ones.
Tell us in the comments section which Flash Fill trick you had the most fun with. Thank you for reading.
Related posts:
 How to access Steam games without an internet connection
  How to view FPS with Xbox Game Bar in Windows 10: Steps Made Easy
  Hacked account? How to check and remedy
  How to make video calls from WhatsApp Web
  How to increase the RAM memory of a desktop or laptop + Tips and Tricks
  How to organize your YouTube subscriptions into categories
+ Tips and Tricks
How to organize your YouTube subscriptions into categories
+ Tips and Tricks


