


How to change network adapter priorities in Windows 11
The Windows 11 device uses the network adapter priorities to determine the network adapter that is used to establish network and Internet connections. If a device has multiple network adapters, say multiple network cards, VPNS, virtual machines, or a network card and a Wi-Fi module, it may not be immediately clear which one it will use to connect to a network or the Internet.
The good news is that you can set the priority of the network adapter manually; this is useful in some cases, even to make sure a specific adapter is prioritized all the time or to troubleshoot connection issues.
Check out our guide on how to change Windows 10 network adapter priorities here.
Change network adapter priorities in Windows 11
One of the first things you may want to do is check the current priorities of all network adapters.
- Select Start.
- Escriba Powershell.
- Select “run as administrator”.
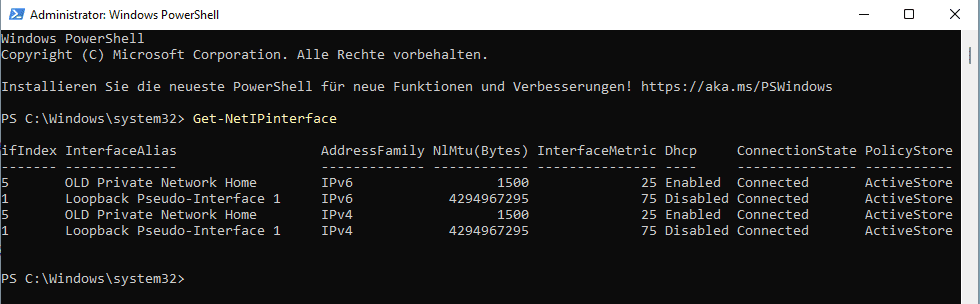
- Run the command Get-NetIPinterface in the PowerShell window.
The command returns all network adapters and their interface index numbers plus other information, such as connection status.
The index number, shown in the first column, is unique for each network adapter. The value of InterfaceMetric defines the priority. Lower InterfaceMetric numbers take precedence over larger numbers.
Tip– The command supports multiple parameters to customize the query. Some interesting options include:
- Get-NetIPInterface -AddressFamily IPv6 – Shows only IPv6 network adapters.
- Get-NetIPInterface | Format-Table: format the table.
- Get-NetIPInterface -InterfaceIndex 12: Shows information about the network adapter with index 12.
All that is required now is to set the values according to the requirements.
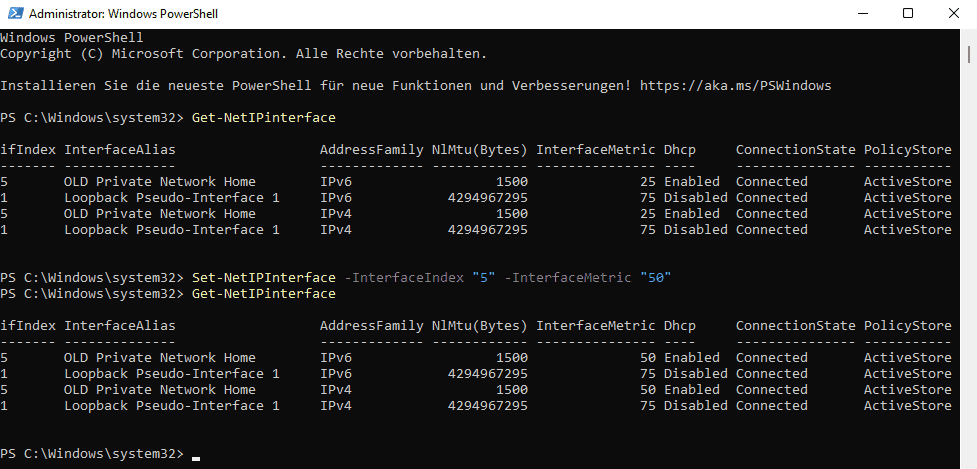
The base command for that is Set-NetIPInterface -InterfaceIndex «XX» -InterfaceMetric «YY».
- InterfaceIndex refers to the current ifIndex of the network adapter.
- InterfaceMetric sets the new priority for the network adapter.
Here is an example:
- Set-NetIPInterface -InterfaceIndex «5» -InterfaceMetric «50»
This changes the priority of the network adapter with the interface index from 5 to 50. Note that there is no confirmation message.
Tip– The command is very powerful as it supports parameters to change certain specific attributes of the network adapter, for example adding -Dhcp Disabled to disable DHCP for the specified adapter.
Once you’re done, run the Get command again to make sure your changes were set correctly.
PowerShell provides a quick and easy option to change network adapter priorities. Alternatively, you can use the Network Connections Control Panel applet to change the priorities.
Change network adapter priorities in Network Connections
You can change the network adapter priorities by using the Network Connections Control Panel applet. It does not provide as good an overview as the PowerShell option, but some users may prefer the graphical user interface to the command line option.
You may still want to run the PowerShell command that lists all network adapters and their priority, as you will not get an overview in the Network Connections applet.
Step 1: Open the Network Connections control panel applet
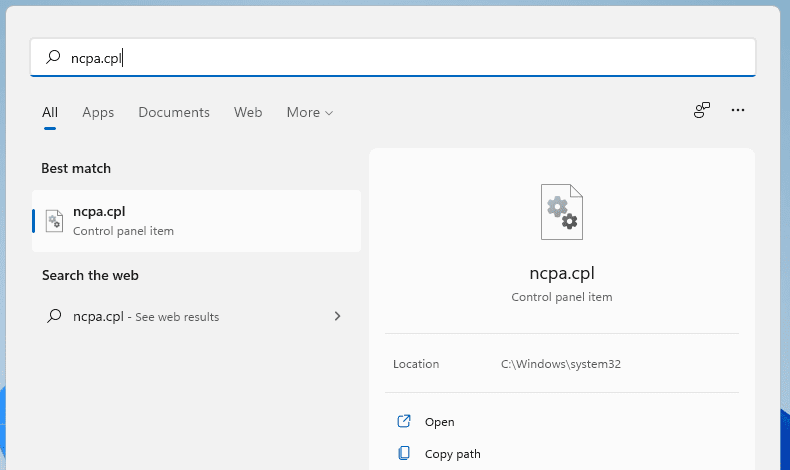
Select Start. Type ncpa.cpl and run the command; this opens the Network Connections control panel applet. Tip: Check out our full list of commands to open the Control Panel applets in Windows.
Step 2: Open the Properties of the network adapter.
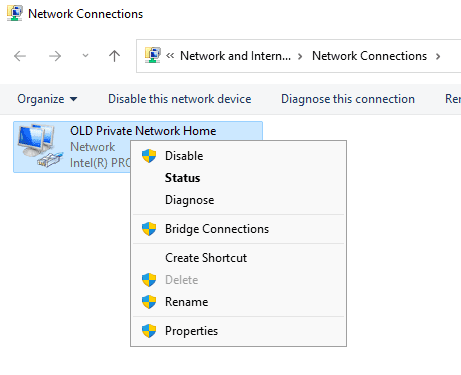
Right-click on the network adapter whose priority you want to change and select properties from the context menu that opens.
Step 3: Open the Properties of the IPv4 or IPv6 protocol
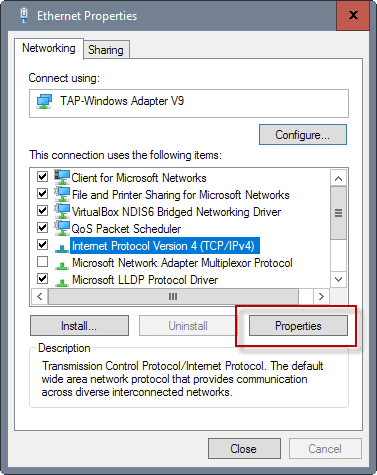
Find Internet Protocol Version 4 (TCP / IPv4) or Internet Protocol Version 6 (TCP / IPv6) and select the Properties button. If you want to change the priority of both, repeat the process several times.
Step 4: Open the advanced properties of the protocol.
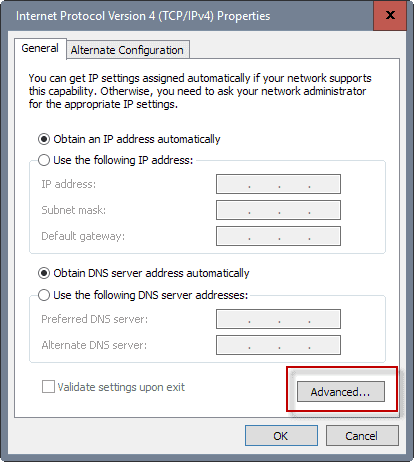
Select the Advanced button on the next screen that opens.
Step 5: change the adapter priority
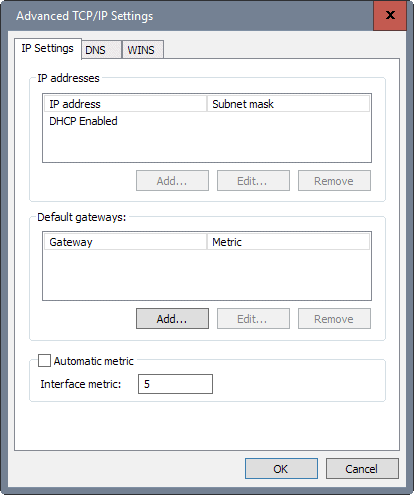
The value of the interface metric defines the priority of the adapter. Change it to the desired priority and select OK to complete the process.
Appendix
Useful Microsoft Docs Pages:
advertising
Related posts:
 How to access Steam games without an internet connection
  How to view FPS with Xbox Game Bar in Windows 10: Steps Made Easy
  Hacked account? How to check and remedy
  How to make video calls from WhatsApp Web
  How to increase the RAM memory of a desktop or laptop + Tips and Tricks
  How to organize your YouTube subscriptions into categories
+ Tips and Tricks
How to organize your YouTube subscriptions into categories
+ Tips and Tricks


