


How to change Turn off hard drive after idle time in Windows 11
While hard drives are more readily available these days and much faster, they still consume a lot of power, especially in laptops. The hard drive consumes more power, it eventually ends up draining your laptop battery sooner than it should and hence users prefer to turn off the hard drive after idle time. This feature was introduced in the power management option in Windows 10 that helps save battery power on your laptop.
Although it can be enabled automatically on systems with the Balance power plan or Power Saver plan, you can also enable this feature manually. This will turn off the hard drive whenever your PC is in an idle state for the selected period of time. This, in turn, will automatically use less power and thus save your laptop’s battery life. However, this can cause a hard drive startup delay when you want to get back to using your PC and find that it suddenly needs to wake up and start working.
However, there are no reports so far of any adverse effect of this feature on PC performance and thus you can turn off the hard drive after the idle time option. However, sometimes, you may also want to change the time of this function, that is, change the hard drive shutdown after idle time, for example, from 10 minutes to 20 minutes. In that case, you can follow the methods we show you here.
Method 1: Through Power Options
This method helps you to turn off hard drive after idle time in Windows 11 via Power Options in Control Panel. From the same location you can also switch to turn off the hard drive after idle time. Let’s see how:
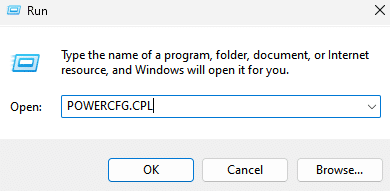
Paso 1: press the Earn + R keys together on your PC to open the run command window.
Step 2 – In the Run Command window, type POWERCFG.CPL in the text field and press Enter to open the Power Options window in Control Panel.
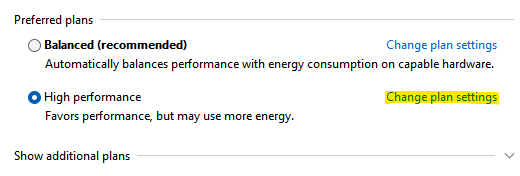
Step 3 – In the Control Panel window, navigate to the right side and go to the power plans.
Here, click on the Change plan settings link to the side your active power plan on your system.
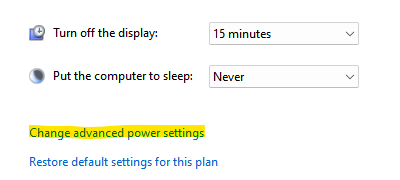
Step 4 – In the next window (Edit plan settings), scroll to the bottom of the window and click Change advanced power settings.
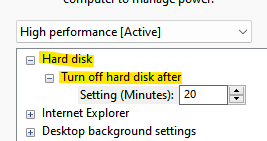
Step 5: The Power Options window will open.
Here, in the Advanced Settings tab, go to the list and expand the HDD option.
Now click to expand Turn off the hard drive after option.
Next, change the time in the On Battery field and also in the Plugged In field.
Once done, press Apply and later OK to save changes and exit.
Close the Control Panel window and now the hard drive should shut down for the time you have set after idle time.
Method 2: Via Command Prompt
However, if you switch to shutting down the hard drive after idle time in a much faster way, you can use the command prompt. Follow the instructions below to make the changes via the command line:
Step 1: Go to Start, right click on it and select Run.
Step 2: The Run command window will open.
In the search field, type cmd and press the button Ctrl + Mayús + Intro keys simultaneously to open the command prompt window with administrator rights.

Step 3 – In the elevated Command Prompt window, run the following command and press Enter:
powercfg -change -disk-timeout-dc 0
Now replace 0 with the number of minutes you want the hard drive to be disabled after idle time.
Step 4: Now, run the following command at the command prompt and press Enter:
powercfg -change-disk-timeout-ac-0
Replace 0 with the number of minutes you want the hard drive to be disabled after idle time
Once done, close the command prompt window, restart your PC, and now the next time your PC is idle, the hard drive will shut down for the specified time.
Related posts:
 How to access Steam games without an internet connection
  How to view FPS with Xbox Game Bar in Windows 10: Steps Made Easy
  Hacked account? How to check and remedy
  How to make video calls from WhatsApp Web
  How to increase the RAM memory of a desktop or laptop + Tips and Tricks
  How to organize your YouTube subscriptions into categories
+ Tips and Tricks
How to organize your YouTube subscriptions into categories
+ Tips and Tricks


