


How to configure Samba shares on Ubuntu Server the easy way
Webmin is an administrative web user interface for managing UNIX-like operating systems. For example, if you have an Ubuntu server and you want an easier way to create Samba shares on your system, Webmin is a great tool.
With Webmin, you can create Samba shares on Ubuntu Server through your web browser, easily manage permissions, etc. In this guide, we will show you how to use Webmin to configure Samba shares on Ubuntu Server in an easy way.
Configure Webmin on Ubuntu Server
Webmin must be installed on your Ubuntu system to use it. If you don’t already have Webmin set up on Ubuntu, head over to the official website and download the latest DEB package.
After downloading the latest DEB package from Webmin, install it on your Ubuntu server. Installation will not take long. When installed, open a web browser on your computer and visit the following URL to access Webmin.
http://YOUR_UBUNTU_SERVER_IP_OR_HOSTNAME:10000
Root password for Webmin
You will need to know the root password of your Ubuntu server. If you do not know your root password for Ubuntu Server, you will need to configure it in the terminal before installing Webmin.

To set the root password on Ubuntu Server, log into the TTY console or SSH terminal with your username. When you are logged in, use the sudo -s command to scale the console to root.
sudo -s
With root access, use the passwd command to change the password of the root account in Ubuntu.
passwd
Install Samba via terminal
You will need to install the Samba tools on your Ubuntu server installation before attempting to use Webmin to configure Samba shares. To install the latest Samba packages, open a terminal and log into the Ubuntu server via SSH. Or physically sit at the server and use the terminal.
Once you have logged into your Ubuntu server, you can begin the Samba installation. Using the fit to install command then install the “samba” package on your server.
sudo apt install samba
When typing the above command, Ubuntu will ask for your password. Using the keyboard, type the password for your username. Then press the Get into key to send your password.
After submitting your password in the terminal, Ubuntu will collect all the packages and dependencies required to run the Samba server. Then when everything is ready to install, Ubuntu will ask you to press the button AND button on keyboard. Do this to install Samba on your Ubuntu server.
To add Samba shares to Ubuntu in Webmin, follow the step-by-step instructions below.
Paso 1: Log in to the Webmin web user interface in your favorite web browser using the root account and root password.
Paso 2: After logging into the Webmin web user interface with your account credentials, click the “Control Panel” button. By selecting the “Control Panel” button, the Webmin sidebar will be displayed.
Look in the Webmin sidebar for the “Servers” section and click the drop-down menu to reveal the “Servers” options.
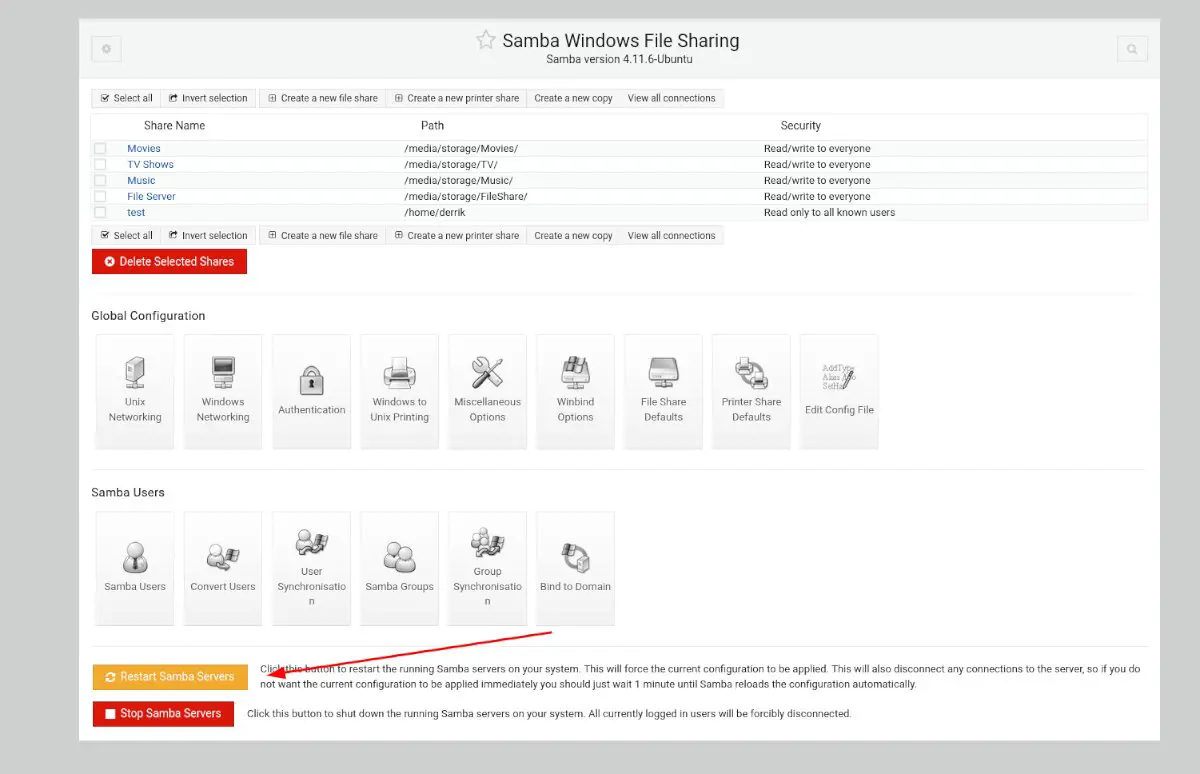
Paso 3: Click the “Windows Samba File Sharing” button to access the Samba section of Webmin. Once inside the “Windows Samba File Sharing” area, click the “Create a new file share” button.
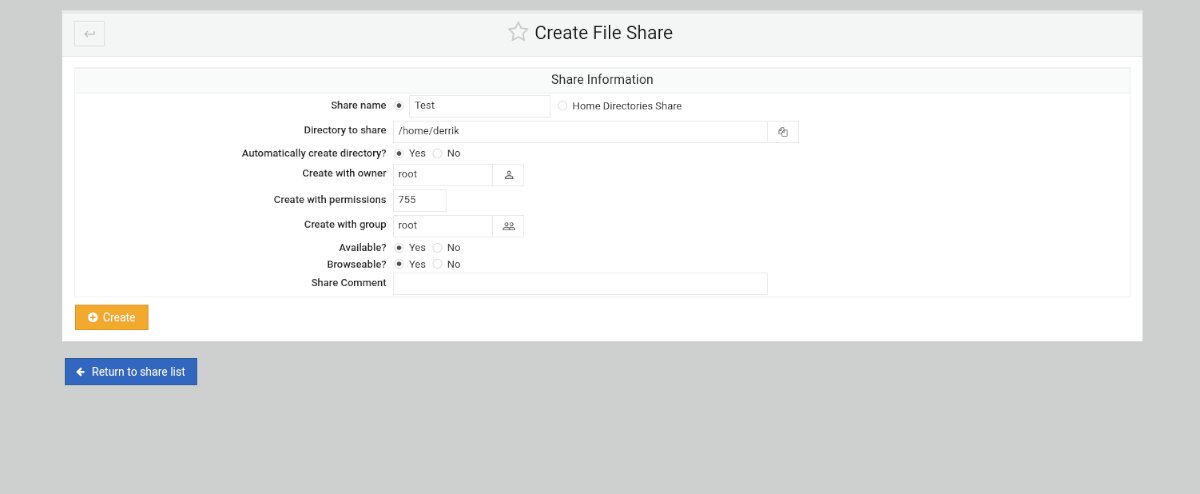
Paso 4: After clicking the “Create a new file share” button, find the “Share name” section and select it with the mouse. Then enter the name of your new share. For example, “My Share”, “File Share”, and so on.
Paso 5: Find the “Directory to share” area and click on it with the mouse. Then enter the path of the directory you want to share. Alternatively, click the icon next to the text box.
Selecting the icon next to the text box will bring up a pop-up window. Using the pop-up window, select the folder you want to share over the Samba file sharing protocol.
Paso 6: Click in the “Share Comment” text box and enter a comment for your new shared file. Then select the “Create” button to create the next share.
Paso 7: Once you have created your new share, click the button to return to the share list. Then, click on your share in the list to access settings.
After accessing the configuration area of your share, click on the “Security and access control” button. From here, you can customize the access settings for your share. For best results, select “Yes” for “Write” and “Guest only” to allow users to access the share without logging in.
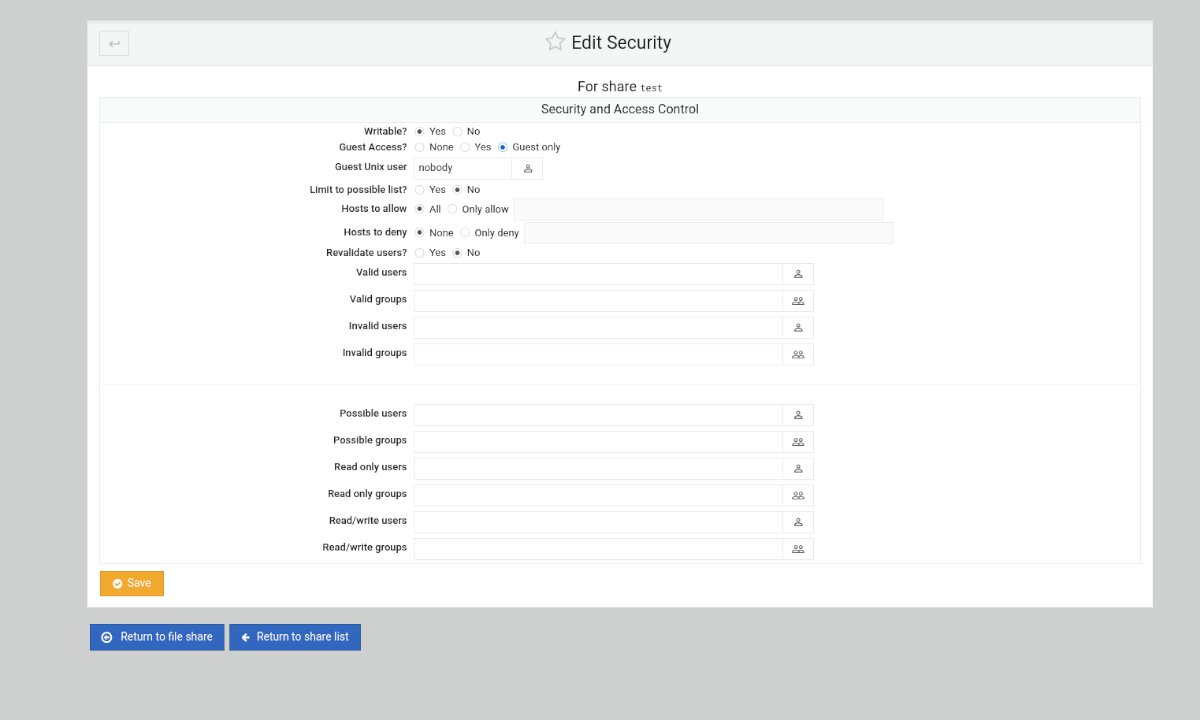
With all the settings configured, select the “Save” button. Then click on the “Back to Sharing List” button.
Paso 8: Select the “Restart Samba Servers” button when you have created all your shares within Webmin and have finished configuring everything. Selecting this button will restart the service in Ubuntu and the new configuration changes will be applied.
Related posts:
 How to access Steam games without an internet connection
  How to view FPS with Xbox Game Bar in Windows 10: Steps Made Easy
  Hacked account? How to check and remedy
  How to make video calls from WhatsApp Web
  How to increase the RAM memory of a desktop or laptop + Tips and Tricks
  How to organize your YouTube subscriptions into categories
+ Tips and Tricks
How to organize your YouTube subscriptions into categories
+ Tips and Tricks


