


How to disable any keyboard key in Windows 11 or 10
There can be many scenarios where you want to disable a key on your keyboard on your Windows 10/11 PC. For example, the key may be stuck and unusable, you just don’t need the key anymore, or you just can’t handle the key. Because of this, you end up hitting the wrong key every time and this can be frustrating.
While working on your PC, pressing the wrong key all the time ends up wasting a lot of your productive time and therefore it is better to disable the problematic key so that you can continue your work as usual, without pressing the wrong key every time. .
In this post today, we will show you how to disable the problematic key on your keyboard on your Windows 10/11 PC.
Download and use Microsoft PowerToys
Since the release of Windows 10, Microsoft has introduced a bundle of system utilities known as Microsoft Power Toys. This utility is known to help users with different aspects while working on Windows and one of them is Keyboard Manager. Let’s see how to access the Keyboard Manager through the PowerToys app:
Step 1 – Click the following link to download PowerToys:
Descargar Microsoft PowerToys
Step 2: Scroll down until you see the Powertoys setup exe file.
Step 3 – Click on the .exe file to descargar e instalar Power Toys
Step 5: Once the .exe file is downloaded, click to open the file.
Step 6: You will now see the PowerToys setup window.
Click Next to proceed.
Step 7: Now follow the instructions on the screen to complete the installation.
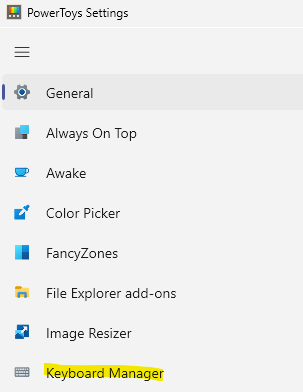
Step 8: Once installed, open the PowerToys utility and the window named PowerToys Settings will open.
Here, click on the keyboard manager left option.
Step 9: Next, go to the right side and below the keys section, click on re asign a wrench.
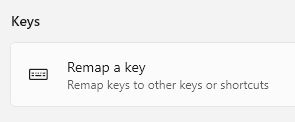
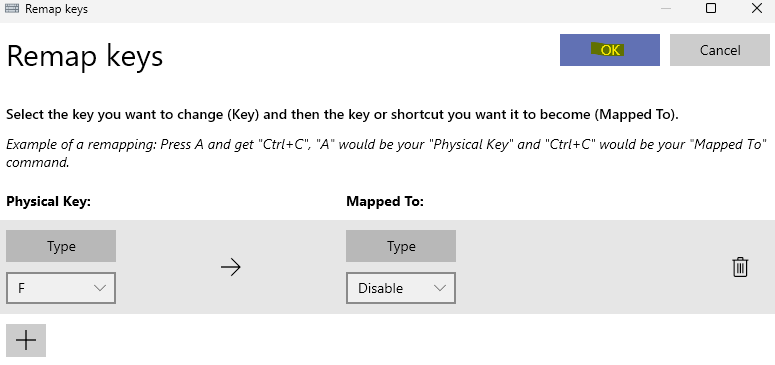
Step 10: Now, in the Remap Keys window, click on the “+” symbol under Key.
Step 11 – You can type the key name (letter/symbol/number) in the Type field or select it from the dropdown menu.
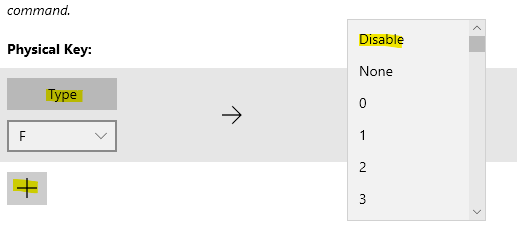
Then, in the Assigned To field, type or select Deactivate from the dropdown menu.
Once done, press OK to save the changes.
Exit the PowerToys setup window and the problem key should now be disabled.
*Note – Similarly, you can also disable a hotkey. Just follow Step 8 and then select Reassign a shortcut from the right side, and then follow Steps 10 and 11 to disable the desired shortcut key.
To restore the key in the future, repeat steps 8-10 and press the trash can icon to remove the key reassignment.
Download and use the KeyTweak app
If you are looking for a free tool that allows you to disable a specific key on your keyboard, then KeyTweak is the first choice for many. Once downloaded, you can choose the problem key from the tool and disable it. Let’s see how;
Paso 1: Open your browser and do a Google search for KeyTweak.
Paso 2: In the results, click on any trusted website to download the KeyTweak application
For example, I clicked on the first result.
Paso 3: Click on the Descargar button to continue downloading.
Stage 4: Once downloaded, navigate to the Descargar folder and click on the installation file to start the installation.
Paso 5: In the window that opens, click I agree to agree to the terms and conditions and proceed.
Now follow the instructions on the screen to finish the installation.
Paso 6: now go to Start and type key setting in the Windows search bar.
Under the best match field, click KeyTweak application to open the program.
Paso 7: Now in the KeyTweak app, the keys are numbered, and so hover over each key to find the key you want to disable.
For example, I want to disable the q key here and therefore I clicked on the number: 17 on the keyboard
Paso 8: As you select the number, it shows which key you selected at the bottom, below the keyboard controls.
Here, you can see the selected key and to which letter or symbol it is assigned.
Now press the button disable key and the selected key is disabled.
Now you can continue to use the PC keyboard with the problem key disabled and thus even if you accidentally hit it while typing, you won’t type anything.
*Note – If at any later time you want to re-enable the key, simply open the KeyTweak application and click the restore default button below to restore the key.
Download and use AutoHotkey
AutoHotkey is another free and open source utility that allows you to automate tasks that you frequently need to do, for example, one of them is reassigning or disabling keys. However, it allows you to automate only certain keys such as the numbers, symbols or general keys (Caps Lock, Enter, Tab, etc.) or the Cursor Control Keys (Delete, PageUp, PageDown, Insert, etc.), Letters and plus.
You can check the list of eligible keys that can be disabled on its official page here.
Now follow the below process to disable the problem key using AutoHotkey utility:
Paso 1: Click the following link to visit the AutoHotkey official page to download the utility:
Descargar AutoHotkey
Paso 2: Now in my case I want to disable the Change key on my keyboard. So, I check the AutoHotkey list for the keys and then proceed to disable the key by following the below process:
To disable a key, open Notepad (or any text document) and type the name of the key followed by ::return.
For example, in my case, I wrote:
LShift::return
Paso 3: Now go to the File tab and select Save As.
Stage 4: In the Save As window, name the file to your convenience followed by .ahk as the file extension.
Click Save to save your changes.
Paso 5: Now go to the location where you saved the AutoHotkey file.
Double click on it to run the file and as soon as it runs it will disable the problem key.
Now you can continue to use your keyboard without fear of hitting the wrong key.
*Note – If you want to restore the key in the future, simply go to the system tray on your taskbar, right click on the H key and select Suspend hotkeys.
Related posts:
 How to access Steam games without an internet connection
  How to view FPS with Xbox Game Bar in Windows 10: Steps Made Easy
  Hacked account? How to check and remedy
  How to make video calls from WhatsApp Web
  How to increase the RAM memory of a desktop or laptop + Tips and Tricks
  How to organize your YouTube subscriptions into categories
+ Tips and Tricks
How to organize your YouTube subscriptions into categories
+ Tips and Tricks


