


How to disable the Run Command feature in Windows 11, 10
If you know the path of a program or application, you can start it immediately with the Run dialog box. The Run dialog is thus a very useful single-line command line interface that makes your life much easier. However, if other people are also using your computer, you may not want them to have the privilege of being able to use the Run command box for security reasons. So is there a way to disable the Run command on your Windows 11 or 10? Definitely yes!
In this article, we explain through 2 different methods, one through the Local Group Policy Editor and the other through the registry editoron how you can easily enable and disable the Run command on your Windows 11 or 10.
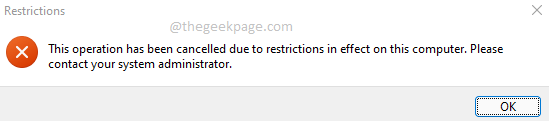
Note: Once you disable the Run command, you will not be able to launch the Run window from anywhere, even using the Earn + R hotkey combination, or from the Start menu, or through Windows Search, etc. You will get a window called restrictions saying The operation has been canceled due to restrictions in place on this equipment. Please contact the system administrator.
Method 1: Through the local group policy editor
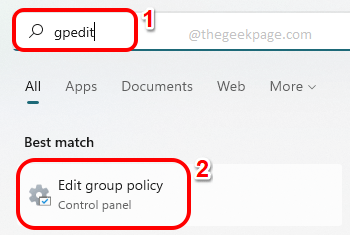
Paso 1: Click on the Search icon on the taskbar.
Paso 2: Writes on gpedit in the search bar and click Edit group policy from the best match section.
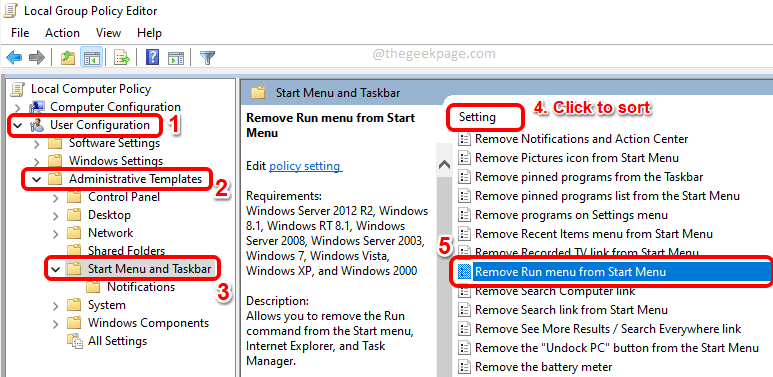
Paso 3: Navigate to the following location on the Local Group Policy Editor window by double-clicking on each folder along the way to expand them.
User Configuration > Administrative Templates > Start Menu and Taskbar
Now make sure the folder Start menu and taskbar is selected by clicking on it. About him right side of the window, click on the name of the column Adjustment once, to sort the list.
Scroll down, locate and double click on the stage called Remove the Run menu from the Start menu.
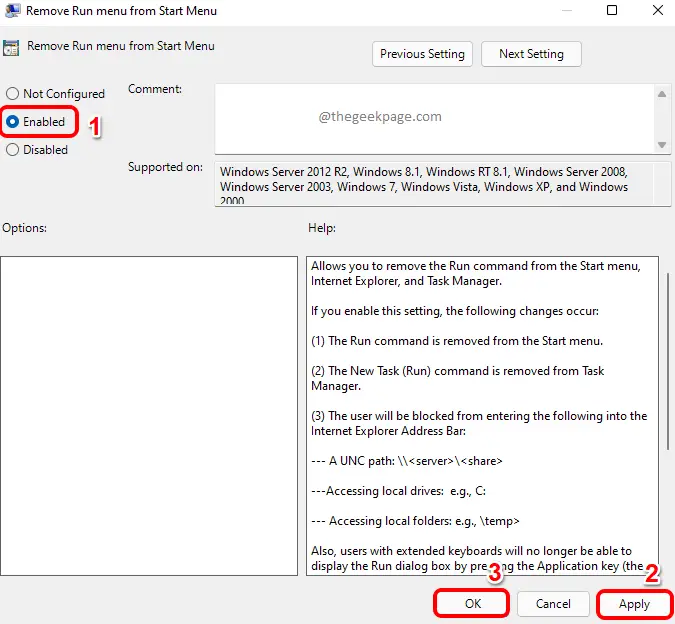
Stage 4: For deactivate the Run window, in the properties window, click the radio button against Activated.
Hit the Apply button and then the OK button.
Paso 5: If you try to start the Run window now, pressing the button CTRL+R keys, you will get the following restrictions window, which prevents you from accessing the execution commands.

Note:- What if you want to re-enable it again?
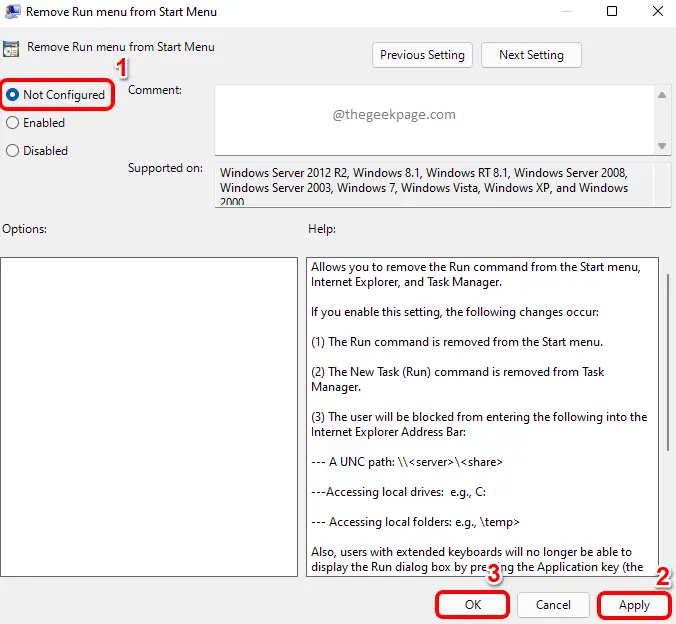
if you would like enable the Run window again, open the properties window again and choose the not configured option.
Hit the Apply button and then the OK button. The changes would be instant.
Method 2 – Via Registry Editor
In this method, we are going to make a small change to your registry settings. It is always recommended that you back up your registry entries, as incorrect registry settings can cause a seriously unstable machine. If something goes wrong, you can always use this backup to restore your previous registry settings.
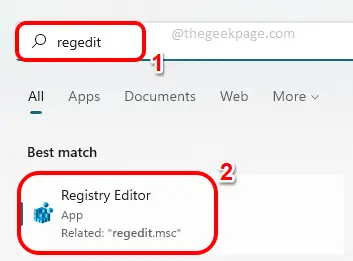
Paso 1: On the taskbar, click the Search icon.

Paso 2: Look for regeditar and click registry editor from the best match section.
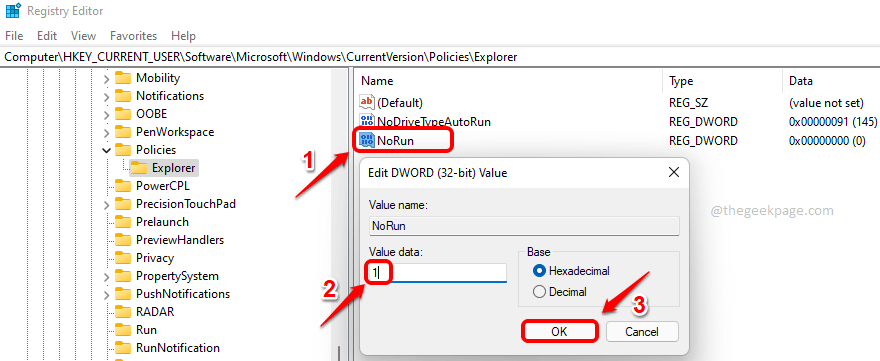
Paso 3: At registry editor window, copy and paste the next location in the navigation bar.
HKEY_CURRENT_USERSOFTWAREMicrosoftWindowsCurrentVersionPoliciesExplorer
As following, the right button of the mouse about him Explorer folder, click New and then click the option Valor DWORD (32 bits).

Stage 4: Now, click about him newly created DWORD value and press the button F2 key to rename that. Give the new name as Do not run and double click on it to open its properties.
In the properties window, set the value data What 1 and hit the OK button.
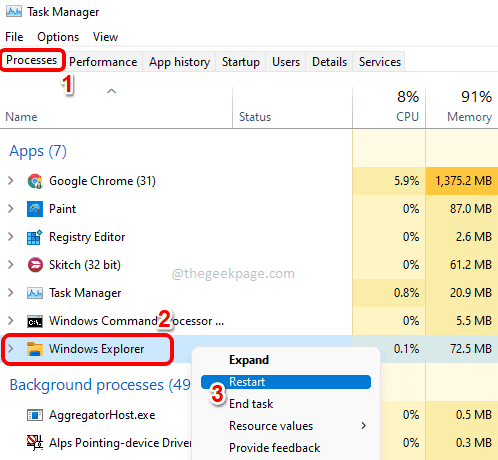
Paso 5: For the changes to take effect, simply restart you Windows Explorer.
For that, the right button of the mouse about him Windows Start Menu icon and click the Task Manager option.

Paso 6: Now under the processes tab, right click on Windows Explorer under the Applications section and click the Restart option.
Paso 7: If you now press the keys CTRL+R Together, you can see that you no longer have access to the Run window.
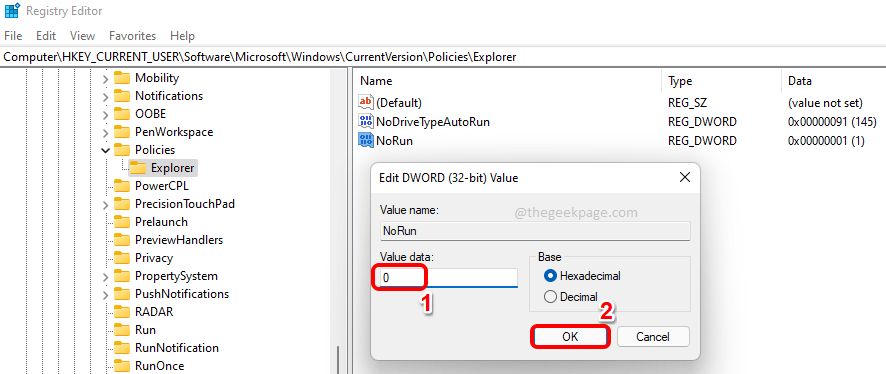
Note: – if you would like reverse changes, open the DWORD properties again, and set the value data What 0. Click on the OK button.
You can now access the Run dialog box again, just like you did before.
That’s it. I hope you found the article useful.
Related posts:
 How to access Steam games without an internet connection
  How to view FPS with Xbox Game Bar in Windows 10: Steps Made Easy
  Hacked account? How to check and remedy
  How to make video calls from WhatsApp Web
  How to increase the RAM memory of a desktop or laptop + Tips and Tricks
  How to organize your YouTube subscriptions into categories
+ Tips and Tricks
How to organize your YouTube subscriptions into categories
+ Tips and Tricks


