


How to fix Can’t disable item checkboxes in Windows 11
Many of the Windows users have recently experienced an issue where they cannot disable item checkboxes in File/Folder Explorer and it is quite irritating for users who prefer not to use item checkboxes while selecting files. or folders on your system.
No matter how many times they have restarted the file explorer or their Windows system, they are still facing the same issue. Possible reasons behind this are listed below:
COMMERCIAL
- Tablet mode in the system
- Registry file changes
- Setting folder options for checkboxes
- Something went wrong when upgrading to Windows 11.
After analyzing these reasons, in this post we have found some solutions/fixes with simple steps that can solve your problem easily.
Solution 1 – Make changes to the registry file
NOTE: Before proceeding with this step, make sure you have exported the log file so that you can revert to it at any time. Because even a minor change that goes wrong can totally damage your system.
The registry file is a data file where all the information about the system is stored, such as installed software, files or settings or any other options related to the Windows operating system. Therefore, any user can modify the information by adding, deleting or editing the registry key using the registry editing tool on your Windows system.
We will show you how to make changes to the registry file using the registry editor so that item checkboxes can be disabled in the simple steps below.
Step 1: Press the Windows + R keys together on your keyboard to open Run command box
Step 2: Then type regeditar in the run box and press the button Get into key to open Registry editor.
Step 3: Accept the UAC prompt by clicking Yes continue.
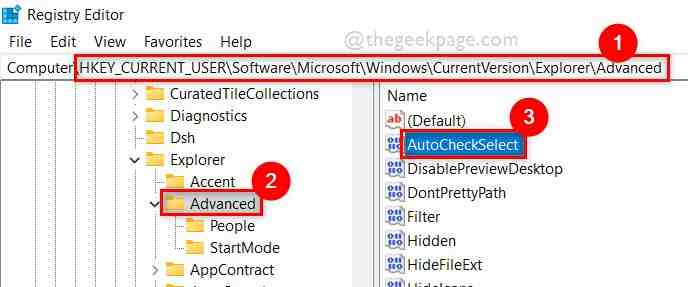
Step 4 – Copy and paste the given below path to the clear and empty address bar of registry editor and then press the button Get into wrench.
HKEY_CURRENT_USERSOFTWAREMicrosoftWindowsCurrentVersionExplorerAdvanced
Step 5: Once done, make sure Advanced The registry key is selected in the left side panel of the registry editor.
Step 6: Then on the right side of the window, double click AutoCheckSelect DWORD value to open it.
COMMERCIAL
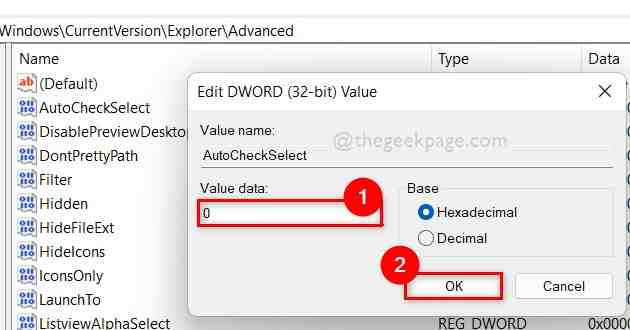
Step 7: Once opened, Enter 0 at value data field and click OK as shown in the following screenshot.
Step 8: Once done, close the registry editor and reboot your system.
Now check if the issue is resolved. If not, try other solutions listed below.
Solution 2 – Disable the checkboxes for selecting items in the folder options settings
In File Explorer, there are many options to change settings where you can modify the appearance or preferences of files or folders. Among them, there is a setting in the folder options where you can disable the checkboxes for selecting items on your system.
Let us see how this can be done using the steps given below.
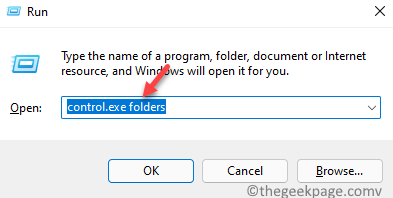
Step 1: Open run command box pressing Windows + R keys together on your keyboard.
Step 2: Then type control.exe folders in the run box and press the Get into key to open the Folder options window as shown below.
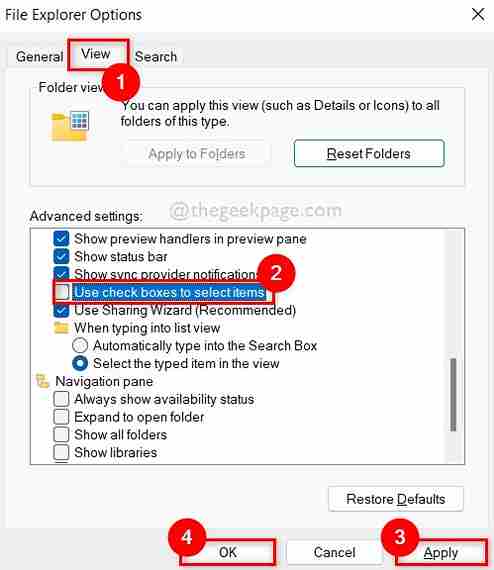
Step 3 – In the Folder Options window, go to Vista tab and scroll down the list of Advanced settings.
Step 4: Uncheck the Use checkboxes to select items checkbox and click Apply and OK to apply the changes and close the Folder options window as shown in the image below.
COMMERCIAL
Now check if the issue is resolved or not.
I hope this solution solved this problem.
Solution 3 – Try to create a new user account on your system
Even after trying all the above fixes, if the issue is not resolved, it means that something might have gone wrong and is not easily detected or fixed on the system. Therefore, creating a new user account and then logging into the system with it might solve this problem because when creating a new user account, everything will be set to default without any error.
We have given below some steps on how to do it.
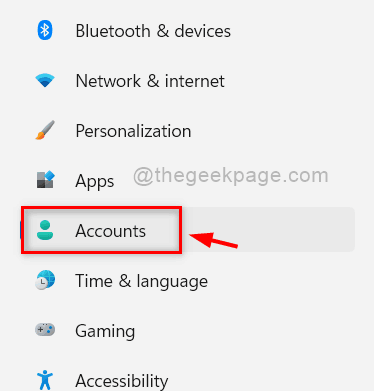
Step 1: Press windows + me keys together to open Settings application on your system.
Step 2: Click accounts in the menu on the left side of the Settings app.
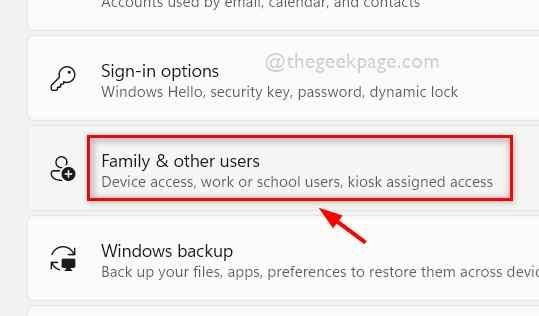
Step 3 – On the right side of the Settings window, select Family and other users as shown in the following screenshot.
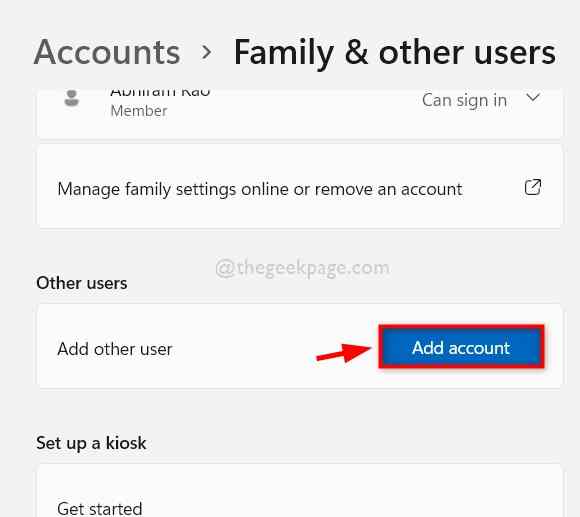
Step 4 – On the Family & other users page, click Add Account button below Other users section as shown below.
Step 5 – Follow and follow the instructions on the screen to create a new user account on your system.
COMMERCIAL
Step 6: Then log out of your system and log in again with the newly created user account credentials.
Now check if the issue still occurs or is resolved.
I hope it gets resolved.
That’s it.
I hope this article has been informative and helpful. Let us know in the comments section below which solution worked for you.
Thank you for reading
Related posts:
 How to access Steam games without an internet connection
  How to view FPS with Xbox Game Bar in Windows 10: Steps Made Easy
  Hacked account? How to check and remedy
  How to make video calls from WhatsApp Web
  How to increase the RAM memory of a desktop or laptop + Tips and Tricks
  How to organize your YouTube subscriptions into categories
+ Tips and Tricks
How to organize your YouTube subscriptions into categories
+ Tips and Tricks


