


How to fix DNS_PROBE_FINISHED_NXDOMAIN in Chrome
The site cannot be reached
<domain-name> IP address could not be found.
DNS_PROBE_FINISHED_NXDOMAIN
DNS stands for Domain Name System. Basically, every website is assigned an IP address. To access and reach the website, the router needs to know the IP address of the server. When we type the domain name (say, www.thegeekpage.com) and hit Enter, internally a request goes to the DNS server and that returns the IP address, say, 770.34.56.1 of the domain name. The router then uses this address to reach the website. This process of obtaining the IP address of the server from a domain name is called Domain Name Resolution. When the DNS cannot resolve the domain name to the IP address, this error is seen.
In this article, we have curated a list of fixes to help you resolve DNS_PROBE_FINISHES_NXDOMAIN in Chrome. Before proceeding with the fixes listed below, try these general fixes:
- Restart your computer.
- Power off and power on your router.
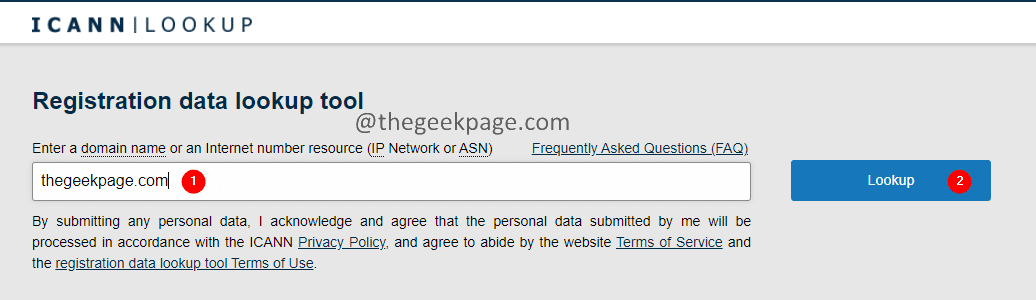
Solution 1 – Check if the domain is active.
1. Check if you have misspelled the domain name when typing the URL.
2. If you notice that you have misspelled the name, correct it.
3. If you haven’t misspelled the domain name and still see this error, try the following steps.
4. Open ICANN search and check if the domain is active.
5. Check the data and check if the domain is active.
6. If the domain is down, the problem is not with you. So don’t worry.
Fix 2: Release and renew IP address in command prompt
1. Open Run Dialog using the Windows + R wrench.
2. Type cmd and press Enter.

3. Enter the following commands one after another.
ipconfig/release
ipconfig/flushdns
ipconfig/renew
Now close and reopen the browser window. Check if this helps, if not then try the next solution given below.
Solution 3 – Restart the DNS client service
1. Open Run Dialog using the Windows + R wrench.
2. Type cmd and press Enter.
3. In the Command Prompt window that appears, enter the following commands. Make sure to hit Enter after each command.
net stop dnscache
net start dnscache
Note: If you see any errors that say, “The requested pause, continue, or stop is not valid for the service,” please proceed to the next solution below.
4. Now, close the browser and reopen it. Check if the problem has been resolved. If not, try the next solution.
Solution 4 – Flush Chrome DNS Cache
Chrome has a different DNS cache from the Windows operating system. Many users have reported that clearing the Google Chrome cache has helped them resolve the issue. To do so, follow the steps below:
1. Open Chrome browser.
2. In the search bar at the top, enter the location below.
chrome://net-internals/#dns
3. On the web page that appears, click the Clear host cache button.
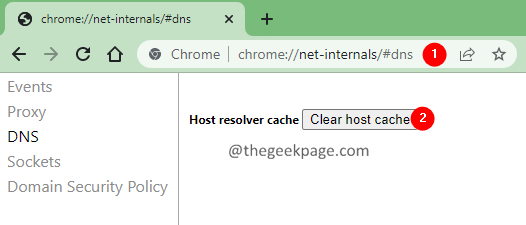
4. Close and reopen the browser window and see if this resolves the issue.
Solution 5 – Use Google’s public DNS server
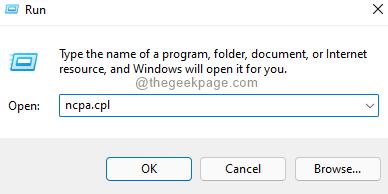
1. Open the Run Dialogue holding the keys Windows + R at the same time.
2. Type ncpa.cpland press Get into.
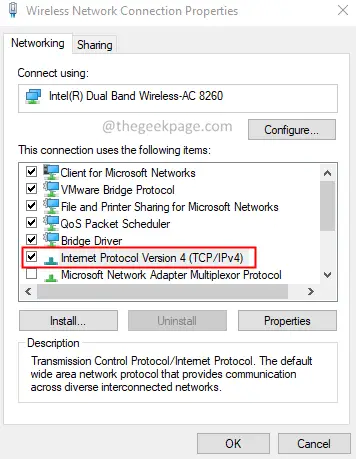
3. The Network connections the window opens. double click in the in your Network adapter in use.
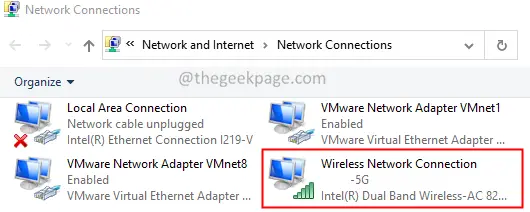
4. You must notice the Wireless network connection properties window opening
5. Low section This connection uses the following elements, double click on Internet Protocol version 4 (TCP/IPv4).
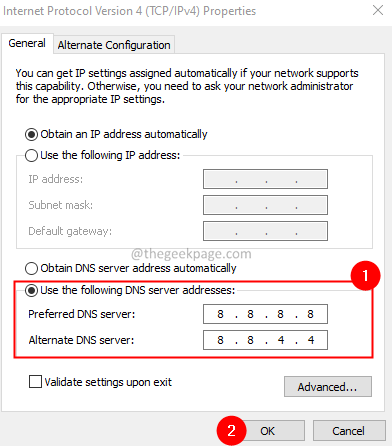
6. The Internet Protocol Version 4 (TCP/IPv4) Properties window opens. Check the option Use the following DNS server addresses.
7. Set the Preferred DNS Server for 8.8.8.8
8. Set the Alternate DNS Server for 8.8.4.4
9. Click on the OK button.
10. Close the browser and reopen it. Check if the problem has been resolved.
Solution 6 – Reset Chrome Flags
1. Abra Google Chrome.
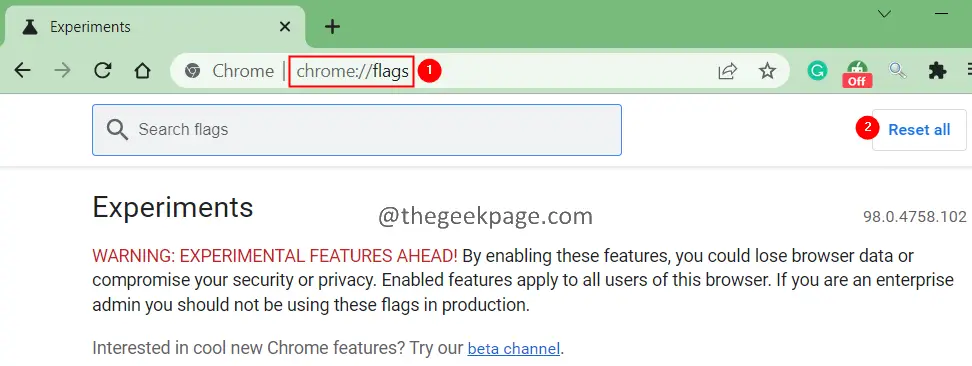
2. In the search bar at the top, enter the following command and press Enter.
chrome://flags
3. In the window that appears, click Reset flags.
4. Restart your browser and check if the problem is resolved.
In case this does not help, try the next solution given below.
Fix 7: Disable VPN or Antivirus
Are you using VPN on your system? If so, disable it and then try to access the website. Check if this works.
Also, if you are using third-party antivirus software, consider disabling it. After disabling, check if you can access the website.
Solution 8 – Check the entry in the Hosts file and delete it.
Note: You must have administrator privileges to make this change.
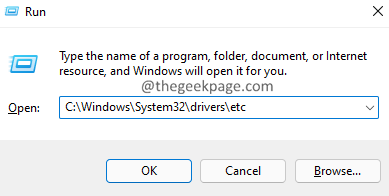
1. Open the Run Dialog using the keys Window+R.
2. Type the location below and press Enter.
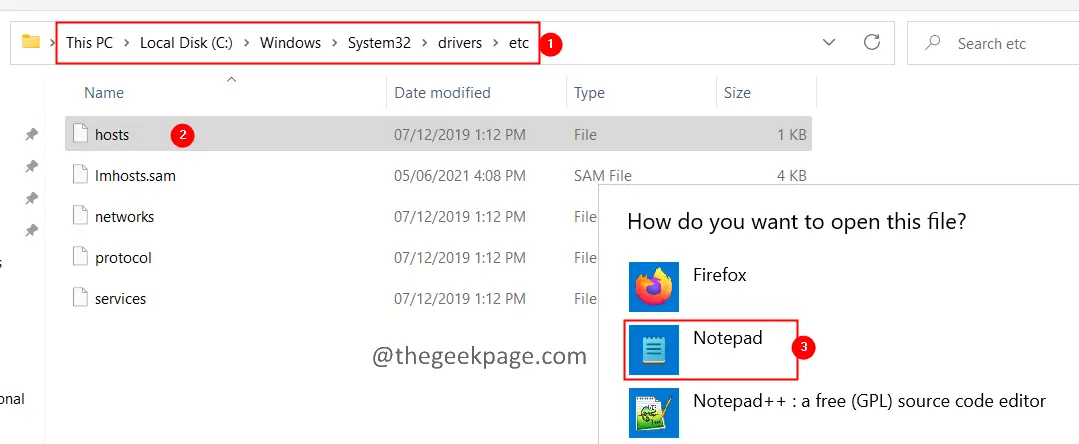
C:WindowsSystem32driversetc
3. In the file that appears, find and double click in the file named hosts.
4. A window indicating How do I want to open this file? appear.
5. From the list double click on Bloc or any text editor of your choice.
6. In the host file, check if an entry to the website exists.
7. If so, delete it by pressing the backspace key.
8. After removing the entry, save the file.
9. Close and reopen the browser and try to access the website.
Check if this helps.
That’s it.
We hope this article has been informative. Please kindly comment and let us know the solution that helped you solve the problem.
Thank you for reading.
Related posts:
 How to access Steam games without an internet connection
  How to view FPS with Xbox Game Bar in Windows 10: Steps Made Easy
  Hacked account? How to check and remedy
  How to make video calls from WhatsApp Web
  How to increase the RAM memory of a desktop or laptop + Tips and Tricks
  How to organize your YouTube subscriptions into categories
+ Tips and Tricks
How to organize your YouTube subscriptions into categories
+ Tips and Tricks


