


How to Fix Outlook Error Code 0x8004060C on Windows 11/10
Many users reported seeing an error when sending or receiving emails in Outlook. This error is seen in all versions of Outlook. The complete error message is as follows:
Task 'Microsoft Exchange Server - Sending' reported error (0x8004060C): 'The message store has reached its maximum size. To reduce the amount of data in this message store, select some items that you no longer need, and permanently delete them.
O
Task ‘EMAIL ADDRESS’ - Sending and Receiving' reported error (0x8004060C): 'Unknown Error 0x8004060C
O
Task 'Microsoft Exchange Server - Receiving' reported error (0x8004060C): 'Unknown Error 0x8004060C
This error occurs because the Outlook PST file exceeds the size limit. In case you are facing this error and wondering how to fix it, don’t panic. In this article, we have compiled a list of fixes that could help you overcome this bug.
Solution 1: remove unwanted items from Outlook
Step 1: Open the MS Outlook application.
Step 2: Delete spam emails from all folders.
Step 3: Make sure messages are deleted even from Deleted Items folders. Alternatively, Shift + Delete to delete the email.
Solution 2: compacting the PST file
Step 1: Open the MS Outlook application.
Step 2: Click the Proceedings menu option.
Step 3: On the right side, click on the Account settings.
Step 4: From the drop-down menu, choose Account settings.
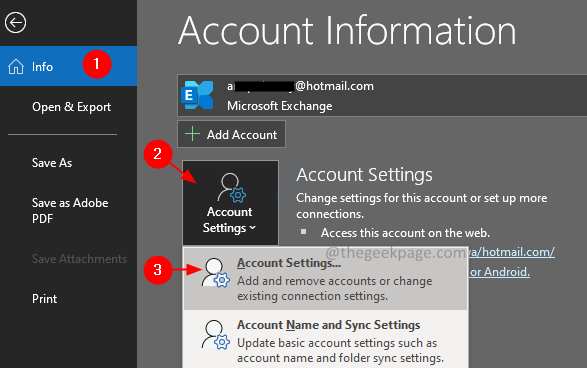
Step 5: In the window that appears, click the Information files tab.
Step 6: Click the account required.
Step 7: Then click Settings.
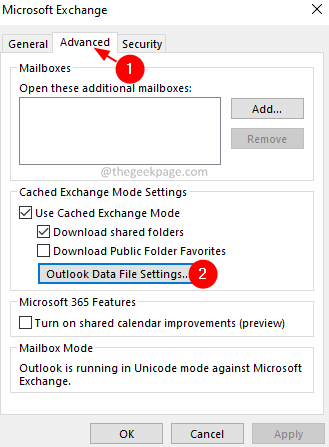
Step 7: In the window that appears, click the Advanced tab.
Step 8: Click the Outlook data file settings button.
Step 9: in the Outlook data file settings window that opens, click the Compact now button.
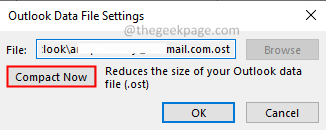
Step 10: Click the OK button.
Solution 3: reduce the size of PST files.
Step 1: Open the MS Outlook application.
Step 2: Click the Proceedings menu option.

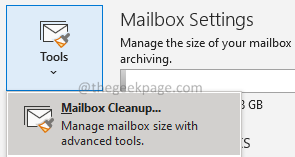
Step 3: Click the Instruments.
Step 4: From the drop-down menu, choose Mailbox cleaning.
Step 5: In the opening window, find the oldest items and find larger items, and delete them.

Step 6: You can choose to remove all items from the Deleted Items folder by clicking the Empty button.

Step 7: You can choose to remove all alternate versions of items from your mailbox. Click on the Delete button.

These steps will help you clean your mailbox and reduce the size of the PST file.
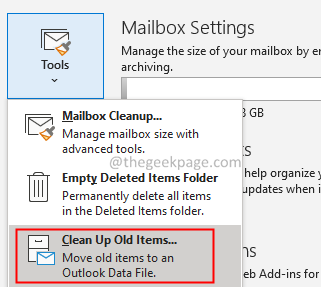
Solution 4: Archive data and create a new PST file.
Step 1: Open the MS Outlook application.
Step 2: Click the Proceedings top menu option tab.
Step 3: Click the Instruments.
Step 4: From the drop-down menu, choose Clean old items.
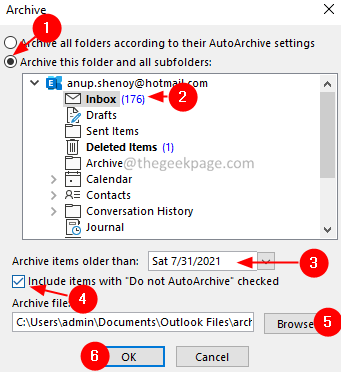
Step 5: In the file window that opens, click Archive this folder and all subfolders.
Step 6: select the required folders.
Note: click Archive all folders according to your Auto Archive settings in the previous step to archive all folders.
Step 7: choose an appropriate date on the Archive items older than section.
Paso 8: Check the box next to Include items with the option “Do not auto-archive” checked.
Step 9: Find and choose the location of the archive file.
Step 10: click the OK button.
Solution 5: repair damaged PST file
If there is a .pst or .ost file present in the location specified in the error message, it means that the file is corrupted due to some problem and Outlook cannot open it. In this case, you can choose to run the built-in repair tool for Microsoft Outlook called, Scan PST.
Step 1: Find out the location of the .pst file. To do it
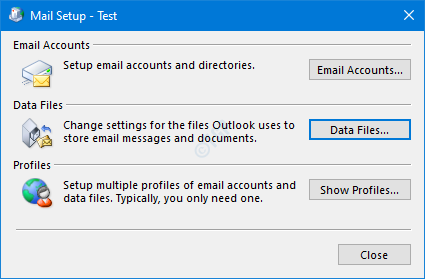
1. Go to the Control Panel and open the Mail settingsSee steps 1, 2, 3 of Fix 3
2. In the Mail Settings window, click data files button as shown below
3. In the Account Settings window that opens, double-click the .pst file you want to repair.
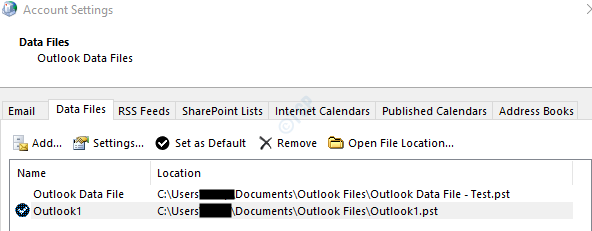
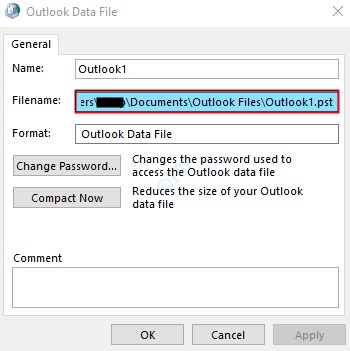
4. In the Outlook Data File window that opens, in the File name section, the location of the file will appear.
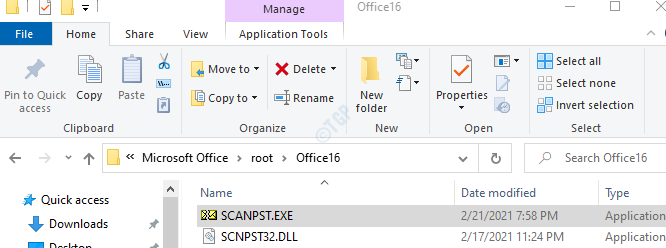
Paso 2: Run the SCANPST application. To do so, we have to know its location.
Below is the location of the different versions of Outlook.
Outlook 365
C: Archivos de programa Microsoft Office root Office16
Outlook 2016/2019
Windows de 32 bits> C: Archivos de programa Microsoft Office Office16
Windows de 64 bits> C: Archivos de programa (x86) Microsoft Office Office16
Outlook de 64 bits> C: Archivos de programa Microsoft Office Office16
Click and run> C: Program files Microsoft Office root Office16
Outlook 2013
Windows de 32 bits> C: Archivos de programa Microsoft Office Office15
Windows de 64 bits> C: Archivos de programa (x86) Microsoft Office Office15
Outlook de 64 bits> C: Archivos de programa Microsoft Office Office15
Click and run> C: Program files Microsoft Office root Office15
Outlook 2010
Windows de 32 bits> C: Archivos de programa Microsoft Office Office14
Windows de 64 bits> C: Archivos de programa (x86) Microsoft Office Office14
Outlook de 64 bits> C: Archivos de programa Microsoft Office Office14
Outlook 2007
Windows de 32 bits> C: Archivos de programa Microsoft Office Office12
Windows de 64 bits> C: Archivos de programa (x86) Microsoft Office Office12
Outlook 2003
32-bit Windows> C: Program Files Common Files MSMAPI System
64-bit Windows> C: Program Files (x86) Common Files MSMAPI System
Outlook 2002 / XP
C: Program Files Common Files MAPI System
Outlook 2000
C: Program Files Common Files MAPI System
Depending on the version of Outlook on your system, go to the appropriate location and double click on SCANPST.EXE
Step 3: Now open the Outlook Data File window (the window was opened in Step 1, point 5) Select the full filename and copy it. (Click anywhere within the Text area, hold Ctrl + a followed by Ctrl + c)
Step 4: when the SCANNPST application opens,
- Paste the file name in the Enter the name of the file you want to scan section
- Click on the Start button
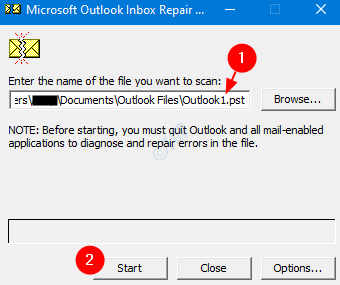
Once, the scan is complete. Restart your system and try to open the Outlook application. Check if this fixed the problem.
That is all. We hope this article has been informative. Thank you for reading.
Related posts:
 How to access Steam games without an internet connection
  How to view FPS with Xbox Game Bar in Windows 10: Steps Made Easy
  Hacked account? How to check and remedy
  How to make video calls from WhatsApp Web
  How to increase the RAM memory of a desktop or laptop + Tips and Tricks
  How to organize your YouTube subscriptions into categories
+ Tips and Tricks
How to organize your YouTube subscriptions into categories
+ Tips and Tricks


