


How to Fix Windows Update and Activation Error Code 0x80072F8F
Windows activation error code 0x80072F8F appears when you try to activate Windows with the error message “a security error has occurred”. Most of the time, the error arises due to a glitch in your system’s date and time setting. However, there may also be other reasons that prevent updating or activation, for example Windows Firewall, an error with DLL files, a bad proxy, or due to corrupted files.
Fortunately, there are a couple of methods that can help you fix Windows activation error code: 0x80072F8F. Let’s learn more about the solutions.
Method 1: correct the date and time settings for the desktop
This method is for those who use Windows desktop mode. In this method, you will adjust the system date and time settings correctly, so that you can proceed with updating or activating Windows without any problem:
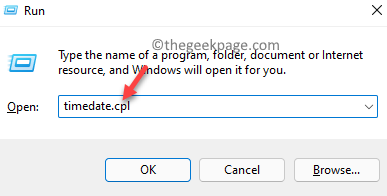
Paso 1: Go to Start, right click and select To run from the context menu.
Paso 2: Will open the Run command window.
Now type timedate.cpl in the search bar and press Get into to open the Date and Time window in Control Panel.
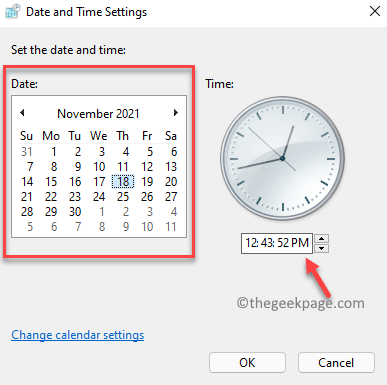
Paso 3: Under the Date and Time tab, click the Change date and time button.

Paso 4: Now in the Date and time settings window, set the correct date and time.
press OK to apply the changes.
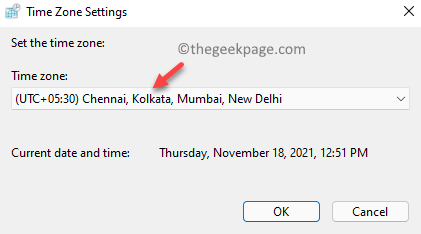
*Note – Back in the Date and Time window, you can also select the correct time zone.
- Just click on the Change time zone button under the Time zone section;

2. Then in the Time zone setting window, select the correct time zone based on your current location from the drop-down menu in the Time zone section. press OK to save the changes.
Paso 5: press Request and later OK at Date and Time dialog box to save changes and exit.
You should no longer see error code 0x80072F8F while completing Windows update or activation.
Method 2: correct the date and time settings for Windows RT
However, if you are working on Windows RT, you can follow the instructions below to change your system date and time settings:
Paso 1: At Start main screen, enter date and time.
Paso 2: Click on the result – Change date and time settings to open the Date and time settings window.
Paso 3: If the date and time are set to automatic, turn it off.

Paso 4: Now get out of the Settings window and press the Win + R hotkeys to open Run command.
Paso 5: At Run command window type timedate.cpl and press OK to open the Date and Time window.
Paso 6: At Date and Time window that opens, select the Date and Time tab and click Change date and time to set the correct date and time for your system.
*Note – You can also configure the Time zone pressing the Change time zone and then make the changes.
After the changes are made, check if the problem has been resolved and you can update or activate your Windows system normally.
How to activate Windows
If the problem is with the activation of your Windows operating system and now that you have made the changes to the date and time settings, you can follow the following process to continue activating your Windows:
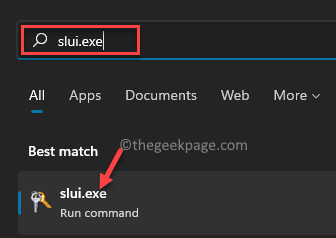
Paso 1: Go to Start and write slui.exe in the Windows search bar.
Click on the result to run the slui.exe command and the Activation window in the Settings the application opens.
Paso 2: Now, enter your product key and continue following the instructions on the screen.
Once this is done, your Windows should activate properly.
Method 3: change registry key value data
However, if the above methods do not help you to activate Windows, you can try editing the registry editor to see if it helps to fix the Windows activation problem. Let’s see how:
Paso 1: press the Win + R keys simultaneously on your keyboard to start the Run command window.
Paso 2: At Run command search bar, type regedit and hit Get into to open the Registry editor window.

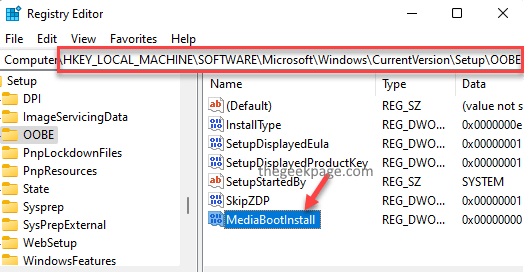
Paso 3: At Registry editor window, navigate to the path below:
HKEY_LOCAL_MACHINE/Software/Microsoft/Windows/CurrentVersion/Setup/OOBE
Now, navigate to the right side of the window and find the DWORD value – MediaBootInstall.
Double click on it.
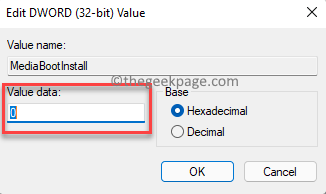
Paso 4: At Edit DWORD value (32-bit) dialog box, configure the Value data field to 0.
press OK to save the changes and exit.
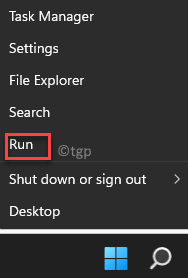
Paso 5: Now get out of the Registry editor window and right click Start.
Click on To run to open the Run command window.
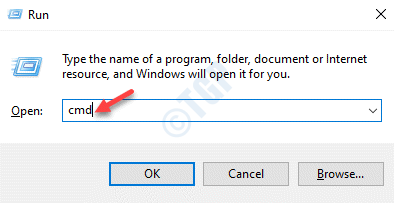
Paso 6: In the search field, type cmd and press the Ctrl + Shift + Enter keys together on your keyboard to open the raised Symbol of the system window.
Paso 7: At Symbol of the system (administration), run the following command and press Get into:
slmgr /rearm

If you see a success message, press OK in the message to restart your PC for the changes to take effect.
This will activate your Windows now.
Method 4: install the root certificate update
But, if you see error code 0x80072F8F while updating Windows, installing the root certificate update camera will help fix the problem in most cases. Just follow the process below to install the root certificate update:
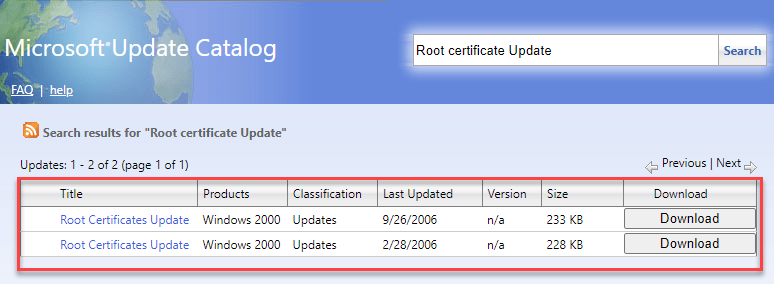
Paso 1: Open your browser and visit the Microsoft Update Catalog website.
Paso 2: Now, in the search field, type Root certificate update and click Look for.

Paso 3: This will take you to the results page.
Here, you can click the Descargar button next to update.
Make sure you download the one that matches your PC version.
Once downloaded, open the installation file and follow the instructions to complete the installation. You can then run a Windows update to check if the Windows update problem is resolved.
Method 5: disable the firewall temporarily
Sometimes the update may not complete due to the Firewall blocking the process. That’s when you run into Windows update error 0x80072F8F. In such a case, you can try disabling the Firewall temporarily and check if that helps fix the problem:
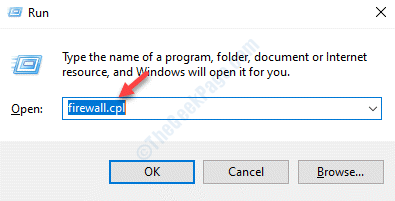
Paso 1: press the Win + R keyboard shortcut keys to open the Run command window.
Paso 2: At Run command window type firewall.cpl in the search field and press Get into.
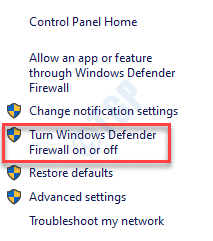
Paso 3: This will open the Firewall de Windows Defender window.
Now, go to the left side of the panel and click on Enable or disable Windows Defender Firewall.
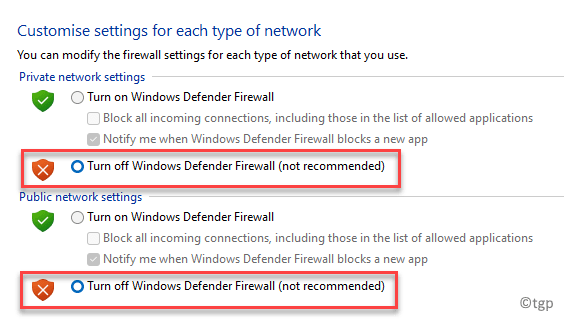
Paso 4: Now in the Customize settings window, select Turn off Windows Defender Firewall (not recommended) below Private network configuration.
Repeat this for the Public network configuration as well as.
press OK to save the changes and exit.
Now, try to install the Windows update and it should work normally.
Method 6: re-register DLL files
Most likely, the Windows update will fail and you will see error code 0x80072F8F due to corrupted DLL files. In this case, you can try to re-register the DLL files on your PC and see if this helps to eliminate the error. That’s how:
Paso 1: Right click on Start and select To run to launch the Run command box.
Paso 2: At Run command search bar, type cmd and press the Ctrl + Shift + Enter keys together on your PC to open the Symbol of the system window with Administration Rights.
Paso 3: On the high Symbol of the system window, type the following commands one after the other and press Get into after each one:
regsvr32 softpub.dll /s
regsvr32 wintrust.dll /s
regsvr32 initpki.dll /s
regsvr32 mssip32.dll /s
After the commands run, exit the Symbol of the system window and restart your PC for the changes to take effect.
If none of the above methods don’t work and you still see Windows update or activation error code 0x80072F8F, you can try activating Windows through your phone. Alternatively, you can also seek help from Microsoft technical support to activate Windows or update Windows.
Related posts:
 How to access Steam games without an internet connection
  How to view FPS with Xbox Game Bar in Windows 10: Steps Made Easy
  Hacked account? How to check and remedy
  How to make video calls from WhatsApp Web
  How to increase the RAM memory of a desktop or laptop + Tips and Tricks
  How to organize your YouTube subscriptions into categories
+ Tips and Tricks
How to organize your YouTube subscriptions into categories
+ Tips and Tricks


