


How to identify Windows update problems using SetupDiag in Windows 11/10
Whenever there is an update issue with your Windows 11 or Windows 10 PC, you usually see an error code indicating the actual reason behind the failure. However, sometimes an update or update failure may not display an error code and that’s when the confusion arises. With an error code at hand, you know exactly where the problem is and can therefore test solutions. But since no error code appears, it becomes extremely difficult to identify the problem and resolve it. This requires a lot of your time to simply find the reason behind the error.
In such cases, you can try using a dedicated tool from Microsoft called SetupDiag, which helps you easily identify the real reason behind the error and save your time in finding a solution for the problem. This utility is free to use and is specially designed to determine the root cause behind the update or update failure.
The utility runs a check on the cached Windows installation logs generated by the installation process and now left behind. At the same time, it also scans the database of common errors for details that indicate the real reason behind the failed installation. Ultimately, this will help you find a proper solution for the error. Additionally, the SetupDiag tool is known to include a huge database of rules (approximately 60) of problems that have already been identified by Microsoft. However, the rules are updated every time the tool receives a new version.
This post will guide you through the process on how to identify Windows update issues using SetupDiag in Windows 11/10.
How to use SetupDiag to identify the reason for the update failure
Although using the SetupDiag tool is very easy, before proceeding, make sure that your system meets the requirements of the .NET Framework. You can then run the utility without any problems and output the results. Let’s see how to check if your PC has the required version of the .NET Framework:
How to check if your PC complies with the .NET Framework
Paso 1: press the Earn + R keys together on your keyboard to start the run command window.
Paso 2: In it run command search field, type cmd in the search bar and press the button Ctrl + Mayús + Intro shortcut keys on your keyboard to open the elevated Symbol of the system window.
Paso 3: In it Symbol of the system (management), run the following command and press Enter:
reg query "HKLMSOFTWAREMicrosoftNet Framework SetupNDPv4" /s
Stage 4: Now, in the results, check the Version and make sure the version is 4.6 or higher that’s when you can use the Configuration diagnostics tool.
*Note – If the device does not come with .NET 4.6 version or higher, then visit the Microsoft official download page for the .NET version 4.6 installer and download and install the file manually.
Now proceed to run the SetupDiag tool.
How to run the SetupDiag tool
Follow the instructions below to run the utility:
Paso 1: Click the following link to visit Microsoft’s official download page for the Configuration diagnostics tool:
Download the SetupDiag tool
Paso 2: Now, on the home page, click on the Download Setup Diag button.
Paso 3: once the .exe the file is downloaded, right click on it and select show in folder.
will take you to Descargar folder usually.
Now cut and paste this file into an empty folder.
*Note – Create a new folder if necessary and paste it into this folder.
Stage 4: Now press the button Earn + E keys together on your keyboard to open the File Browser window.
Paso 5: In it File Browser window, navigate to the location where you saved the SetupDiag.exe proceedings.
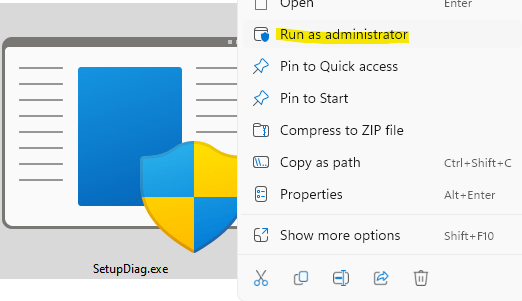
Then right click on the .exe file and select Execute as an administrator.
Now the tool will start running with immediate effect and the best part is that it doesn’t need to be installed and requires no interaction. Runs a scan to check if there are rules available for the logs generated by the failed installation. Once this is done, the tool will close automatically.
Once the scanning process is finished, it will generate three new files: Log.zip, SetupDiag.exe.configY SetupDiagResults.log and save them in the folder where the SetupDiag.exe the file is found.

How to read the results of SetupDiag
Here’s how to read and understand the SetupDiag output:
Step 1: Go to Start, right click on it and select File Explorer.
Step 2: In the File Explorer window, navigate to the folder where SetupDiag.exe is saved.
here, search SetupDiagResults.logright click on it and click open.
Step 3: This will open the log file and here you can see the results that the tool got after scanning the available rules.
For example, if you were trying to upgrade to the latest version of Windows 10 and then the device was forcefully shut down, the setup process points the operating system to the previous version of Windows 10 and stores the error logs on the device.
So when you open the log file, you will see the system details like PC name, manufacturer name, BIOS (UEFI) version, original version of Windows 10, etc. at the top and then You will see the error details towards the bottom with the error code.
It also mentions the exact reason or root cause of the problem and the solution to fix it. In the absence of the steps or the solution, click on the provided link or search for the error code or any other related information to find the solutions available online. Alternatively, you can also search for solutions using the references provided on the Microsoft forums.
Related posts:
 How to access Steam games without an internet connection
  How to view FPS with Xbox Game Bar in Windows 10: Steps Made Easy
  Hacked account? How to check and remedy
  How to make video calls from WhatsApp Web
  How to increase the RAM memory of a desktop or laptop + Tips and Tricks
  How to organize your YouTube subscriptions into categories
+ Tips and Tricks
How to organize your YouTube subscriptions into categories
+ Tips and Tricks


