


How many times have you wondered “Will you have read my message?” after sending an email to a major person or company? And how many times have you wondered if there is a way to know?
Here, you must know that there is good news and bad news. The good news is that yes, you can put the read receipt on Gmail. The bad news is that the service isn’t available to everyone. In theory there would be two more bad news, but we will deal with it later.
In this article we will explain to you how to put the read receipt on Gmail, based on the methods that work today. And as you continue reading, you will better understand why the other two “bad news”.
Premise
Let’s start from the premise, or if you prefer the first and second bad news:
Bad news first: the service of read receipt on Gmail is officially available only for Google Workspace subscribers. Formerly known as G-Suite, Workspace is Google’s answer to Microsoft’s Office 365 package (here we explain how to activate Microsoft Office). This means that if you do not have a company account you cannot activate the read receipt, nor – consequently – know whether the recipient has read the message or not.
Second bad news: there would also be a way to “bypass” Google Workspacebut only with unofficial browser extensions. This would mean giving complete strangers access to your Google account and browsing data. At this point a question arises: is it really worth it? 99.9% of the time no.
In summarytherefore, the situation is this:
- the free version of Gmail – the one with domain @ gmail.com to be clear – does not offer the read receipt function;
- browser extensions that activate this function are not official (read “they are not safe“);
- the only official way to get a read receipt on Gmail is to subscribe to Google Workspace.
All clear? After this necessary premise we can finally continue now.
Read also: How to create a new Gmail account
How to put the read receipt on Gmail with Google Workspace
First you need to create an account on Google Workspace. In this regard, we remind you that the registration procedure for a new profile is only active for those who own a company.
Google Workspace registration
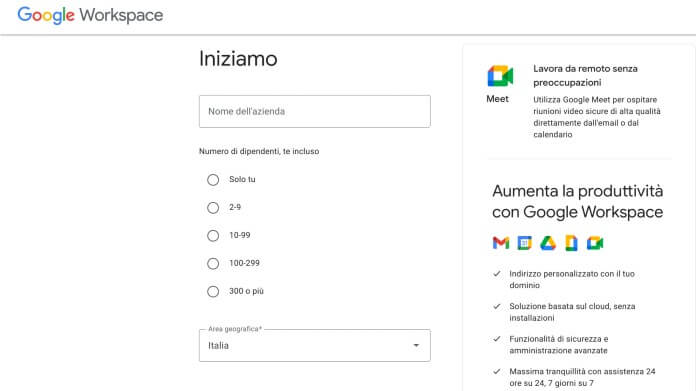
Then connected to the workspace.google.it page, click on the button “Start the free trial” and enter the first data requested (company name, number of employees and geographical area).
On the next screen fill in the fields “Name”, “Last name” e “Current email address”. Next, you will need to type the domain name of your business, i.e. the url of the home page. Google will use your domain to complete the account setup.
Once this is done, the page will open “How to access your account”. Now choose your account username and password, then click the button “Accept and continue” to accept the terms of use of the Google Workspace service.
The last step is to enter the details of the card or bank account that you will use to pay for the subscription to the Google suite.
On the same topic: The best free alternatives to Office
Verify domain and Gmail configuration as a professional email
Before you can request a read receipt on Gmail, you still need to complete two steps: the domain verification and the configuring Gmail as a professional email. These are two steps required for Google to ensure that no one else is using your Google Workspace account without permission.
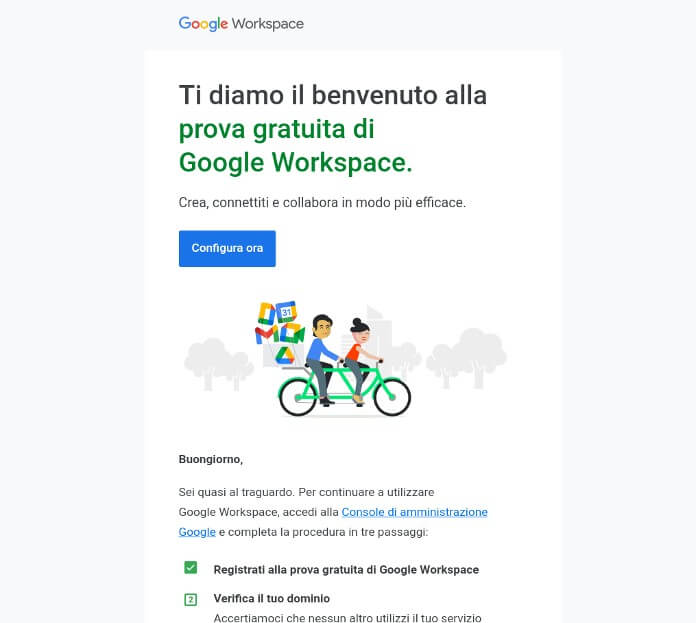
First proceed with the domain verification. Open the welcome message received from Google Workspace and click on the button “Configure Now”. From here on, follow the on-screen instructions to complete the verification in just a few steps.
Once the second step has also been completed, you just have to configure your domain’s MX records, to make them work with the email service. As the procedure varies from host to host, link to this Google Workspace page, where it explains how to set up MX records, where you find their complete list of hosts for your domain, then follow the onscreen instructions.
Note: if your host is not in the list click on the link “I need general instructions because my host is not on the list“.
Activation of confirmation of reading messages on Gmail
Now that Gmail is set up as a professional email, you have everything you need to activate the read receipt request on Gmail. Go to Google Workspace admin panelopen applications, then select “Google Workspace” before and “Gmail” after.
In the new screen that opens go to “User settings“. Then he identifies the entry “Read confirmations of email messages“And add a dot next to the”Allow message read receipts to be sent to all addresses in my organization and to authorized email addresses“. Now click the “Save”To store the changes just made.
By now the most has been done. Now write a new email, then click on the three dots icon at the top right and in the drop-down menu that appears choose the option “Request read receipts“. That’s it, you just added the request for read receipt of messages on Gmail.
Recommended reading: How to sign an email on Gmail
How the read receipt on Gmail works
The request for confirmation of reading messages on Gmail works something like this: you send a message by activating the function “Request read receipts“when the recipient opens it, you will automatically receive an email which will confirm that the message has been read, with the time and date of opening.
However, confirmation is not always equivalent to an actual reading of the email by the recipient. That is it depends on the email system used by the user to whom you send the message. Let’s take an example to better understand the speech.
Let’s assume to send an email to a user using an IMAP-based client, who considers the message as read without opening it. Result? You will receive the read receipt, but the recipient has not actually read the email.
The same happens when the recipient uses a non-IMAP system for mobile devices that does not send confirmations.
And then again: You will not receive any read receipts if the user you send the email to uses a client that does not synchronize in real time. Or if you deliver a message to a group alias or mailing list.
In short, it is not certain that after activating the exclusive professional Gmail function you will receive the confirmation of reading the emails with certainty.
Read also: Gmail PEC, configuration and quick guide
Does it also work on the Gmail app for smartphones and tablets?
Remember when we first talked about three bad news? Here, the third is this: you cannot put the read receipt on the Gmail app you use on smartphones and tablets. At the moment, therefore, the only valid and safe method is to use Google Workspace Gmail from a computer.
You might also be interested in: How to hide WhatsApp online status

Related posts:
 How to access Steam games without an internet connection
  How to view FPS with Xbox Game Bar in Windows 10: Steps Made Easy
  Hacked account? How to check and remedy
  How to make video calls from WhatsApp Web
  How to increase the RAM memory of a desktop or laptop + Tips and Tricks
  How to organize your YouTube subscriptions into categories
+ Tips and Tricks
How to organize your YouTube subscriptions into categories
+ Tips and Tricks


