


How to take a scrolling screenshot on Android 12
With Android 12, Google introduced the ability to take full-screen scrolling screenshots on your Android device. We are confident that this will be one of the most popular Android 12 features for many users. What’s even better is that Google’s user interface for the same looks great. Here’s how to take a scrolling screenshot in Android 12.
How to take a scrolling screenshot on Android 12
The option to take scrolling screenshots has been one of the most requested features and has taken years to arrive, finally here we can hope that it offers a smooth experience and better compatibility with a multitude of applications. Android Developers Blog, Scrolling Screenshots work out of the box for most apps. Is that how it works:
Open an app or page you want to take a screenshot of, then press the power button and the volume down button at the same time (or use your preferred method). To start a screenshot).
This will capture the screenshot exactly as you expected. The screenshot will go to the bottom left of the screen. If the scrolling screenshot feature is available for this app, you will see a » Capture more € œPresúalo.
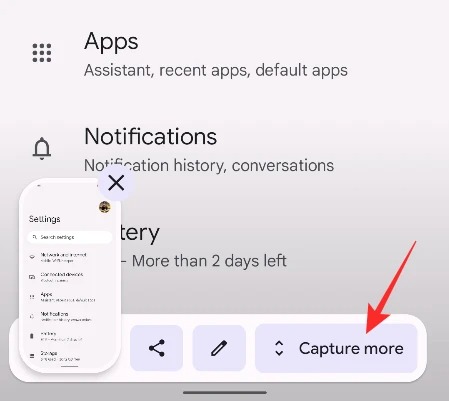
Now you will see an interface similar to the one shown below.

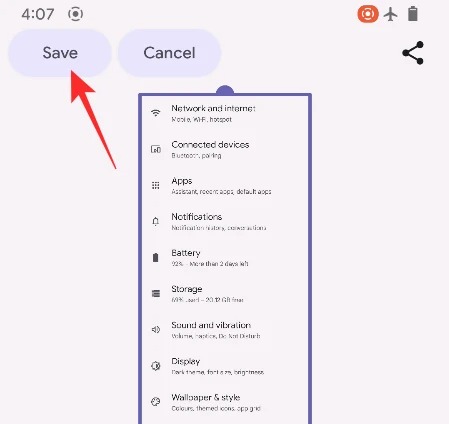
Here you can expand the total area you want to capture by dragging the upper or lower handles. If you drag from the top or bottom, a circle will appear that zooms in on the exact area where it is at the end of the margins.

Once you have the area you want to cover, hit the old “Save” button in the upper left corner.
And that’s it! Your scrolling screenshot will be available in your Gallery or Photos app.
How to edit a scrolling screenshot in Android 12
Android 12 not only allows you to take scrolling screenshots, but you can also edit them just like you would any other screenshot on your phone.
Crop a screenshot
You can also crop the scrolling screenshot while taking a screenshot or after capturing it.
During screenshot
To do this, drag the side handles to crop your scrolling screenshot, as shown below.

You won’t see the zoom circle if you drag the side controls. However, you will still be able to drag and select the area.
When done, press Save money.

After taking a screenshot
If you’ve already aligned your screenshot with scrolling, you can crop it shortly after capturing one by tapping the pencil icon in the lower right-hand corner of the screen.

On the editing screen, tap the crop icon at the bottom.

Now start moving the dots on one of the edges of the screenshot accordingly to crop it the way you want.

Once you have cropped your screenshot, you can tap on the “Save” option in the upper left corner.

The screenshot will be cropped and stored on your Android device.
conclusion
In this guide, you have learned how to take a scrolling screenshot on Android 12. If you have any questions or suggestions, please let us know in the comments. Also, check out this guide too if you want to learn how to set up a VPN on Android.
Related posts:
 How to access Steam games without an internet connection
  How to view FPS with Xbox Game Bar in Windows 10: Steps Made Easy
  Hacked account? How to check and remedy
  How to make video calls from WhatsApp Web
  How to increase the RAM memory of a desktop or laptop + Tips and Tricks
  How to organize your YouTube subscriptions into categories
+ Tips and Tricks
How to organize your YouTube subscriptions into categories
+ Tips and Tricks


