


How to use Do Not Disturb on iPhone

How to use Do Not Disturb mode on iPhone, to silence notifications and limit distractions. You can turn on Do Not Disturb on your iPhone in several ways. You can use Do Not Disturb on your iPhone anytime you want to block calls, messages, or other notifications from ringing your phone.
Notifications and alerts will still be stored on your phone and you can check them at any time, but your iPhone won’t turn on or ring. You can use Do Not Disturb by activating it manually or by scheduling it to activate automatically at certain times of the day.
Thanks to our iPhones, we are now hyper-aware of who is trying to communicate with us during the day. We see notifications for phone calls, text messages, social media mentions, and a grueling list of pings from all kinds of apps and services.
Even if you turn off your phone, you still see the screen light up with incoming notifications, making it difficult to truly “check out” from the online world.
That’s why Apple offers Do Not Disturb, a mode that completely mutes your iPhone (with a few exceptions – read on). When enabled, Do Not Disturb mutes all audible notifications and also keeps the screen dark. Yes, the notifications are still coming and if you manually turn on the screen, you can see them. But left alone, the phone will offer you a break from the online world.
There are two ways to use Do Not Disturb mode on iPhone. You can turn it on at any time, like when you walk into a movie theater, or have it turn on automatically every day, for example before going to bed. Let’s see the two methods below.
How to manually activate Do Not Disturb on iPhone
- Swipe up from the bottom of the screen to view the Control Center. If you have an iPhone X or later, or have an iPad with iOS 12 or later, you should instead swipe down from the top right corner of the screen to open Control Center.
- Tap the Do Not Disturb icon. Do not disturb is now turned on and no notifications will disturb you until you go back to the Control Center and tap the icon to turn it off.
- If you want to further customize Do Not Disturb, press the icon hard when you turn it on. You will have three choices: enable it for an hour, until evening, or until you leave your current location.
- Tap the Do Not Disturb button to instantly activate the feature, or deep press the button to get more scheduling options.
That’s all you need to do – Do Not Disturb is now enabled. But there are plenty of ways to tweak what can sneak through the Do Not Disturb barrier, allowing you to see exactly as much as you want. For details on how to do this, see Customizing Do Not Disturb below.
How to schedule Do Not Disturb on iPhone to use it automatically at a certain time every day
- Tap the Settings icon, then tap Do Not Disturb.
- Tap “Scheduled” to activate the schedule mode.
- Tap the From – To option and set the time you want Do Not Disturb to start and end each day. For example, you might want to start every night at 10pm and finish at 7am in the morning. Tap Back to keep your changes.
- Make other changes to the Do Not Disturb settings (see Customizing Do Not Disturb below) and then tap Settings to return to the main Settings screen. It is now scheduled to run every day.
How to customize Do Not Disturb on iPhone
Your iPhone allows you to change the Do Not Disturb feature in several ways from the schedule page above:
- The rest mode will apply Do Not Disturb for hours at a time. Turn it on and it will keep notifications off your lock screen overnight, so if you turn on your phone, you won’t see any notifications yet. (They’ll still be in the Notification Center if you absolutely have to check them out at 2am.)
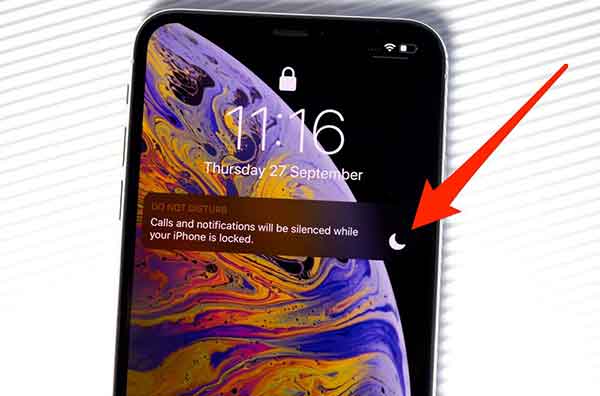
- The section Silence is where you can also choose how quiet your phone should be. Choose between “Always” (the phone will always be silent when in Do Not Disturb mode) and “While iPhone is locked” (it will still beep if the phone is on and in use).
- The section Phone lets you decide who your phone will ring with. You can choose to allow calls from “Everyone” (which, if we can editorialize for a moment, somehow defeats the purpose of Do Not Disturb), “Nobody” or just people in your “Favorites”.
- Do not disturb while driving lets you set Do Not Disturb to turn on automatically, as you can imagine, while driving. For this to work, you need a car with Bluetooth capability.
How to find lost iPhone, even of a friend
Finally, there is another Do Not Disturb option. It’s called Emergency Bypass and resides in the Contacts app. If you enable Emergency Bypass for a specific contact, that person’s calls will ring and vibrate even during Do Not Disturb times. To do this, open the desired contact in the Contacts app and tap “Ringtone”. On the Ringtone screen, turn on “Emergency Bypass”.
Related posts:
 How to access Steam games without an internet connection
  How to view FPS with Xbox Game Bar in Windows 10: Steps Made Easy
  Hacked account? How to check and remedy
  How to make video calls from WhatsApp Web
  How to increase the RAM memory of a desktop or laptop + Tips and Tricks
  How to organize your YouTube subscriptions into categories
+ Tips and Tricks
How to organize your YouTube subscriptions into categories
+ Tips and Tricks


