


Few people knew before the outbreak of the pandemic Zoom, despite having existed since 2011. Today, however, it is one of the web platforms for video conferencing most used in the world.
From condominium managers to teachers for remote lessons, from business managers to small entrepreneurs: all, more or less, have resorted to videoconferencing, since words such as distancing and quarantine entered everyday life.
And this is where Zoom’s success was born, which became in a short time one of the favorite tools for organizing streaming video conferences very useful in particular for those people forced to have to resort to audio and video calls during smart working.
As a result, many people have been forced to become familiar with a service previously unknown to them: condominiums, students, employees, etc., each with mixed fortunes.
That’s why we thought we’d prepare a clear guide on how to use Zoom for video conferencingto help you with your next online meeting.
How to register for Zoom
To start using Zoom you must first register to the platform.
You can create an account on Zoom for free; the account can be created via the website, or you can download the Zoom Cloud Meetings app for mobile devices, available for free on the Play Store for Android smartphones and on the App Store for iPhone.
Here are the steps to register to Zoom from PC:
- Go to the official Zoom site;
- click on “Agree and Proceed” e “Close” to accept the cookie policy;
- type your e-mail address in the field “Enter your work email address” and select “Sign up for free”;
- access the email address you just entered, open the message received from Zoom and click on the button “Activate Account”.
To record to Zoom with the app, just install Zoom, start it, tap on the item “Subscribe” and follow the guided registration by entering the required data.
Start a test meeting
A new screen will open soon after, where you will be guided in creating and launching your own first meeting, even if only test:
- Fill in the required fields and click on “Keep it going” (step 1 “Account Information”);
- enter one or more email addresses of users you would like to invite to the videoconference (step 2 “Invite colleagues”);
- copy the conference call invitation link next to “Personal meeting url” to share it to other people you want to attend the test meeting;
- click on “Start the meeting now” to start the test video conference (step 3 “Trial meeting”).
How to create a meeting with Zoom
The steps for the creation of a new videoconference they are not that different from those just listed, however there are some changes:
- Go to the Zoom home page and log into your profile;
- move up “Organize a meeting” and choose whether to start it with “With video disabled”, “With video activated” or with “Screen sharing only”;
- wait for the meeting window to load, then click on “Invite” bottom right;
- cheap with “Copy Invitation” to copy the meeting ID and password connected to the videoconference;
- to invite participants, share the data you just picked up with the person you want to invite to the conference in streaming;
- wait for him to join the meeting
Important: the user to whom you send the invitation can join the videoconference even if they do not necessarily have an account registered on Zoom. We’ll explain it to you better shortly.
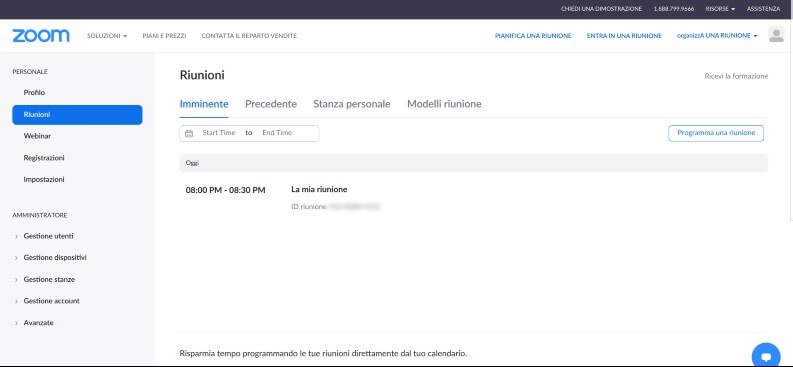
Schedule a meeting
Instead of starting the meeting right away, you can decide to plan it. To do this, go up “Schedule a meeting”, choose a title to assign to it (“Topic”), set date and time (“When”), and make sure the other settings are to your liking.
When finished, click on “Save” to confirm everything.
Note– Meeting ID and password are also available on the same page.
How to join a meeting
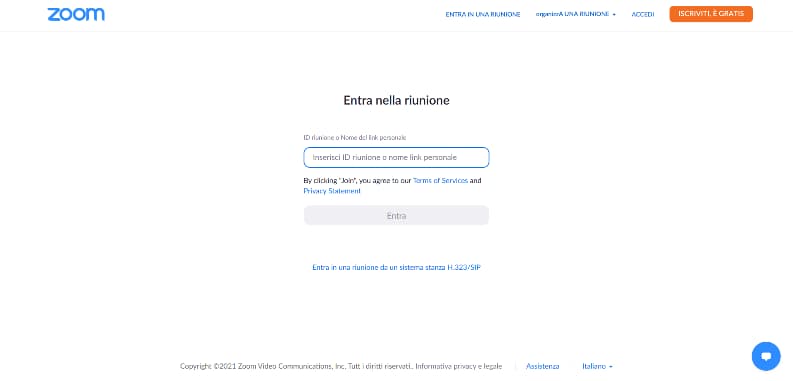
Here are the steps you need to complete for join a videoconference with Zoom:
- Connect to the Zoom home page;
- click on “Join a meeting” up;
- type the ID provided by the videoconference host below “Meeting ID or Personal Link Name”;
- cheap with “Come in” to continue;
- write the password you received earlier in the field “Meeting password”;
- click on “Join” to take part in the meeting.
Note: If you signed in before the meeting starts, you will see a black screen with the message “Please wait for the host to start this meeting”, with the name of the meeting underneath. After a while a white screen will appear showing the warning “The meeting will start in a few seconds”.
What can be done with Zoom

After seeing its basic functions, here is a list of all the things you can do with Zoom free and which for a fee during a videoconference:
- Mute (and reactivate) the microphone: click on “Mute my Audio” (the microphone icon) to mute the microphone, up “Unmute My Audio” to reactivate it.
- Disable the video: click on “Stop Video” lower left.
- See all attendees: Move the cursor to the top right and click on the button next to the meeting time to view all other participants. During the meeting, by default, only the person who is speaking at that moment appears on the screen.
- Share your screen: click on “Share” (the green rectangle icon with the arrow pointing up) and choose whether to share only the active window or the whole screen.
- Record the meeting locally: select “Record” bottom right e “Record on this computer” to start recording. To pause it click on “Pause”, to interrupt it on “Stop”.
- Enable the waiting room: go up “Meetings”, click on the button “Edit” located next to the desired video conference, then scroll to “Meeting options” and add a check mark next to “Enable waiting room” (“Enable Waiting Room”). It allows you to increase security when conducting your video conference by preventing strangers and attackers from entering the meeting without having received authorization. The option is only valid for paid accounts.
- Transcribe the audio: Add check to the option for audio transcriptions via cloud recording settings. This function, like the “Waiting Room”, is also available only for those who subscribe to a premium subscription.
- Eliminate the 40 minute limit: the only way to automatically remove the 40-minute limit for each video meeting is to sign up for a paid plan.
Zoom plans and pricing
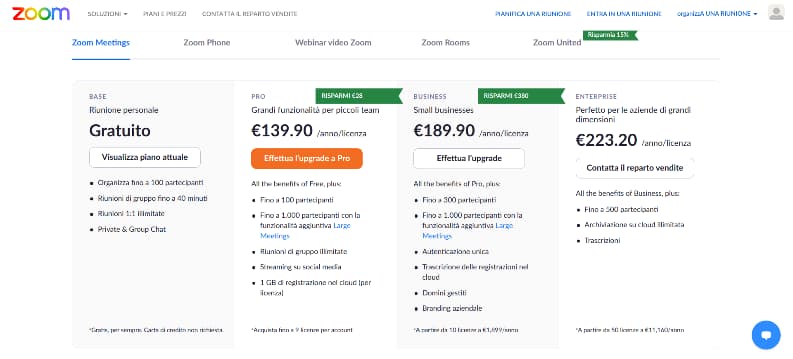
We conclude our study by presenting a complete overview of plans and rates on Zoom:
- FreeGroup meetings are limited to 40 minutes and a maximum of 100 participants in the Zoom free plan. No limitations, however, for meetings with only one participant.
- Pro – 139.90 euros per year: Unlimited group meetings of up to 100 participants, with the possibility of adding up to 1,000 participants thanks to Large Meeting, a 558 euro per year feature that allows you to increase the number of people to be included in a video conference. In addition, the Pro subscription allows you to have 1 GB of cloud recording and streaming on social media.
- Business – 189.90 euros per year: Unlimited group meetings of up to 300 participants, with the opportunity to take advantage of Large Meeting. In addition, recordings can be transcribed to the cloud.
- Enterprise – 223,20 euro all’anno: Unlimited group meetings for up to 500 attendees, unlimited cloud storage also available.
Conclusions
Our guide ends here. We hope to have helped you to learn more about the service Video conference zoom, so that you can use it in the future without problems.
If you are looking for alternatives to Zoom, other similar platforms are available to hold an online meeting, for example you can try the features of Google Meet, make video conferences on Facebook with Messenger Rooms or try one of the best apps for group video calls and use the one that satisfies you. more your needs.

Related posts:
 How to access Steam games without an internet connection
  How to view FPS with Xbox Game Bar in Windows 10: Steps Made Easy
  Hacked account? How to check and remedy
  How to make video calls from WhatsApp Web
  How to increase the RAM memory of a desktop or laptop + Tips and Tricks
  How to organize your YouTube subscriptions into categories
+ Tips and Tricks
How to organize your YouTube subscriptions into categories
+ Tips and Tricks


