


Microsoft begins removing NetBIOS and LLMNR to focus on mDNS
Microsoft’s Windows operating system supports several multicast name resolution protocols, including NetBIOS and LLMNR. The latest generation protocol that is widely used today is mDNS, while the NetBIOS and LLMNR protocols are not widely used anymore.

In Alignment in mDNS: Gradual Reduction of NetBIOS and LLMNR Name Resolution, Microsoft informs Windows System Administrators that it plans to disable the old protocols in future versions of Windows to improve the security of devices and decrease the load on the networks they use. .
Microsoft is aware that there are still scenarios and “real world implementations” where these protocols are used, but the company is convinced that disabling the protocols by default is the right direction to go.
The company has not yet started the process of disabling LLMNR by default, but has started the process for NetBIOS.
The NetBIOS protocol is already disabled by default on mobile devices according to Microsoft. In the latest versions of Windows Developer and Beta Insider, NetBIOS is in learning mode. Learning mode means that NetBIOS is used as a fallback if mDNS and LLMNR queries fail.
The change may cause connectivity issues in some cases. Administrators can modify a Group Policy or Registry value to change the behavior of the protocol.
Note: Group Policy Editor is only available in the Professional and Enterprise editions of Windows. Home edition administrators can modify the behavior in the Registry.
NetBIOS change in Group Policy Editor
- Use the keyboard shortcut Windows-R to open the Run box on the system.
- Type gpedit.msc and press Enter; this should load the Group Policy Editor.
- Go to Computer Configuration > Administrative Templates > Network > DNS Client.
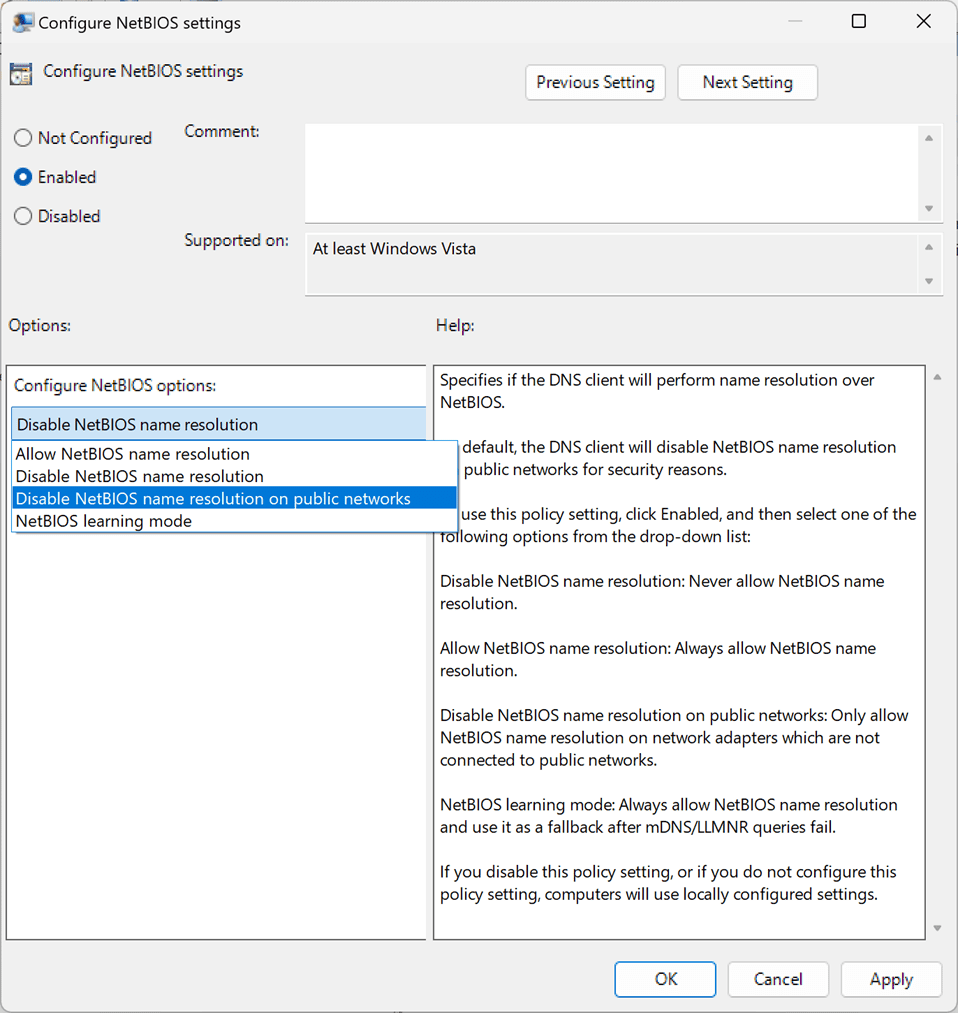
- Double-click the Configure NetBIOS policy.
- Set the policy to Enabled.
- Use the provided menu “Configure NetBIOS Options” to switch to one of the supported options:
- Allow NetBIOS Name Resolution – Enables full NetBIOS support.
- Disable NetBIOS Name Resolution – Disables NetBIOS support on the device.
- Disable NetBIOS name resolution on public networks – Keeps NetBIOS enabled on private networks, but disables it on public networks.
- NetBIOS Learn Mode: NetBIOS is only used as a fallback if mDNS and LLMNR queries fail.
- Select OK to save the new policy settings.
Change NetBIOS in the Windows Registry
The same options are also available in the Windows Registry.
- Use the keyboard shortcut Windows-R to open the run box.
- Type regedit.exe and press the Enter key.
- Go to ComputerHKEY_LOCAL_MACHINESYSTEMCurrentControlSetServicesDnscacheParameters in Registry Editor.
- Right-click Parameters and select New > Dword (32-bit) Value.
- Name the value EnableNetbios.
- Double click on the new Dword and set it to one of the following values:
- 0 — Disabled.
- 1 — Allowed.
- 2 — Disabled on public networks.
- 3 — Learning mode.
- Close Registry Editor after you’ve made the change.
closing words
LLMNR has yet to be touched, but Microsoft plans to make similar changes to this protocol in future builds and versions of the Windows operating system.
Now you: do you use NetBIOS or LLMNR? (via Desktop Modifier)
advertising
Related posts:
 How to access Steam games without an internet connection
  How to view FPS with Xbox Game Bar in Windows 10: Steps Made Easy
  Hacked account? How to check and remedy
  How to make video calls from WhatsApp Web
  How to increase the RAM memory of a desktop or laptop + Tips and Tricks
  How to organize your YouTube subscriptions into categories
+ Tips and Tricks
How to organize your YouTube subscriptions into categories
+ Tips and Tricks


