


The built-in administrator cannot activate this app
Windows does not allow all levels of users to operate with the same level of security. While administrators enjoy full one-click accessibility permissions, this is not true for a standard / guest account on the system. But sometimes even while using an administrative account, a user can see this «The built-in administrator cannot activate this app” Error message. Do not worry. This is nothing more than a simple misconfigured policy problem. Follow these steps.
Solution 1: make sure you are using an administrative account
If you are using a standard account, you may experience this problem. You can change the account type or log in with an administrator account.
1. First, press the Tecla de Windows + R keys together.
2. Then write «control“On Run and click on”OK“.
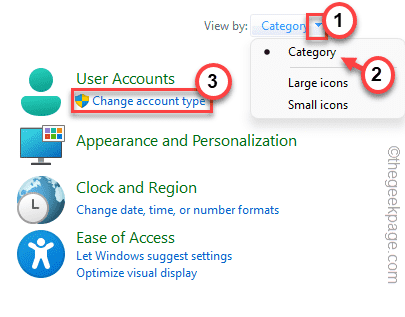
3. When the Control Panel opens, tap the drop-down menu next to “View by:” and set it to “Category“.
4. After that, click on «Change account type”To modify the type of account.
5. You will now see the list of accounts on your system.
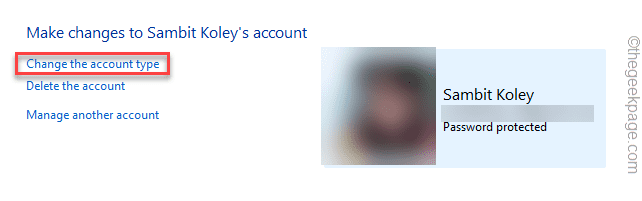
6. After that, tap the account you are using now.

7. Now, touch «Change account type“.
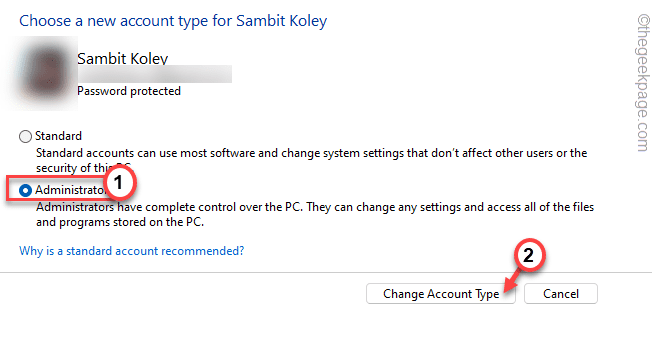
7. Next, set the account type to «Administrator“.
8. After that, click on «Change account type”To configure the new type of account as ‘Administrator’.
After that, close the Control Panel.
Now, restart your computer once. Once you are logged in, try to open the file with which you were facing the problem. This should fix the problem you are facing.
Solution 2: modify the policy
[FOR WINDOWS PRO & ENTERPRISE EDITION ONLY]
Misconfigured policy settings can cause this problem on your system.
Paso 1
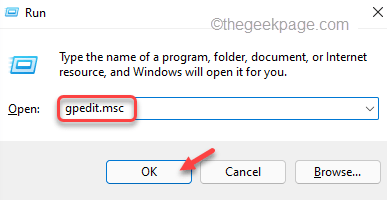
1. First, press the Tecla de Windows + R keys together.
2. Then write «gpedit.msc“And click”OK“.
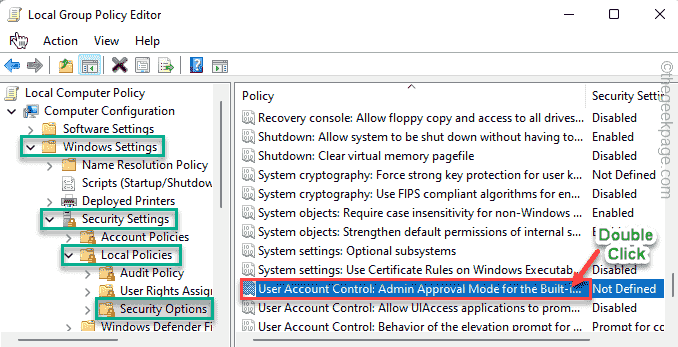
3. When the Local Group Policy Editor opens, expand the left side like this:
Computer Configuration > Windows Settings > Security Settings > Local Policy > Security Options
4. Then, on the right side, double click about him “User account control: Administrator approval mode for the built-in administrator account“.
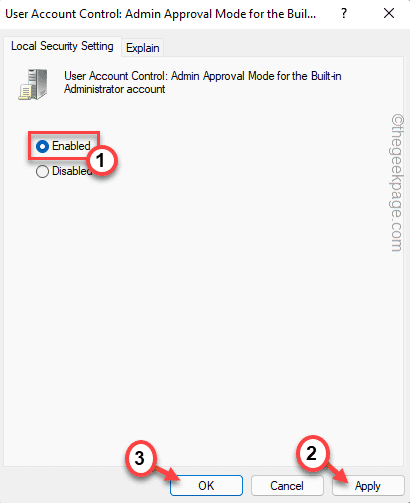
5. Choose policy settings for «Activated”To enable politics.
6. After that, tap «Request” Y “OK”To save the changes.
Once you’re done, close the Local Group Policy Editor settings. Then, restart your system to allow this change to take effect.
After that, check by opening the problematic files on your system.
Paso 2
Now you have to modify the registry.
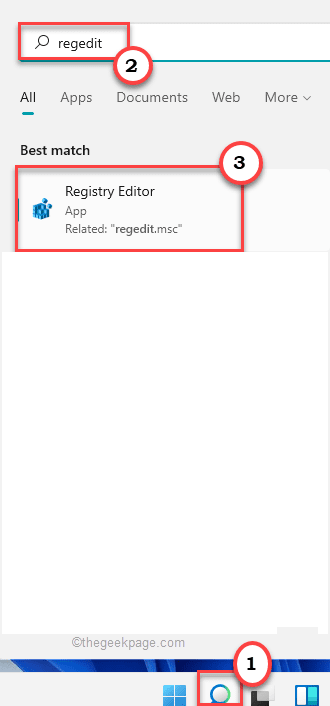
1. At first, tap the search button on the taskbar and type «regedit”In the search box.
2. Then tap «Registry editor”From the search results to access it.
NOTE–
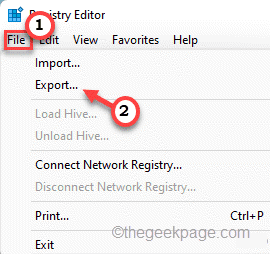
Once you have opened the Registry Editor window, click on «Archive«>»To export”To create a backup of your registry. Give the backup a suitable name and keep it in a safe place.
If something wrong happens, you can easily import this backup.
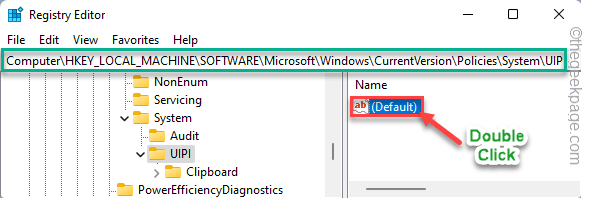
3. Now on the left side, go this way:
ComputerHKEY_LOCAL_MACHINESOFTWAREMicrosoftWindowsCurrentVersionPoliciesSystemUIPI
4. Then, double click about him “(Default)”Value to edit.
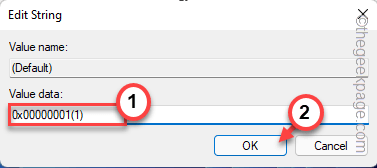
5. Now, copy get the value in this box.
0x00000001 (1)
6. Then tap «OK”To save these changes.
After that, close the Registry Editor. Restart the system and check if it works.
After restarting the system, try to open the application one more time.
Solution 3: change the UAC level
If modifying the policy settings does not work, you must modify the User Account Control (UAC) level.
1. First, press the Windows key and writes “UAC“.
2. Then, tap on the «Change the control parameters of your user account“.

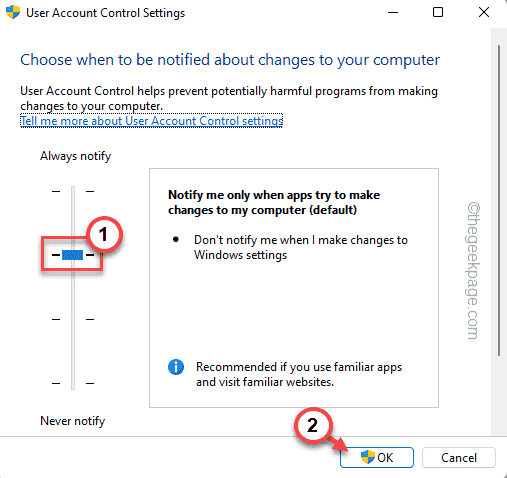
This will open the User Account Control settings.
3. When the UAC configuration opens, perform any of the following steps according to the requirement.
If UAC was disabled, raise the slider one level.
If UAC is already enabled, raise the slider one more level.
4. Then tap «OK”To save the changes.
After doing this, close the Control Panel. Then, restart your system.
After rebooting the system, you should be able to resolve the problem.
Solution 4: empty the store cache
Some users have solved the problem simply by flushing the Store cache on their system.
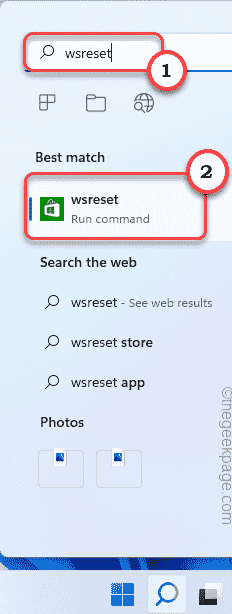
1. First, press the Windows icon and writes “wsreset“.
2. Then click on «wsreset”In the search result to reset the Store cache.
This will reset the store cache on your system. Check if this solves the problem.
Solution 5 – Run SFC commands
Running a simple system file checker scan can fix this problem if the problem is caused by a corrupted file.
1. At first, press the Windows key and type «cmd“.
2. Then, right-click on the «Symbol of the system«And touch»Execute as an administrator“.
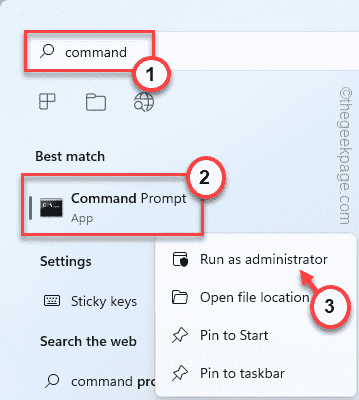
3. When the command prompt appears, type this command and press Get into to start an SFC scan.
sfc /scannow

Once the scanning process is complete, close the command prompt. After, restart your system. Check if this solves the problem.
Related posts:
 How to access Steam games without an internet connection
  How to view FPS with Xbox Game Bar in Windows 10: Steps Made Easy
  Hacked account? How to check and remedy
  How to make video calls from WhatsApp Web
  How to increase the RAM memory of a desktop or laptop + Tips and Tricks
  How to organize your YouTube subscriptions into categories
+ Tips and Tricks
How to organize your YouTube subscriptions into categories
+ Tips and Tricks


