


How to enable or disable the Quick Access feature in Windows 11
The Quick Access feature was released with the release of Windows 10. Windows users have loved this feature and it is quite safe because it allows them to quickly access recently opened files or frequently used folders and so on. in File Explorer or Open & Save. As a magician. If you have noticed that the file explorer, by default opens in quick access where you can find all recently opened items or folders or files pinned by you. If you don’t want to open file explorer in quick access, or you just want to disable quick access or enable quick access feature on your Windows 11 system, this post will definitely help you a lot. Keep reading.
How to enable or disable the Quick Access feature in Windows 11 using Registry Editor
NOTE: Always make sure you have exported the log file as a backup before making any changes so that if something goes wrong you can revert it at any time. Even a minor change to a registry file can totally damage your system software.
Step 1: Press Windows + R keys together on your keyboard to open To run dialog box.
Step 2: Write regedit in the run box and press the Get into key to open Registry Editor.
Step 3: click Yes in the UAC message to continue.
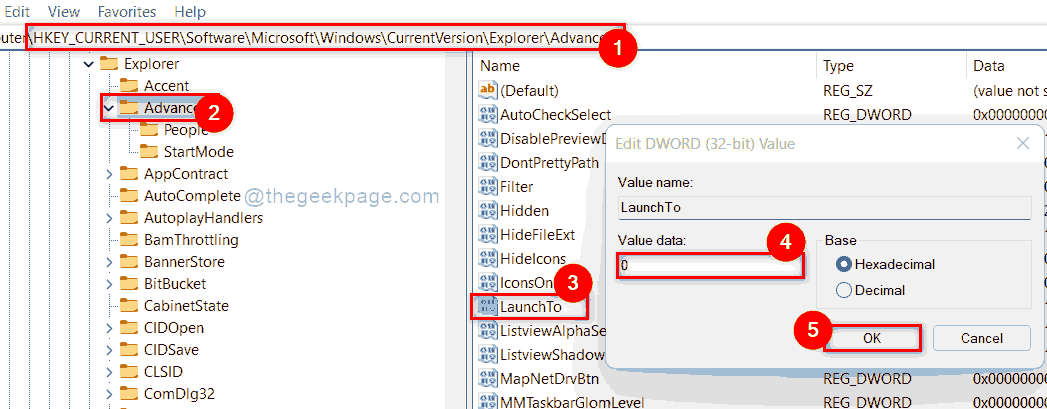
Step 4: Copy and paste the path below into the clear, empty address bar in the registry editor.
HKEY_CURRENT_USERSoftwareMicrosoftWindowsCurrentVersionExplorerAdvanced
Step 5: Then select the Advanced registry key on the left side of the registry editor.
Step 6: locate LaunchTo DWORD value and open it by double clicking on it.
Step 7: Login 0 in the Value data text box and click OK button to apply changes.
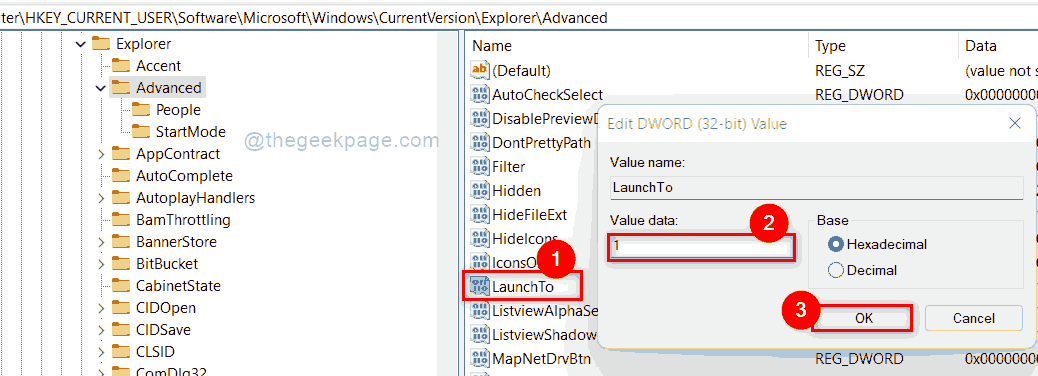
Step 8: In case you want to re-enable it, open the LaunchTo DWORD value and Enter 1 in the Value data text box and click OK to make changes as shown below.
Step 9: Now close the registry editor and reboot your system once.
Step 10: The next time you start your system, you will be able to observe the changes made.
This is how you can enable or disable Quick Access using the registry editor in Windows 11.
How to Open File Explorer for Quick Access or Always This PC in Windows 11
Step 1: Press Windows + E keys together to open File Browser on your system.
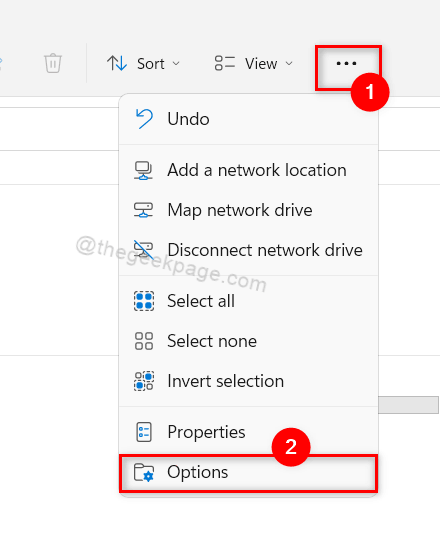
Step 2: Click on three horizontal dots (Show more options) located at the bottom of the menu bar as shown below.
Step 3: Then select Options in the drop-down menu as shown in the following screenshot.
Step 4: If your file explorer opens in Quick Access and you want to change it to This PC, Then go to General Folder Options window tab.
Step 5: Now, click Open File Explorer to drop down list and select This PC of the list.
Step 6: Once done, click Request Y OK button to make changes.
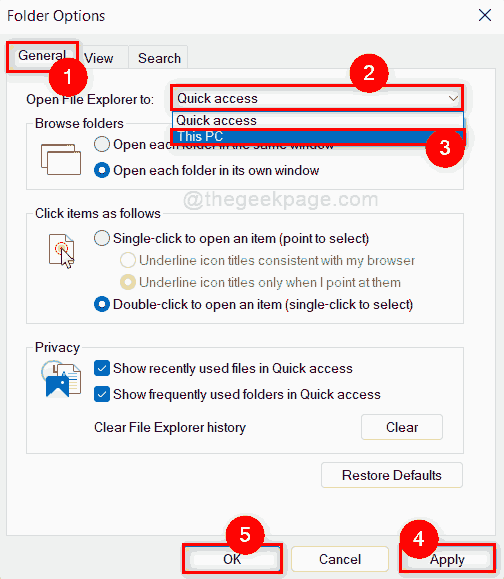
Step 7: If you want File Explorer to open for Quick access, then go to General Folder Options window tab.
Step 8: select Quick access from the drop-down list of Open File Explorer to and click Request Y OK button to reflect changes.
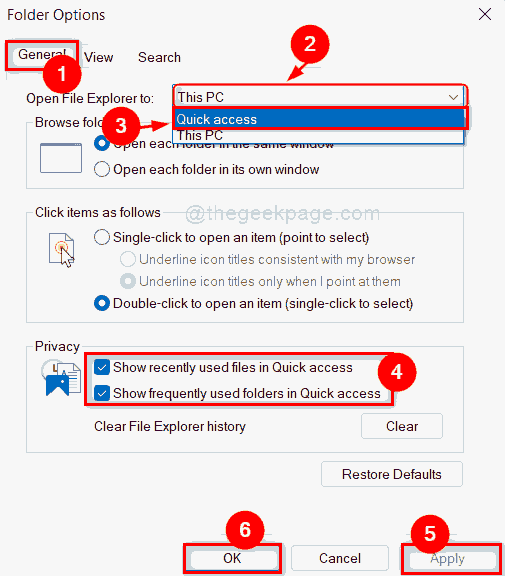
Step 9: This will not enable or disable Quick Access, but will only ensure where the file explorer should open.
That’s it guys!
I hope this article has been helpful and useful to you.
Please leave us comments below for any queries.
Thanks!
Related posts:
 How to access Steam games without an internet connection
  How to view FPS with Xbox Game Bar in Windows 10: Steps Made Easy
  Hacked account? How to check and remedy
  How to make video calls from WhatsApp Web
  How to increase the RAM memory of a desktop or laptop + Tips and Tricks
  How to organize your YouTube subscriptions into categories
+ Tips and Tricks
How to organize your YouTube subscriptions into categories
+ Tips and Tricks


