


How to take screenshots on iPad – After thinking about it for a long time, you too have decided to buy an iPad. Although you were the first experience with this type of device, you were pleasantly surprised by its ease of use to the point that you have already become familiar with the main features of your new iPad. Unfortunately, however, when you have had the need to do one screenshot, you could not understand how to “capture” what is displayed on the screen: for this reason, you did some research on the Web and you ended up straight on this guide of mine.
That’s the way it is, am I right? Then let me tell you that you’ve come to the right place at the right time. In the next paragraphs of this tutorial, in fact, I will explain to you how to take screenshots on iPad providing you with the necessary information to succeed in your intent on all models of the famous Apple tablet. First, you will find the detailed procedure to take a screenshot of the screen by pressing the physical buttons of the iPad in your possession, also explaining how to make any changes to the screenshots made.
Subsequently, I will show you an alternative procedure to “capture” the screens of your interest using AssistiveTouch, the feature that allows you to activate a virtual key with which you can also take screenshots. How do you say? Is that exactly what you wanted to know? Well, then let’s not dwell further and see how to proceed. Happy reading and, above all, have fun!
Index
How to take screenshots on iPad Pro
Per fare screenshot su iPad Pro, access the screen you want to photograph and press the button at the same time Volume up, located on the right side of the device (if you are holding it vertically), and the top button, that is, the one you usually use to turn on / off your iPad or to lock / unlock its screen.
How do you say? Do you have an older iPad Pro with a Home button? In this case, to take a screenshot, simultaneously press the Home button and the top button of your device.
Also, no matter which iPad Pro model you own, you can activate the feature AssistiveTouch from the iPadOS Settings and take a snapshot without using the iPad’s physical keys. If you are interested in this option, click on the icon of gear wheel, tap on the item Accessibility and access the section Touch.
Then click on the option AssistiveTouch and, in the new screen that appears, move the lever next to the item AssistiveTouch gives OFF a ON. By doing so, you should see a virtual button which allows you to perform various operations, such as activating Siri, calling up the Control Center, accessing the Notification Center and much more.
To take a screenshot with AssistiveTouch, press the virtual button in question, tap on the items Device e Other and select the option Screen snapshot.
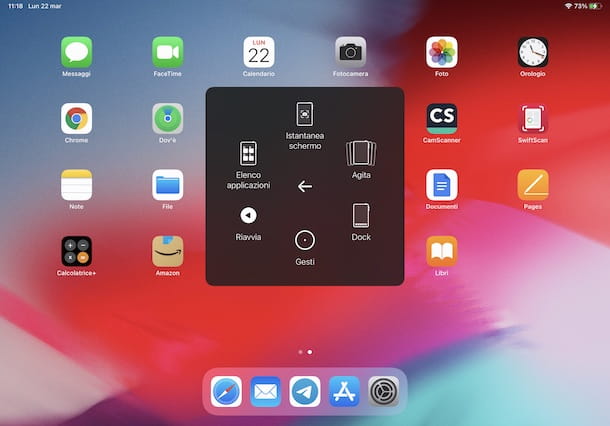
Please note that by accessing the section again AssistiveTouch and pressing on the item Customize main menu, you can change the options visible when you press the virtual key, including the ability to add the voice Screenshot on the AssistiveTouch main screen. To find out more, you can follow the instructions I gave you in my guide on how to put the ball on iPhone which are also valid for iPad.
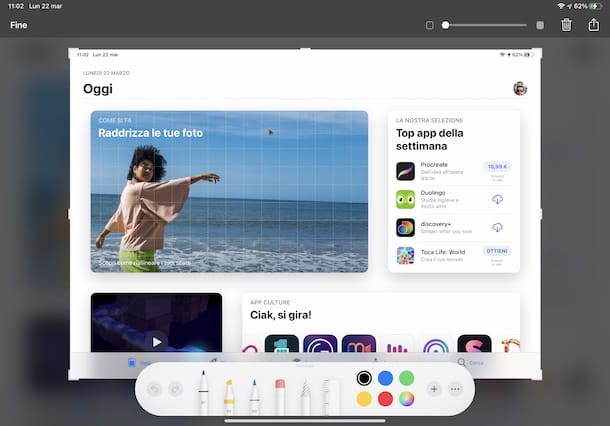
Regardless of the procedure you have chosen to take a screenshot on iPad, you should know that the captured image is automatically saved in the Photos app. Furthermore, immediately after taking the screenshot, you can view a preview and make any changes by pressing on box appeared in the lower left.
In the latter case, by pressing the button Fine located at the top left you can decide whether to save the screen in the Photos app or in the Files app. Instead, by selecting the option Delete screen snapshot (or by pressing the icon trash can, top right), you can delete the screenshot in question.
Come fare screenshot su iPad Air
The procedure for fare screenshot su iPad Air It’s pretty simple: you can take a snapshot of your Apple tablet screen either via a predefined key combination or by using the AssistiveTouch tool built into iPadOS.
In the first case, if you have a iPad Air 2020, i.e. the model without the Home button and with an improved screen-to-frame ratio compared to previous iPad Air, you can take a screenshot by simply pressing the Volume up button and the top button, the same one you use to turn on your device or lock its screen.
If, on the other hand, you have a iPad Air 2019 or earlier, access the screen you wish to photograph and simultaneously press the Home button and the top button, to take a snapshot.
In both cases, your iPad will emit an acoustic and visual signal to indicate that the screenshot has been taken successfully: the latter is automatically saved in the iPad Photos app and is visible both in the Library than in the album Snapshots.
Also, it might be useful to know that after taking the screenshot, you can preview it at the bottom left: by pressing on the box in question, you can access the iPadOS photo editor, apply all the changes you prefer and, by tapping on the option Fine located at the top left, choose whether to save it (Save your Photo The Save to File) or whether to delete it (Delete screen snapshot).
In case one of the keys I have just indicated is not working, or if you simply want to know an alternative procedure to take a screenshot on iPad (regardless of the model in your possession), access the Settings iPadOS by pressing on the icon gear wheel found on the Home screen, select the options Accessibility e Touch and tap on the item AssistiveTouch.
In the new screen that appears, move the toggle next to the option AssistiveTouch gives OFF a ON, to activate the AssistiveTouch tool, which allows you to control your iPad without having to press the physical buttons, using a virtual multifunction button.
At this point, access the screen you want to photograph, tap on virtual button appeared on the screen, press on the item Device, access the section Other and tap on the option Screen snapshot. Convenient, right ?!
How to take screenshots on iPad 10.2

How do you say? You would like to know how to take screenshots on iPad 10.2 ″? Even in this, all you have to do is press the key combination that I indicated in the previous lines of this guide.
After taking your iPad and positioning yourself on the screen to “capture”, press the button at the same time Home and the top button of the device. If everything went well, you should see a box at the bottom left showing a preview of the snapshot you just took.
By pressing on the box in question, which remains visible only for a few moments, you can also make any changes to the screenshot. For example, if you want to add a text, tap the button +, select the option Text and type the text you want to insert. Then press the button aA, to set the character, the size and thealignment, while tapping on one of the colors available you can customize the color of the text.
Complete the changes you are interested in, click on the item Fine and choose one of the options available from Save your Photo e Save to File, depending on where you want to save the screen. If, on the other hand, you have decided not to make any changes to the screenshot, it will automatically be saved in the Photos app.
In addition to following the instructions I have just given you, I would like to point out that you can also “capture” a screen on your iPad via AssistiveTouch. If so, go to Settings iPadOS, select the option Accessibility and press on the item Touch.
In the new screen that appears, tap on the option AssistiveTouch and move the lever next to the item AssistiveTouch gives OFF a ON, to activate the function in question. Now, go to the screen you intend to “capture”, press the virtual button visible on the screen, choose the options Device e Other and tap on the item Screenshot, to take a screenshot. Simple, right?
How to take screenshots on iPad mini

If your intention is fare screenshot su iPad Mini, you must know that the procedure is almost identical to what I indicated in the previous lines of this guide to make a screen on iPads equipped with a Home button.
To proceed, take your iPad and position yourself on the screen you intend to “capture”. At this point, press the simultaneously Home button and the top button and, as soon as you hear a beep from your iPad and see a completely white screen, release the keys in question.
If one of the two keys I have just indicated does not work, access the Settings iPadOS by pressing on the icon gear wheel, tap on the items Accessibility, Touch e AssistiveTouch and, in the new screen that appears, move the toggle next to the option AssistiveTouch gives OFF a ON.
By doing so, you should see a virtual button on the screen that allows you to perform numerous operations without using the iPad Home button. To take a screenshot of a screenshot, press the virtual button, select the option Device, tap on the item Other and click on the option Screenshot.
All screenshots are automatically saved in the iPad Photos app. I point out that a specific album is also available, called Snapshots, in which your screens are collected.
How to screenshot web pages on iPad

If it is your intention to “capture” a web page in its entirety, you will be pleased to know that you can do it all using a predefined iPadOS feature.
In fact, by opening the Web page of your interest in Safari, by taking a screenshot as explained above and pressing on miniature that appears at the bottom left, you will in fact have the possibility to press on the option Whole page (in the editor that appears on the screen, above) and thus obtain a PDF file of the full page.
To save it, just click on the icon of sharing (the square with the arrow inside, in the upper right corner of the screen) and choose the option Save to File from the menu that opens. Later, you can eventually convert the PDF to an image using one of the many solutions available for the purpose.
Related posts:
 How to access Steam games without an internet connection
  How to view FPS with Xbox Game Bar in Windows 10: Steps Made Easy
  Hacked account? How to check and remedy
  How to make video calls from WhatsApp Web
  How to increase the RAM memory of a desktop or laptop + Tips and Tricks
  How to organize your YouTube subscriptions into categories
+ Tips and Tricks
How to organize your YouTube subscriptions into categories
+ Tips and Tricks


