


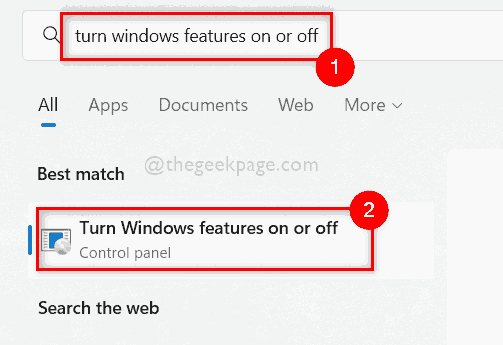
Turn Windows features on or off Blank or empty issue in Windows 11, 10
Many Windows users reported that when they launched the Turn Windows features on or off window on their system, even after several minutes, the list of features did not appear and is still blank or empty and they cannot do anything about it. If you’re wondering what these Windows features are all about, we’ll briefly explain.
Windows has many features within its operating system and enhances system performance and user experience. This Windows feature lists all the features installed on your system, which you can enable or disable using the Turn Windows features on or off wizard. Enabling or disabling will not install or uninstall the features, but it will remain on your system.
If you are also facing this same problem on your system, then we have compiled some solutions below that may help you to resolve this issue.
Solution 1 – Perform an SFC scan on your system
Some corrupted files on any system may be the cause of the interruption in loading the list of Windows features in the window to turn Windows features on or off. Therefore, running the System File Checker scan will help detect the corrupted files so that the user can replace or delete that file and resolve this issue. Follow some simple steps given below.
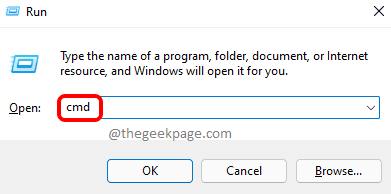
Step 1: Press Windows + R keys together on your keyboard to open Run cash register.
Step 2: Write cmd in the run command box and press CTRL + SHIFT + ENTER keys together to open Symbol of the system What management.
Step 3: Accept the UAC prompt by clicking Yes continue.
Step 4 – At the command prompt, type sfc /scan now and hit the Get into to run it as shown below.
NOTE: This scanning process takes a bit of time, so please wait patiently for it to complete.
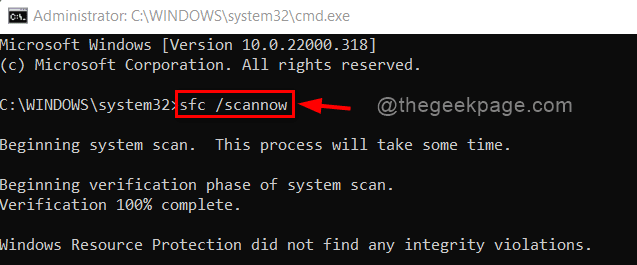
Step 5 – If there are no damaged system files, it will show that Windows Resource Protection did not find any integrity violations.
Step 6: Replace or delete the damaged files listed in the results, if any.
Step 7: Close Command Prompt.
This solution should resolve this issue. If not then do other fixes mentioned below.
Solution 2: Run DISM Restore Health
Step 1: Press Windows + R keys together on your keyboard to open Run cash register.
Step 2: Write cmd in the run command box and press CTRL + SHIFT + ENTER keys together to open Symbol of the system What management.
Step 3: Accept the UAC prompt by clicking Yes continue.
Step 4 – Copy and paste the command below into the command prompt and tap Get into wrench.
DISM /Online /Cleanup-Image /RestoreHealth
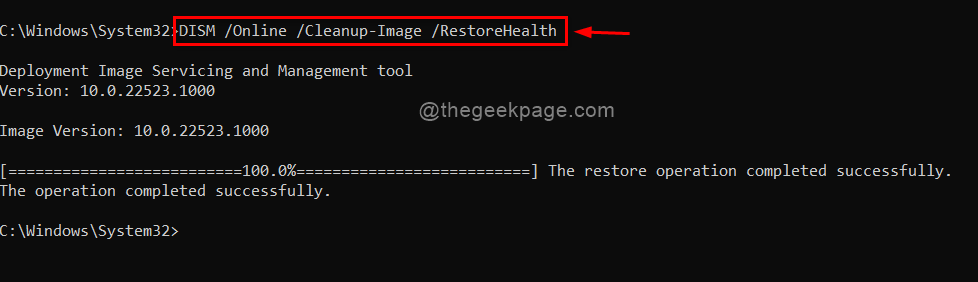
Step 5: Once the operation is complete and if there is any problem, rectify it.
Step 6 – Close Command Prompt.
That’s it!
Hope this solution solved your problem.
Solution 3 – Delete the StoreDirty registry key using Command Prompt
Step 1: Press Windows + R keys together on your keyboard to open Run cash register.
Step 2: Write cmd in the run command box and press CTRL + SHIFT + ENTER keys together to open Symbol of the system What management.
Step 3: Accept the UAC prompt by clicking Yes continue.
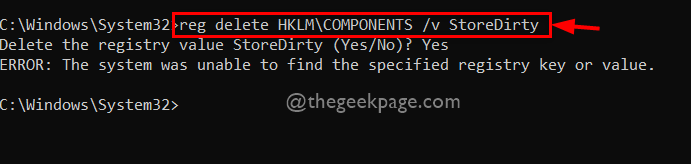
Step 4: Run the command below.
reg delete HKLMCOMPONENTS /v StoreDirty
Step 5 – If there is no registry key named StoreDirty in your log file, it will display ERROR: The system could not find the specified registry key or value. Please ignore this message. Nothing to worry about.
Step 6 – If you run the command without any error, it means you have deleted/erased the StoreDirty registry key.
Step 7: Close Command Prompt.
I hope this solves your problem.
Solution 4 – Change Windows Modules Installer Startup to Automatic
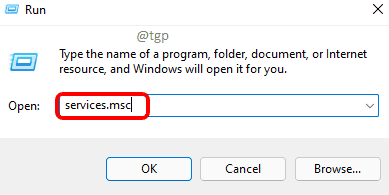
Step 1: Press Windows + R keys together on your keyboard to open Run cash register.
Step 2: Write services.msc in the run box and press the Get into key to open the windows service.
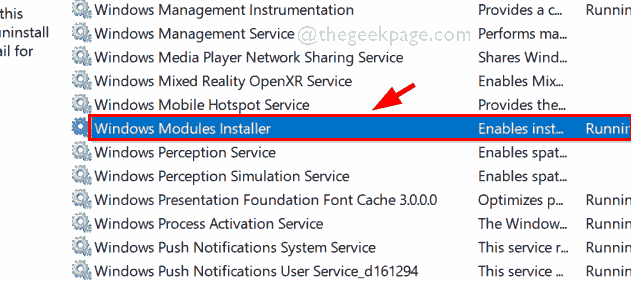
Step 3 – Scroll down the list of services and find the Windows Modules Installer service.
Step 4: Double click Windows Modules Installer service to open its Properties window.
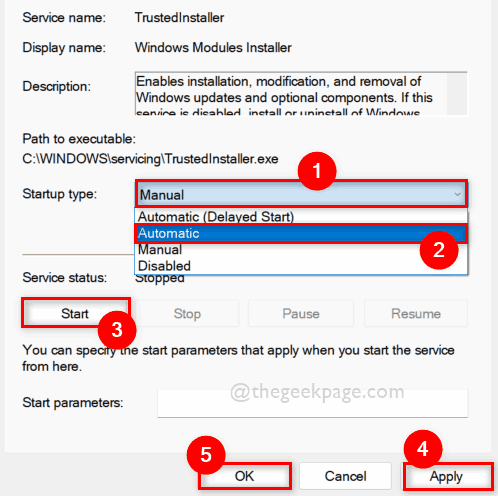
Step 5 – In the Properties window, click Stop button to stop the service.
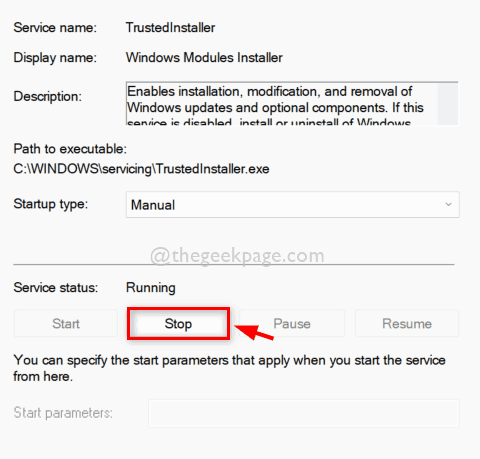
Step 6: Then click Manual to see the drop-down list of start type.
Step 7: Select Automatic of the list.
Step 8: After selecting, click Start to start the Windows Modules Installation service.
Step 9: Once done, click Apply and OK to make changes and close the window.
Step 10: Once reboot your system and check if the issue is resolved.
I hope this solves your problem.
Solution 5 – Restore your system
If none of the above solutions worked for you, then this is the ultimate solution that will definitely help you. Restoring your system will take your system to the last stored point where it worked perfectly fine. Click here to read the article on system restore.
That’s it.
I hope this post has been informative and helpful.
Leave us your comments below to let us know which solution worked for you and if there are any questions to answer.
Thanks!
Related posts:
 How to access Steam games without an internet connection
  How to view FPS with Xbox Game Bar in Windows 10: Steps Made Easy
  Hacked account? How to check and remedy
  How to make video calls from WhatsApp Web
  How to increase the RAM memory of a desktop or laptop + Tips and Tricks
  How to organize your YouTube subscriptions into categories
+ Tips and Tricks
How to organize your YouTube subscriptions into categories
+ Tips and Tricks


