


Windows Security won’t open in Windows 11 or 10
Windows Security is a set of tools that help protect your system and your data from virus and malware threats that originate from the Internet or other third-party applications.
Many Windows users have reported lately that after upgrading to Windows 11, they are unable to launch Windows security software on their PC. Windows users have been frustrated because they couldn’t do anything about it.
There can be various causes for this, and we have mentioned some of them below.
- Corrupted data files
- windows not updated
- Third party antivirus
- Windows system settings may have been changed
- The Security Center service is not running
- Changed registry settings
Following our investigation on the above mentioned reasons, we have come up with a list of solutions in this post that will help users to fix this issue.
Solution 1 – Reset Windows Security app
These types of issues are visible even with minor changes made by users to any application settings. As a result, it’s a good idea to restart or repair the app to fix this problem.
Let’s see how to reset Windows Security app in this article.
Method 1 – Using the PowerShell App
Step 1: Press Windows + R keys together on your keyboard that opens the Run command box
Step 2: Then type potencia Shell in the run box and press CTRL + SHIFT + ENTER keys together to open the Potencia Shell application as administrator.
Step 3: Accept the UAC prompt, if applicable, by clicking Yes to proceed.
Step 4 – Once the PowerShell app opens, copy and paste the following command and press Get into key to run it.
Get-AppxPackage Microsoft.SecHealthUI -AllUsers | Reset-AppxPackage
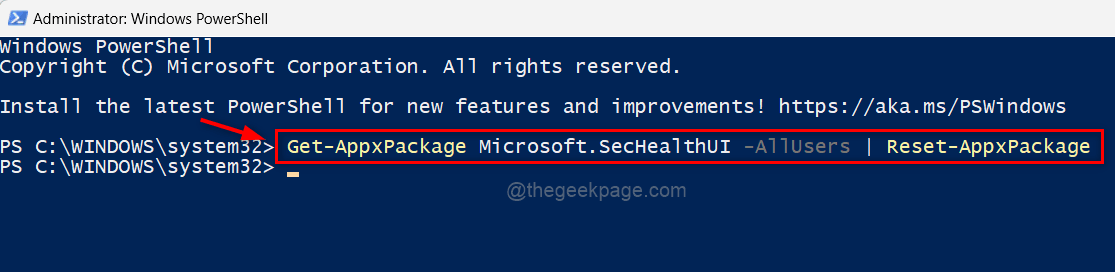
Step 5 – Once the command is executed, close the PowerShell application window.
Now check if the Windows Security app opens on your system.
That’s it.
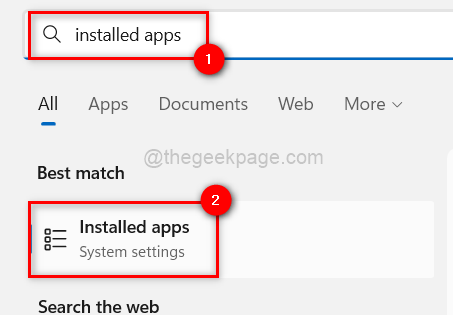
Method 2 – From the Installed Apps page
Step 1: Press the Windows key and type installed apps.
Step 2: Select Installed apps system configuration from the search results as shown below.
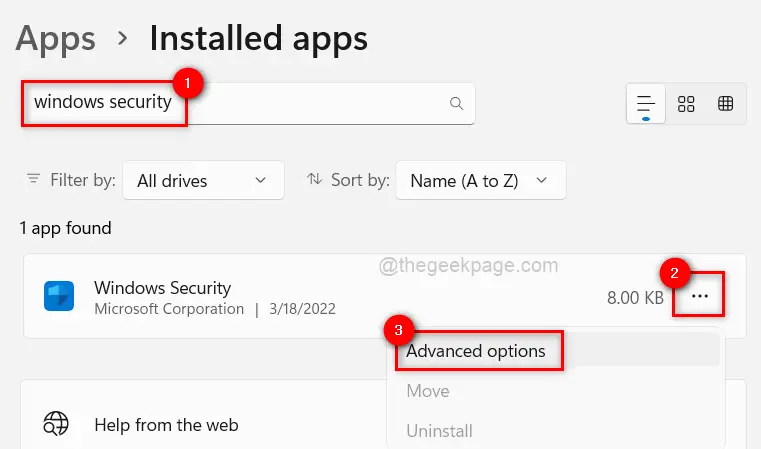
Step 3 – Once the installed apps page opens, type window security in the search bar.
Step 4: Then click on the three vertical dots icon in the right corner of the windows security app from the search results as shown in the image below.
Step 5: Select Advanced Options of the list.
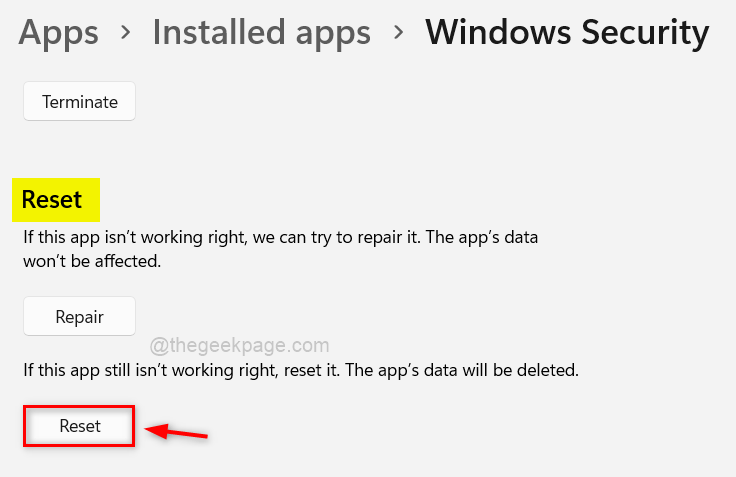
Step 6 – This takes you to the advanced options page. Scroll down and go to the Reset section.
Step 7: Then click on the Restart to reset the Windows Security app as shown below.
Step 8 – Once it resets, close the installed apps page and check if the Windows Security app opens normally.
I hope this has solved your problem.
Solution 2 – Restart the Windows Security Center service
The Windows Security Center service ensures that the Windows Security app stays up-to-date with the latest information to protect your system from threats. If there is a problem with this service, the Windows Security application may not start on your Windows system.
Therefore, we recommend users to restart the Windows Security Center service once on the system and see if this works to resolve this issue.
Let us see how this can be done with the steps given below.
Step 1: Press CTRL + MAYÚS + ESC keys to open the Task Manager in the system
Step 2 – In Task Manager, go to the Services tab as shown below.
Step 3: Next, find the Security Center Service (wscsvc) and right click on it.
Step 4: Select Restart from the context menu as shown in the following screenshot.
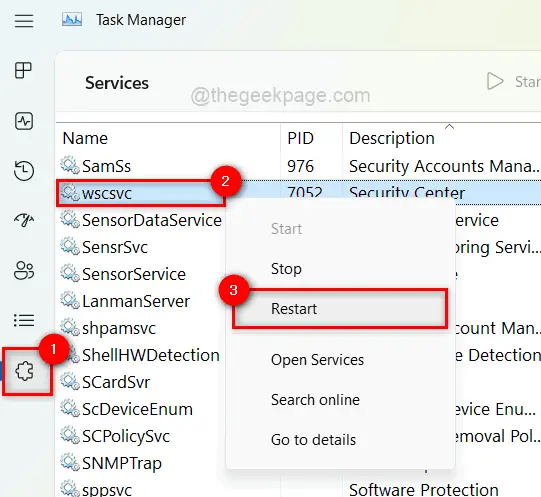
Step 5 – Once done, close the Services window.
Now try to open Windows Security app on your system and see if this solution worked for you.
Fix 3 – Perform system file checker scan and restore system state using DISM
Corrupted data files on the system can be the root cause of this problem.
When the user does not repair or remove these corrupted files, the performance of the system and the application suffers.
When these kinds of problems arise, it’s a good idea to check for any damaged data files.
Take a look at the steps to perform SFC scan and restore DISM status.
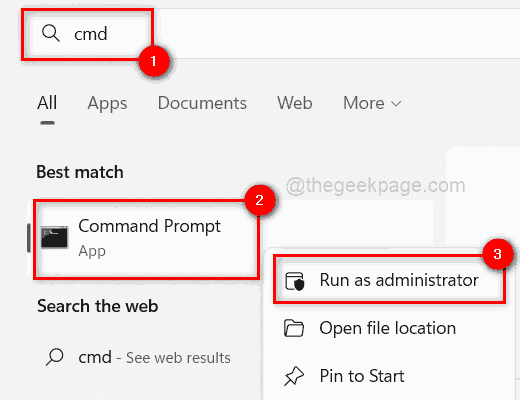
Step 1: open the Elevated Command Prompt on your system by pressing the button Windows key and click cmd.
Step 2: Then the right button of the mouse about him symbol of the system from the search results as shown below.
Step 3: Select Execute as an administrator from the context menu.
NOTE: Click Yes at the UAC prompt to continue.
Step 4 – At the command prompt, run the following command to scan for corrupted system files.
sfc /scannow
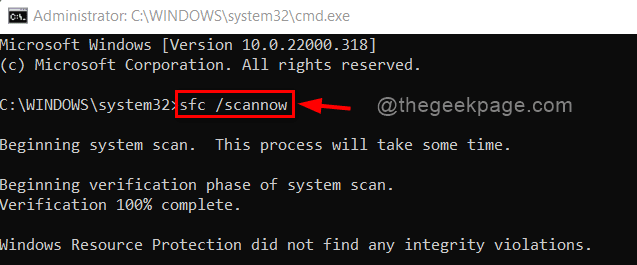
Step 5 – If there are any corrupt files available in the list, replace them immediately.
Step 6: Once done, copy and paste the following command and press Get into key to restore system health using the DISM tool.
Dism /Online /Cleanup-Image /RestoreHealth
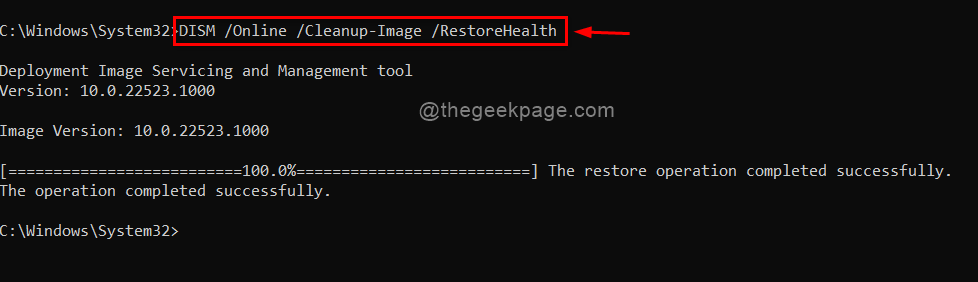
Step 7 – After this, close Command Prompt and check if the issue is resolved.
Solution 4 – Keep Windows System Updated
If any user fails to update windows then these issues tend to arise in the system. Microsoft releases lots of updates from time to time to ensure users get maximum benefits and experience whether it is driver updates or system updates.
Follow these steps below on how to update Windows system.
Step 1: Press windows + me keys together on the keyboard to open the Settings application
Step 2: Then go to windows update in the left side panel of the Settings window.
![Windows Update Min Configuration[1]](https://www.bitcoinminershashrate.com/wp-content/uploads/2022/03/1647577899_205_DLLREGISTERSERVER-not-found-in-command-prompt-in-Windows-11-10.png)
Step 3 – On the Windows update page, click Search for updates in the upper right corner as shown below.

Step 4: Once done, check if there are any updates available.
Step 5 – Download and install all available updates on the system to keep it up to date.
Step 6: After this, close the Settings window.
Now check if the problem is fixed or not.
Solution 5 – Modify the registry file using Registry Editor
Registry file changes often wreak havoc on the system. These changes may have been inadvertently made by the user or by third-party software on the system.
The registry file can be modified to correct Windows security (Defender).
NOTE: Before you start, make a backup of the log file as it is the most important file and can cause the system to crash if something goes wrong.
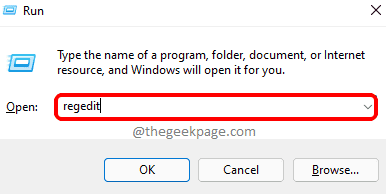
Step 1: Press Windows + R keys together to open the Run command box
Step 2: Write regeditar in the Run box and press Get into key to open registry editor.
NOTE: Accept the UAC prompt by clicking Yes continue.
Step 3: In Registry Editor, copy and paste the following path into the empty address bar and press Get into key to get to Windows Defender registry key As shown below.
HKEY_LOCAL_MACHINESOFTWAREPoliciesMicrosoftWindows Defender
Step 4: Select the Windows Defender registry key on the left side and check if there is any DWORD (32-bit) value named Disable AntiSpyware on the right side of the window.
Step 5: If not, right click on the Windows Defender registry key and select Nuevo > Valor DWORD (32 bits) from the context menu as shown below.
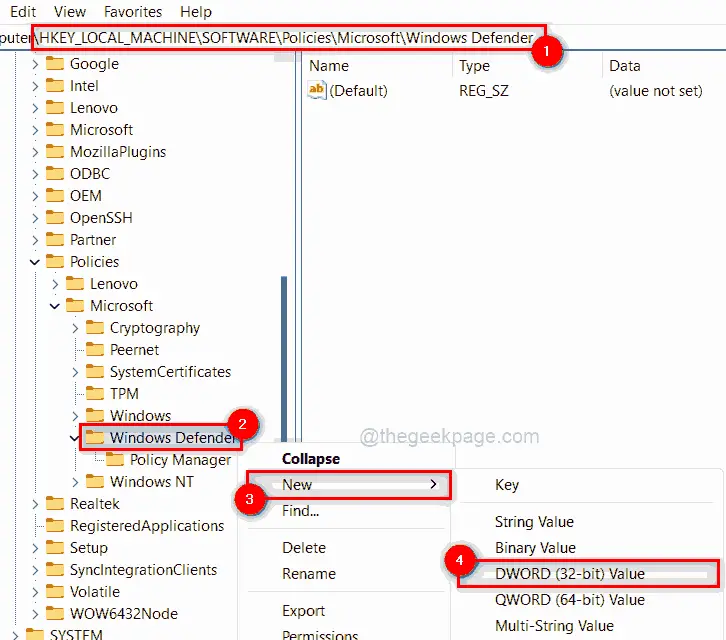
Step 6: Rename the newly created DWORD value to Disable AntiSpyware and open it by double clicking on it.
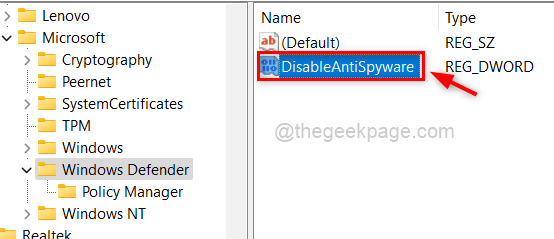
Step 7: Next, Login 0 in the Value Data field and click OK to apply changes.

Step 8: Once done, close the Registry editor.
Now see if the Windows Security app opens normally or not.
Thanks!
Related posts:
 How to access Steam games without an internet connection
  How to view FPS with Xbox Game Bar in Windows 10: Steps Made Easy
  Hacked account? How to check and remedy
  How to make video calls from WhatsApp Web
  How to increase the RAM memory of a desktop or laptop + Tips and Tricks
  How to organize your YouTube subscriptions into categories
+ Tips and Tricks
How to organize your YouTube subscriptions into categories
+ Tips and Tricks


